
Table Of Content
- I Tested Flux2 Klein 9B in Just 4 Steps. The Results Were Unexpected
- Download and Setup
- Where to Put the Files in ComfyUI
- Workflow in ComfyUI
- Image Loader Groups and Pixel Shift Control
- KSampler and Resolution Settings
- Single Reference Editing - I Tested Flux2 Klein 9B in Just 4 Steps. The Results Were Unexpected
- Add Object
- Remove Object
- Global Edits - I Tested Flux2 Klein 9B in Just 4 Steps. The Results Were Unexpected
- Change Time and Season
- Style Transformations - I Tested Flux2 Klein 9B in Just 4 Steps. The Results Were Unexpected
- Bring Anime To Life
- Transform Photo Into Anime Art
- Structured Views - I Tested Flux2 Klein 9B in Just 4 Steps. The Results Were Unexpected
- Generate Character Sheet
- Generate Blueprint
- Restoration - I Tested Flux2 Klein 9B in Just 4 Steps. The Results Were Unexpected
- Restore Old Photo
- Final Thoughts

I Tested Flux2 Klein 9B in Just 4 Steps. The Results Were Unexpected
Table Of Content
- I Tested Flux2 Klein 9B in Just 4 Steps. The Results Were Unexpected
- Download and Setup
- Where to Put the Files in ComfyUI
- Workflow in ComfyUI
- Image Loader Groups and Pixel Shift Control
- KSampler and Resolution Settings
- Single Reference Editing - I Tested Flux2 Klein 9B in Just 4 Steps. The Results Were Unexpected
- Add Object
- Remove Object
- Global Edits - I Tested Flux2 Klein 9B in Just 4 Steps. The Results Were Unexpected
- Change Time and Season
- Style Transformations - I Tested Flux2 Klein 9B in Just 4 Steps. The Results Were Unexpected
- Bring Anime To Life
- Transform Photo Into Anime Art
- Structured Views - I Tested Flux2 Klein 9B in Just 4 Steps. The Results Were Unexpected
- Generate Character Sheet
- Generate Blueprint
- Restoration - I Tested Flux2 Klein 9B in Just 4 Steps. The Results Were Unexpected
- Restore Old Photo
- Final Thoughts
Black Forest Labs released their newest image generation models under the name Flux 2 Klein. This release includes two base models, the 4B and 9B, along with their distilled versions, which only need four steps to generate an image. These distilled models are lightning fast. All of these models can perform text to image generation and are also capable of image editing. I am going to focus on editing with the 9B distilled model.
I Tested Flux2 Klein 9B in Just 4 Steps. The Results Were Unexpected
Download and Setup
First let's see where we can get the 9B distilled model and its related files. Then where we need to put those files inside ComfyUI.
- To download the model, you need to have a Hugging Face account. If you are a beginner, don't worry. You don't need to pay anything. Just create an account and agree to their conditions.
- Go to Files and Versions. Here you can find the 9B line model named Flux 2 Klein 9B.safetensors.
- If your computer cannot handle this model, you can find other quantized models:
- FP8 model provided by Black Forest Labs. The file is named Flux 2 9B FP8.safetensors. This model is quite a bit smaller, around 9.5 GB.
- NVFP4 format is also available. The file is named Flux 2 Klein 9B NVFP4.safetensors. This file is even smaller, which makes me think you might not even need GGUF models.
- GGUF models are also available and provided by Unsloth. You can try any of these quantized models depending on your hardware.
- Next, you need the text encoder. You will see three different formats of QN38B. If your computer can handle the bigger one, download that. If not, download the FP8 mixed or the FP4 mixed.
- Next, you need the VAE model. Look for flux2vae.safetensors. If you have used the Flux 2 dev model before, you may already have this file. If not, go ahead and download it.
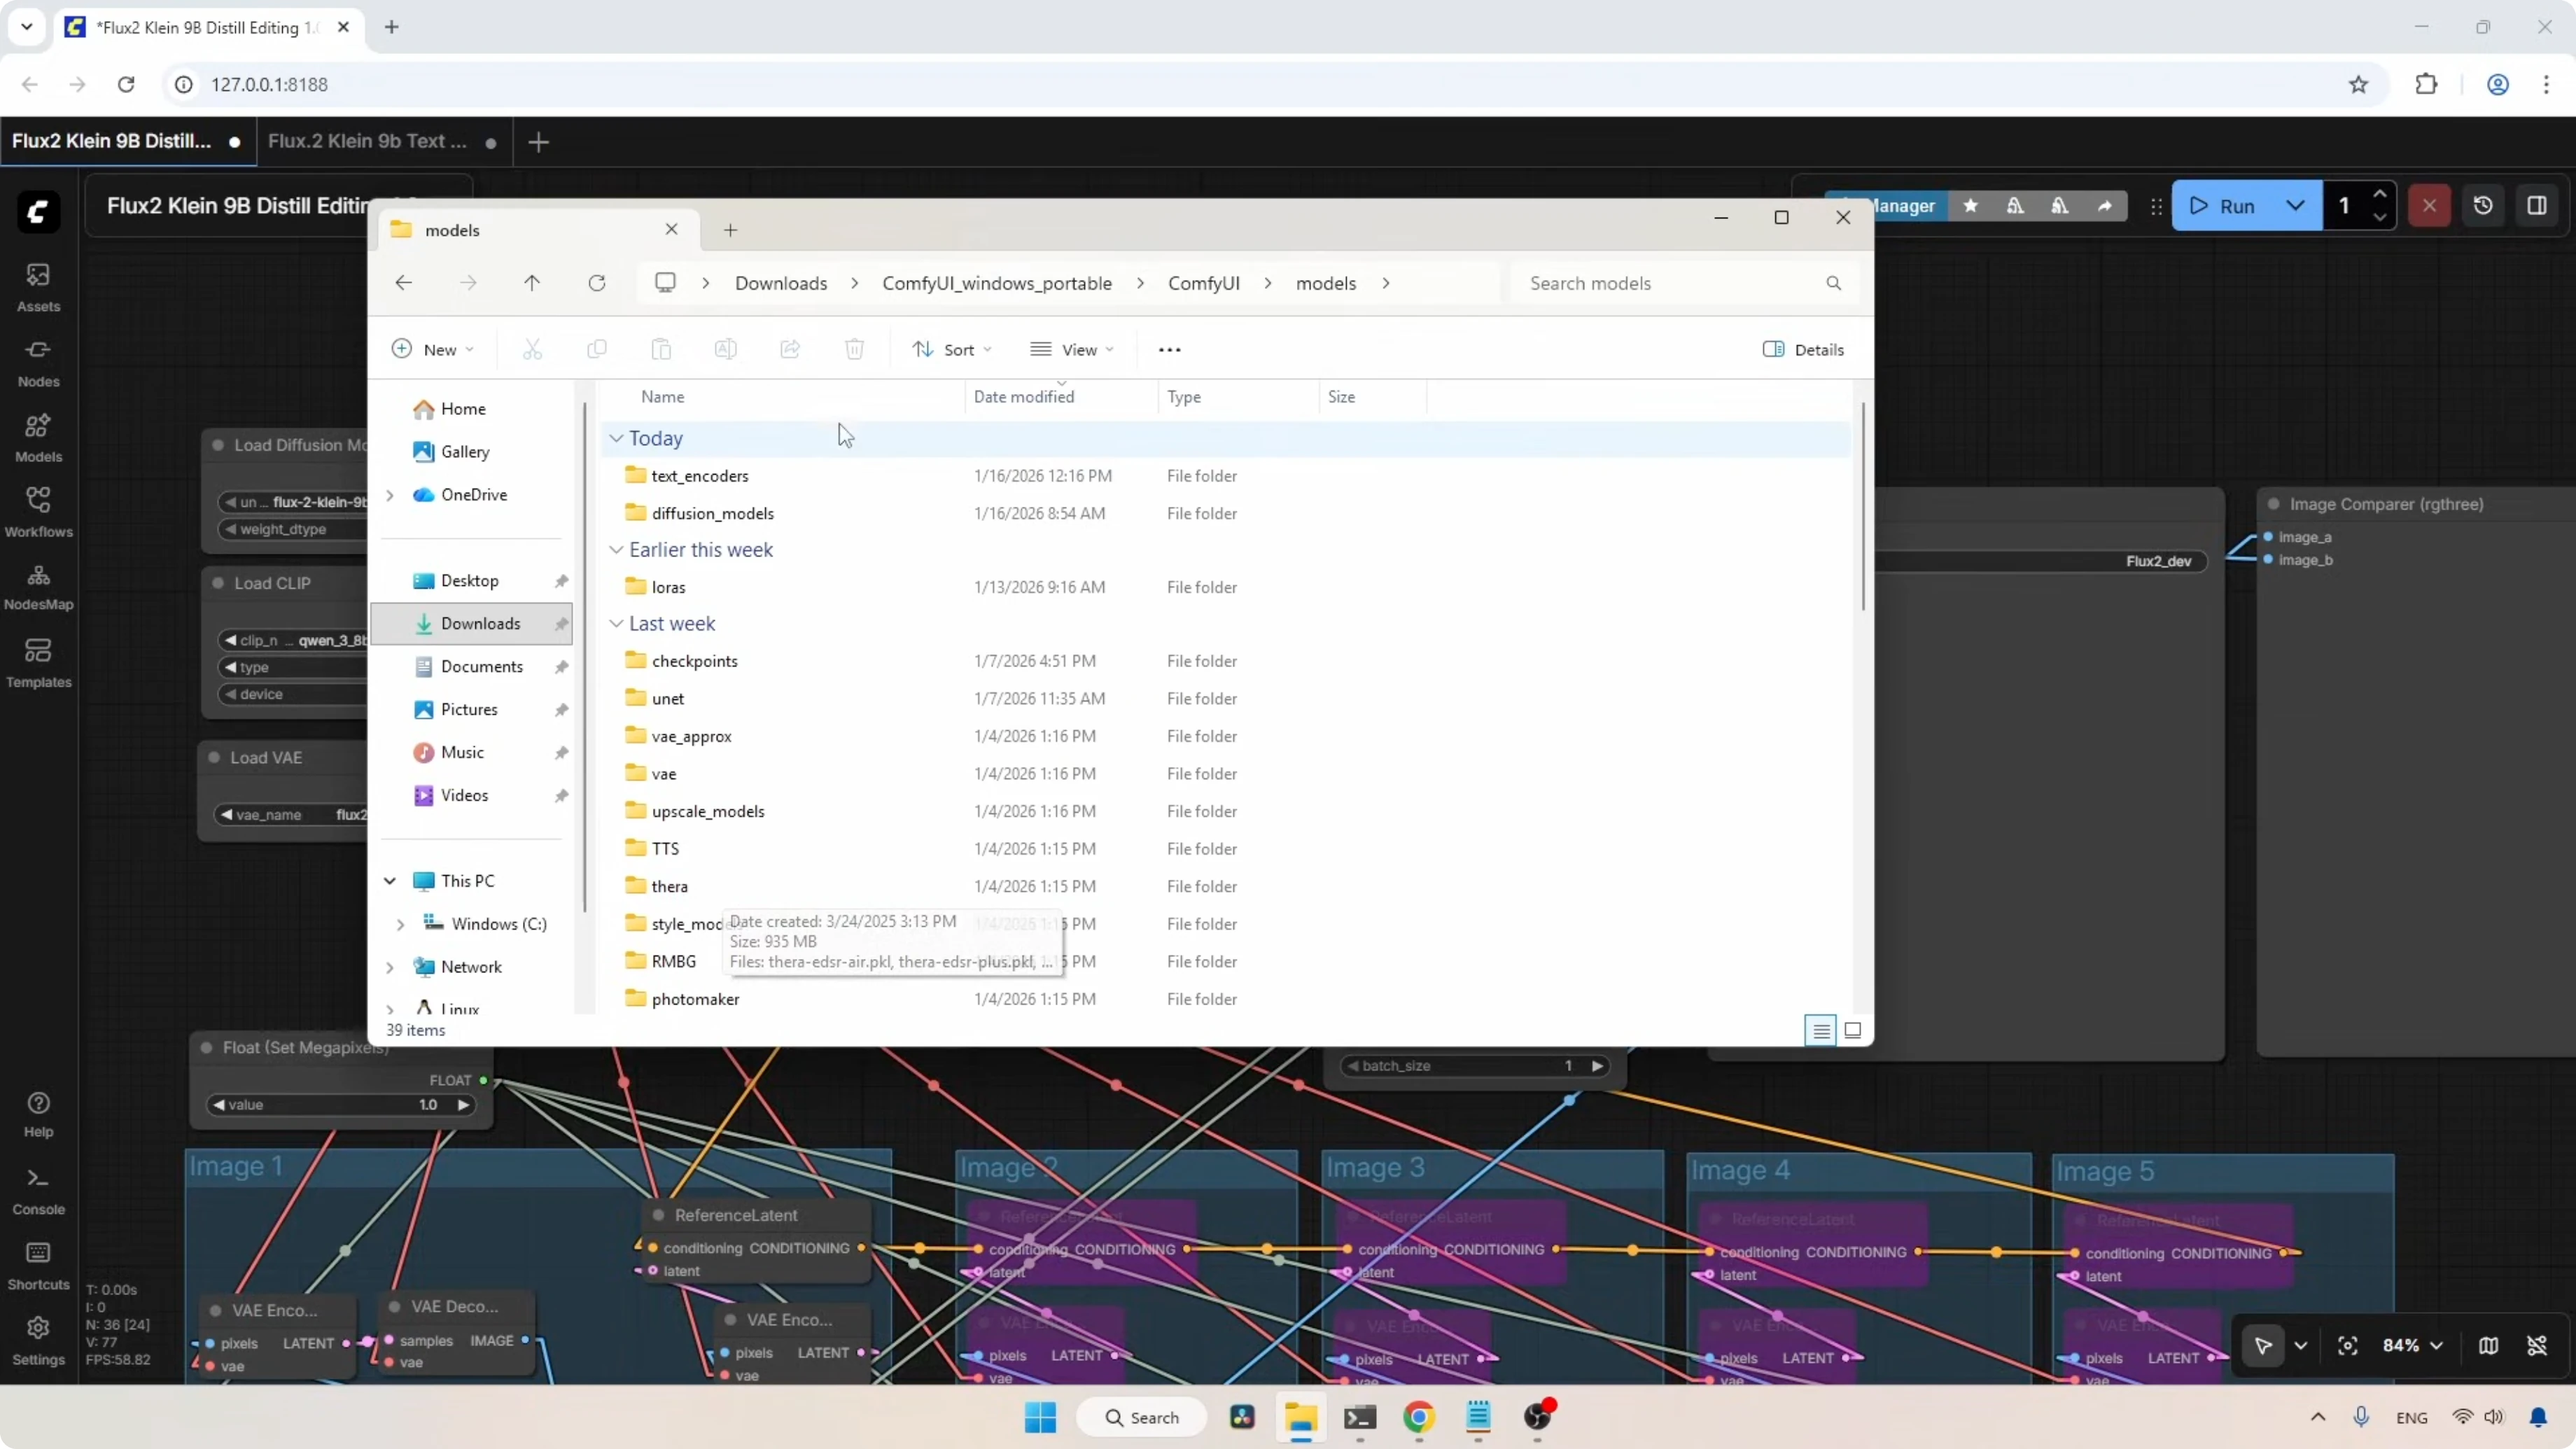
Where to Put the Files in ComfyUI
I am using the portable ComfyUI.
- Models:
- ComfyUI/models/diffusion_models - put the Flux 2 Klein 9B models here. No matter if you are using the FP8, the NVFP4, the GGUF, or the base models.
- Text encoder:
- ComfyUI/models/text_encoders - put the QN38B model here. If you are using the FP8 mixed or the FP4 mixed, the text encoder should be placed here.
- VAE:
- ComfyUI/models/vae - put flux2vae.safetensors here.

If you moved the files while ComfyUI was running, refresh it by pressing R on your keyboard.
Workflow in ComfyUI
The workflow I'm using here is the same one I used for the Flux 2 dev model, but with some changes I added to support the new Klein model.
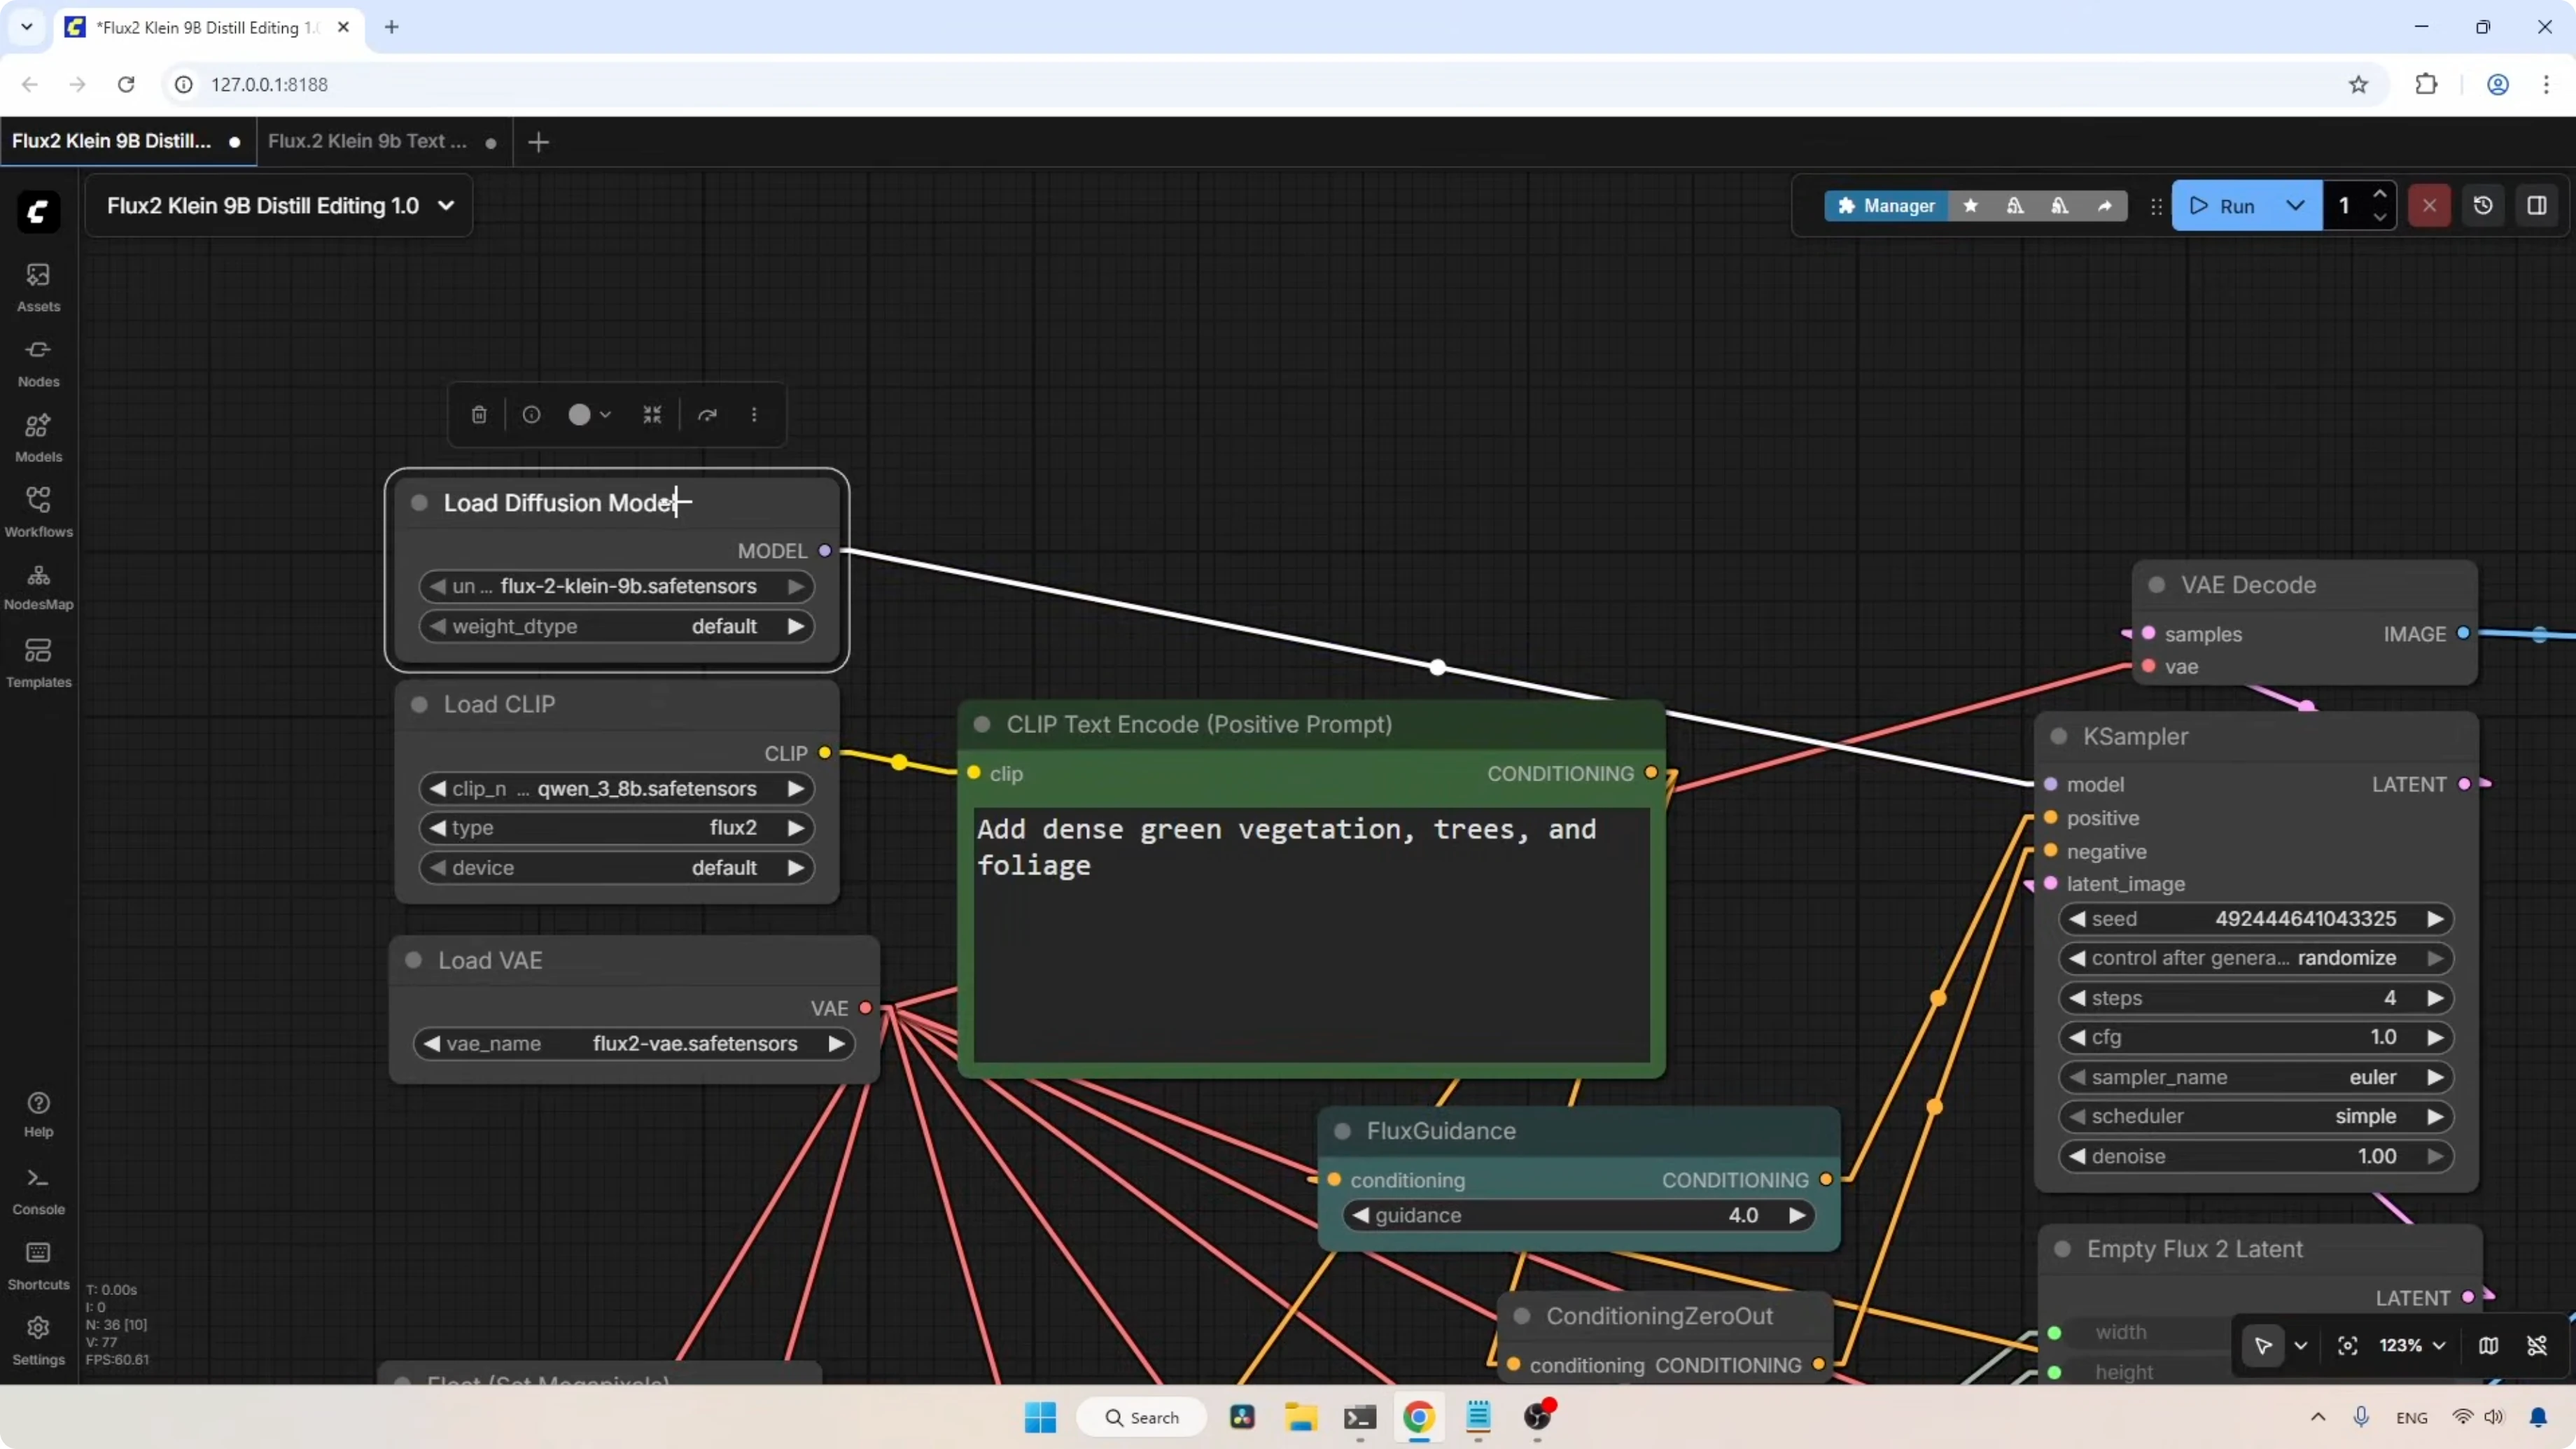
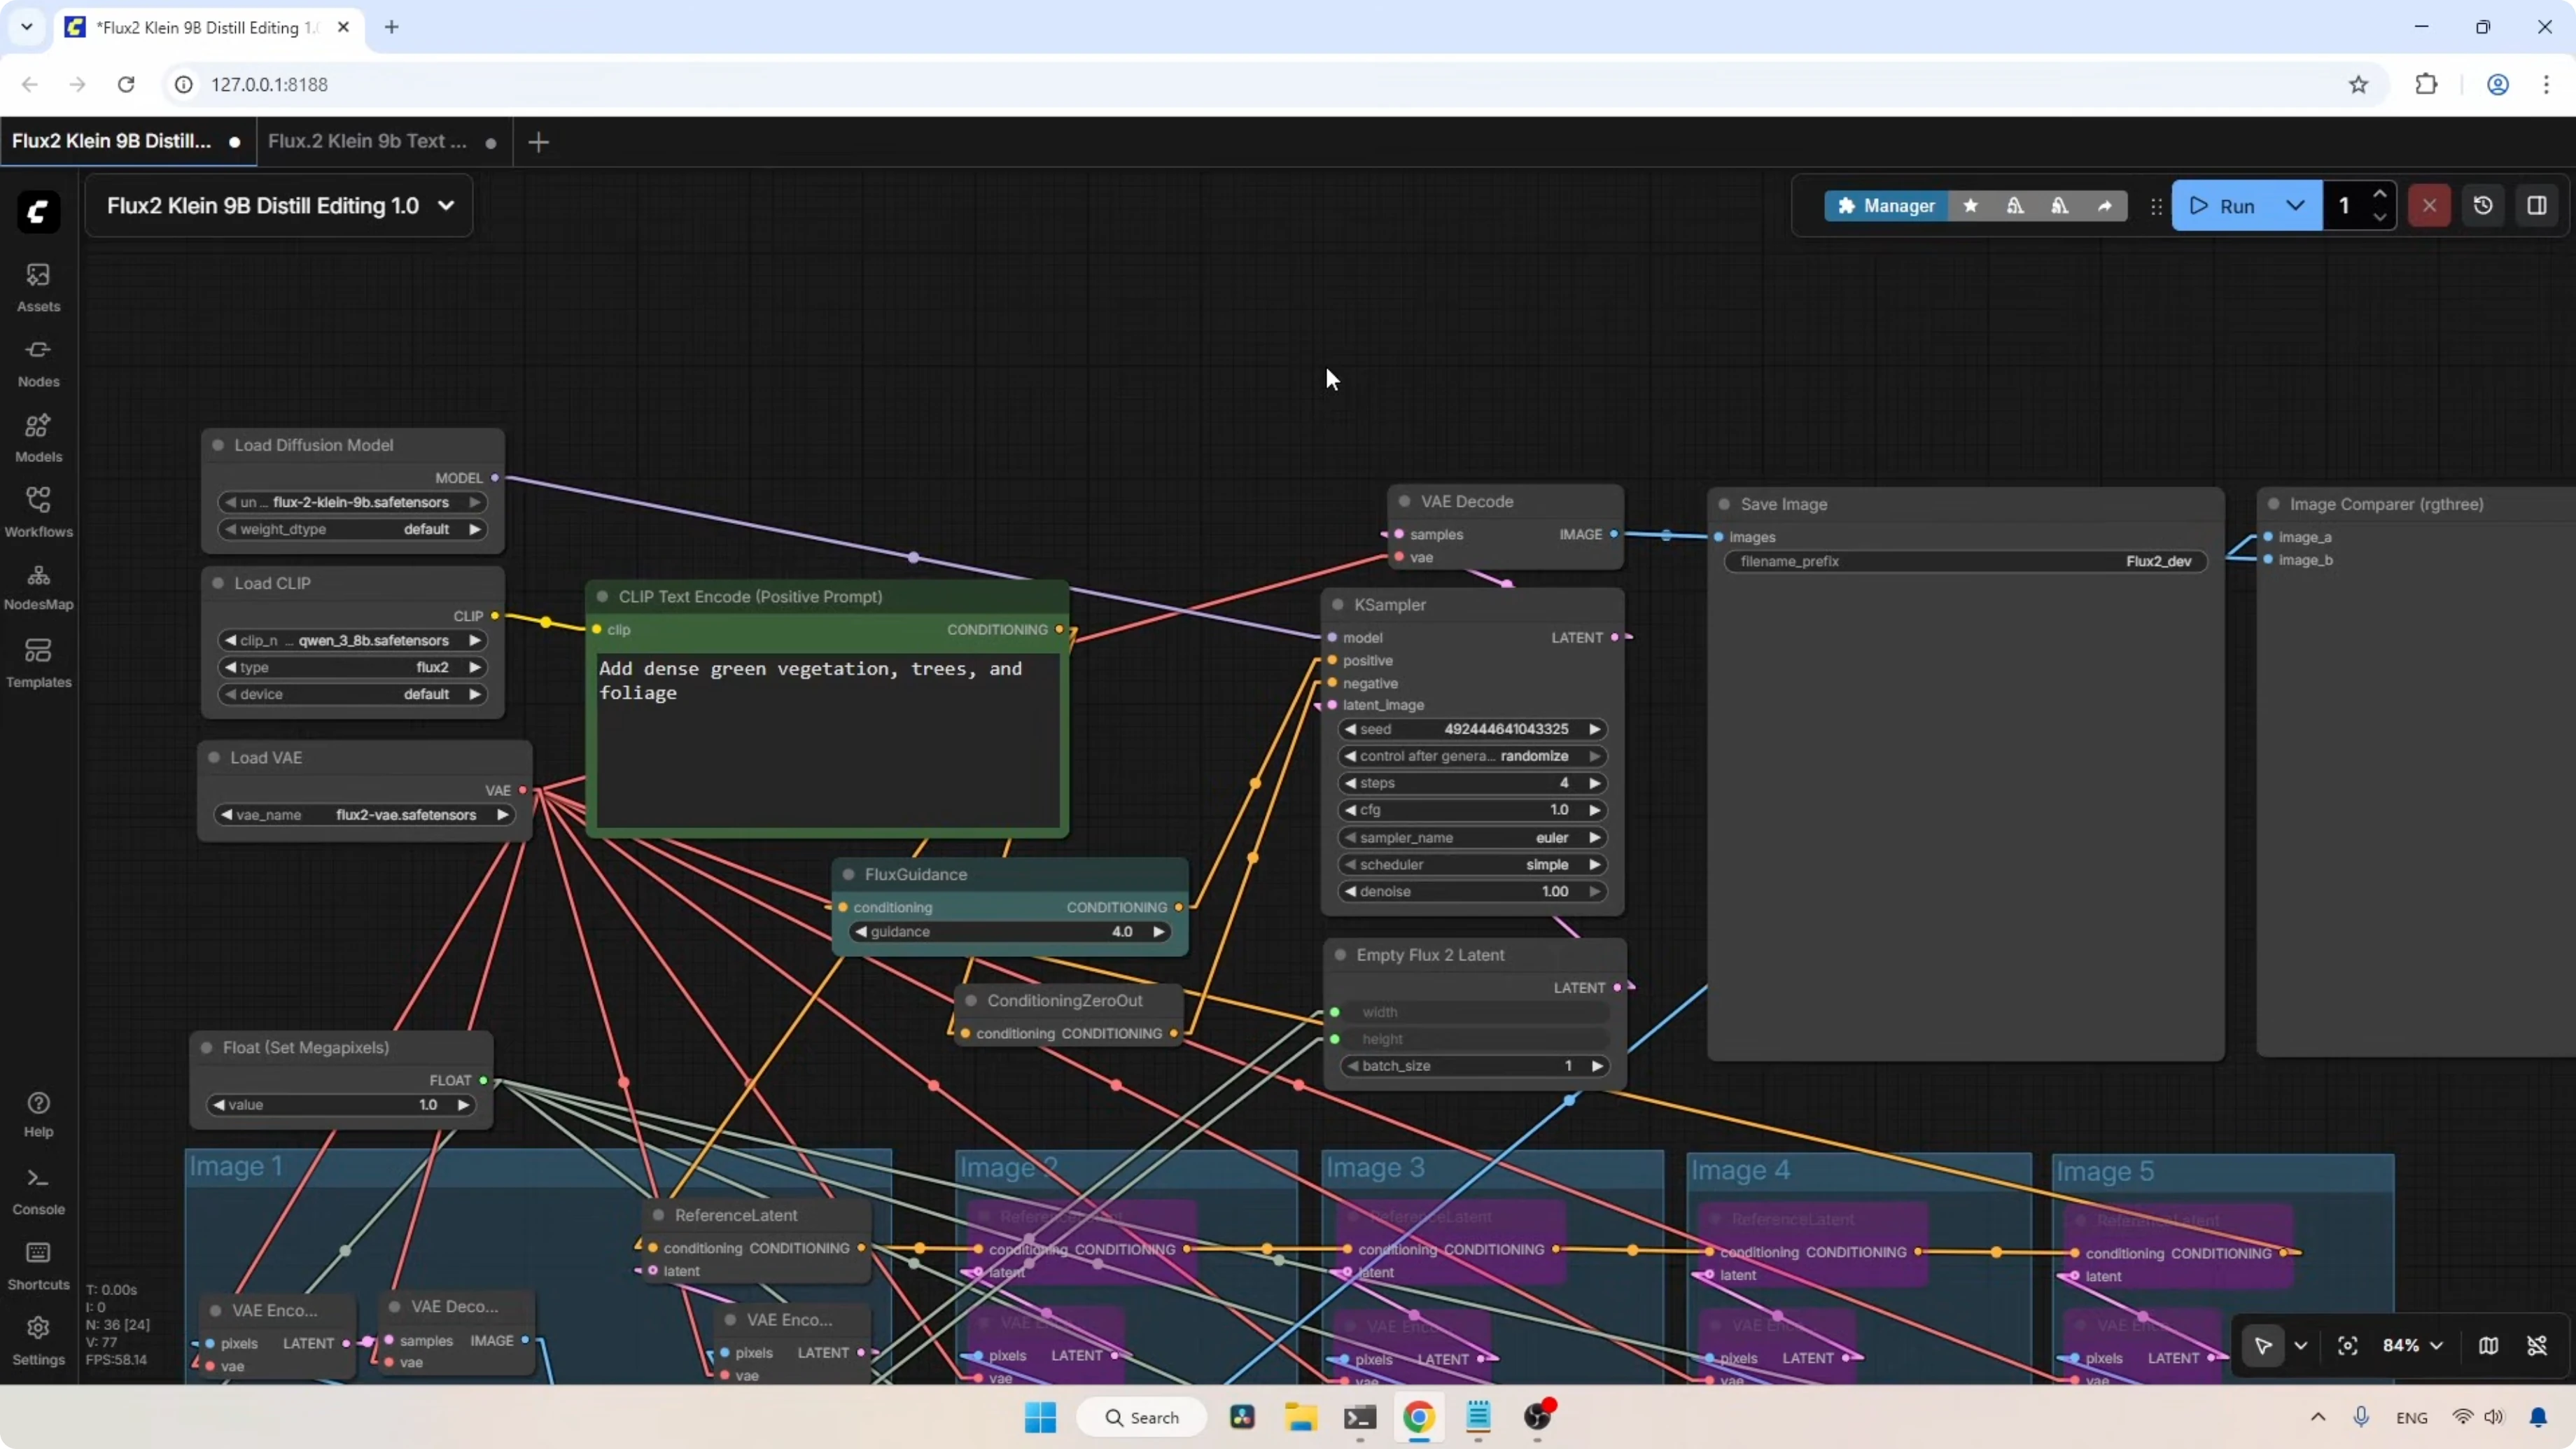
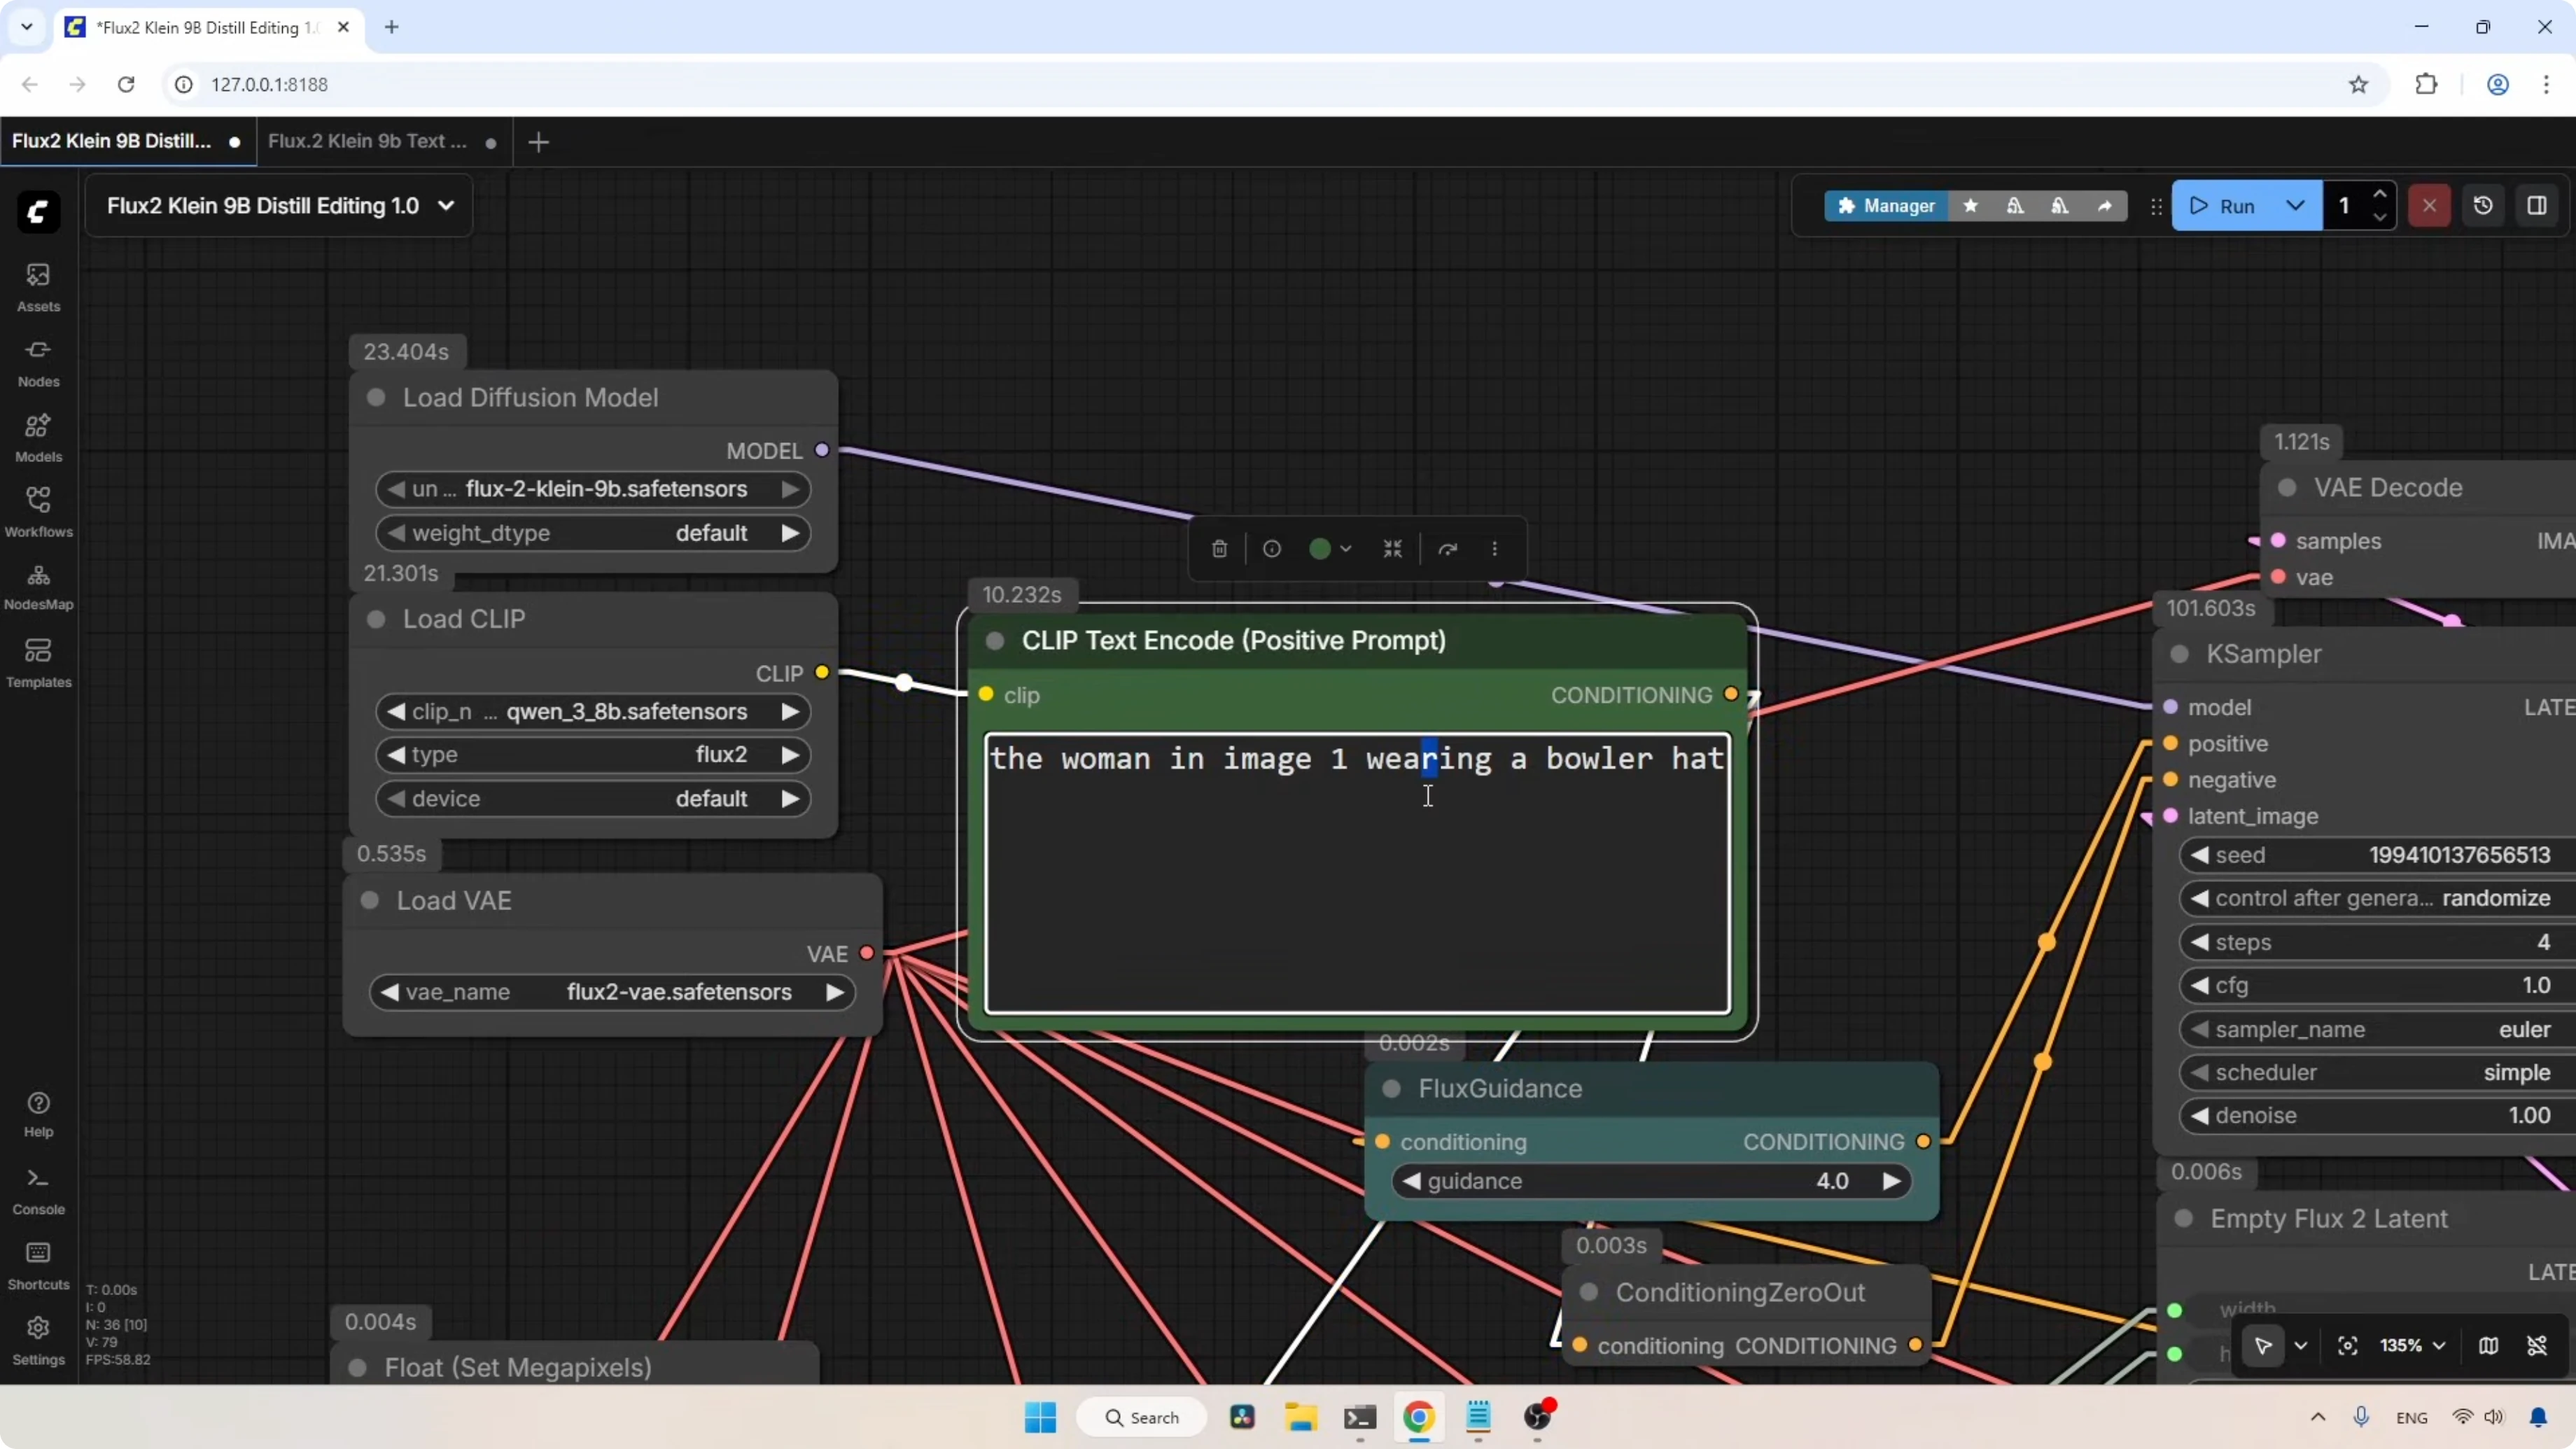
- Load Diffusion Model:
- The Load Diffusion Model node loads the Flux 2 Klein 9B model. If you are using the FP8 or the NVFP4 model, select it here. The model output connects directly to the KSampler model input.
- Text Encoder:
- The Load CLIP node loads the text encoder. I am using the highest quality one. If you are using the FP8 mixed or FP4 mixed, select those here instead. I'm using the highest one because I want to show you the maximum quality we can expect.
- For the type, set it to flux2. For the device, leave it on default. If you are having out of memory issues, you can try the CPU option. The CLIP output goes into the CLIP input of the Positive Prompt node.
- Conditioning Path:
- The conditioning output goes to the Reference Latent nodes located in the multiple image loader groups before coming back to the conditioning input of the Flux Guidance node.
- The output from Flux Guidance goes to the Positive input of the KSampler since we don't need a negative prompt for the distilled model. The Conditioning Zero Out node acts as a dummy input for the Negative of the KSampler.
- VAE:
- The Load VAE node loads the Flux 2 VAE. The VAE output is connected to all the nodes that require a VAE input.
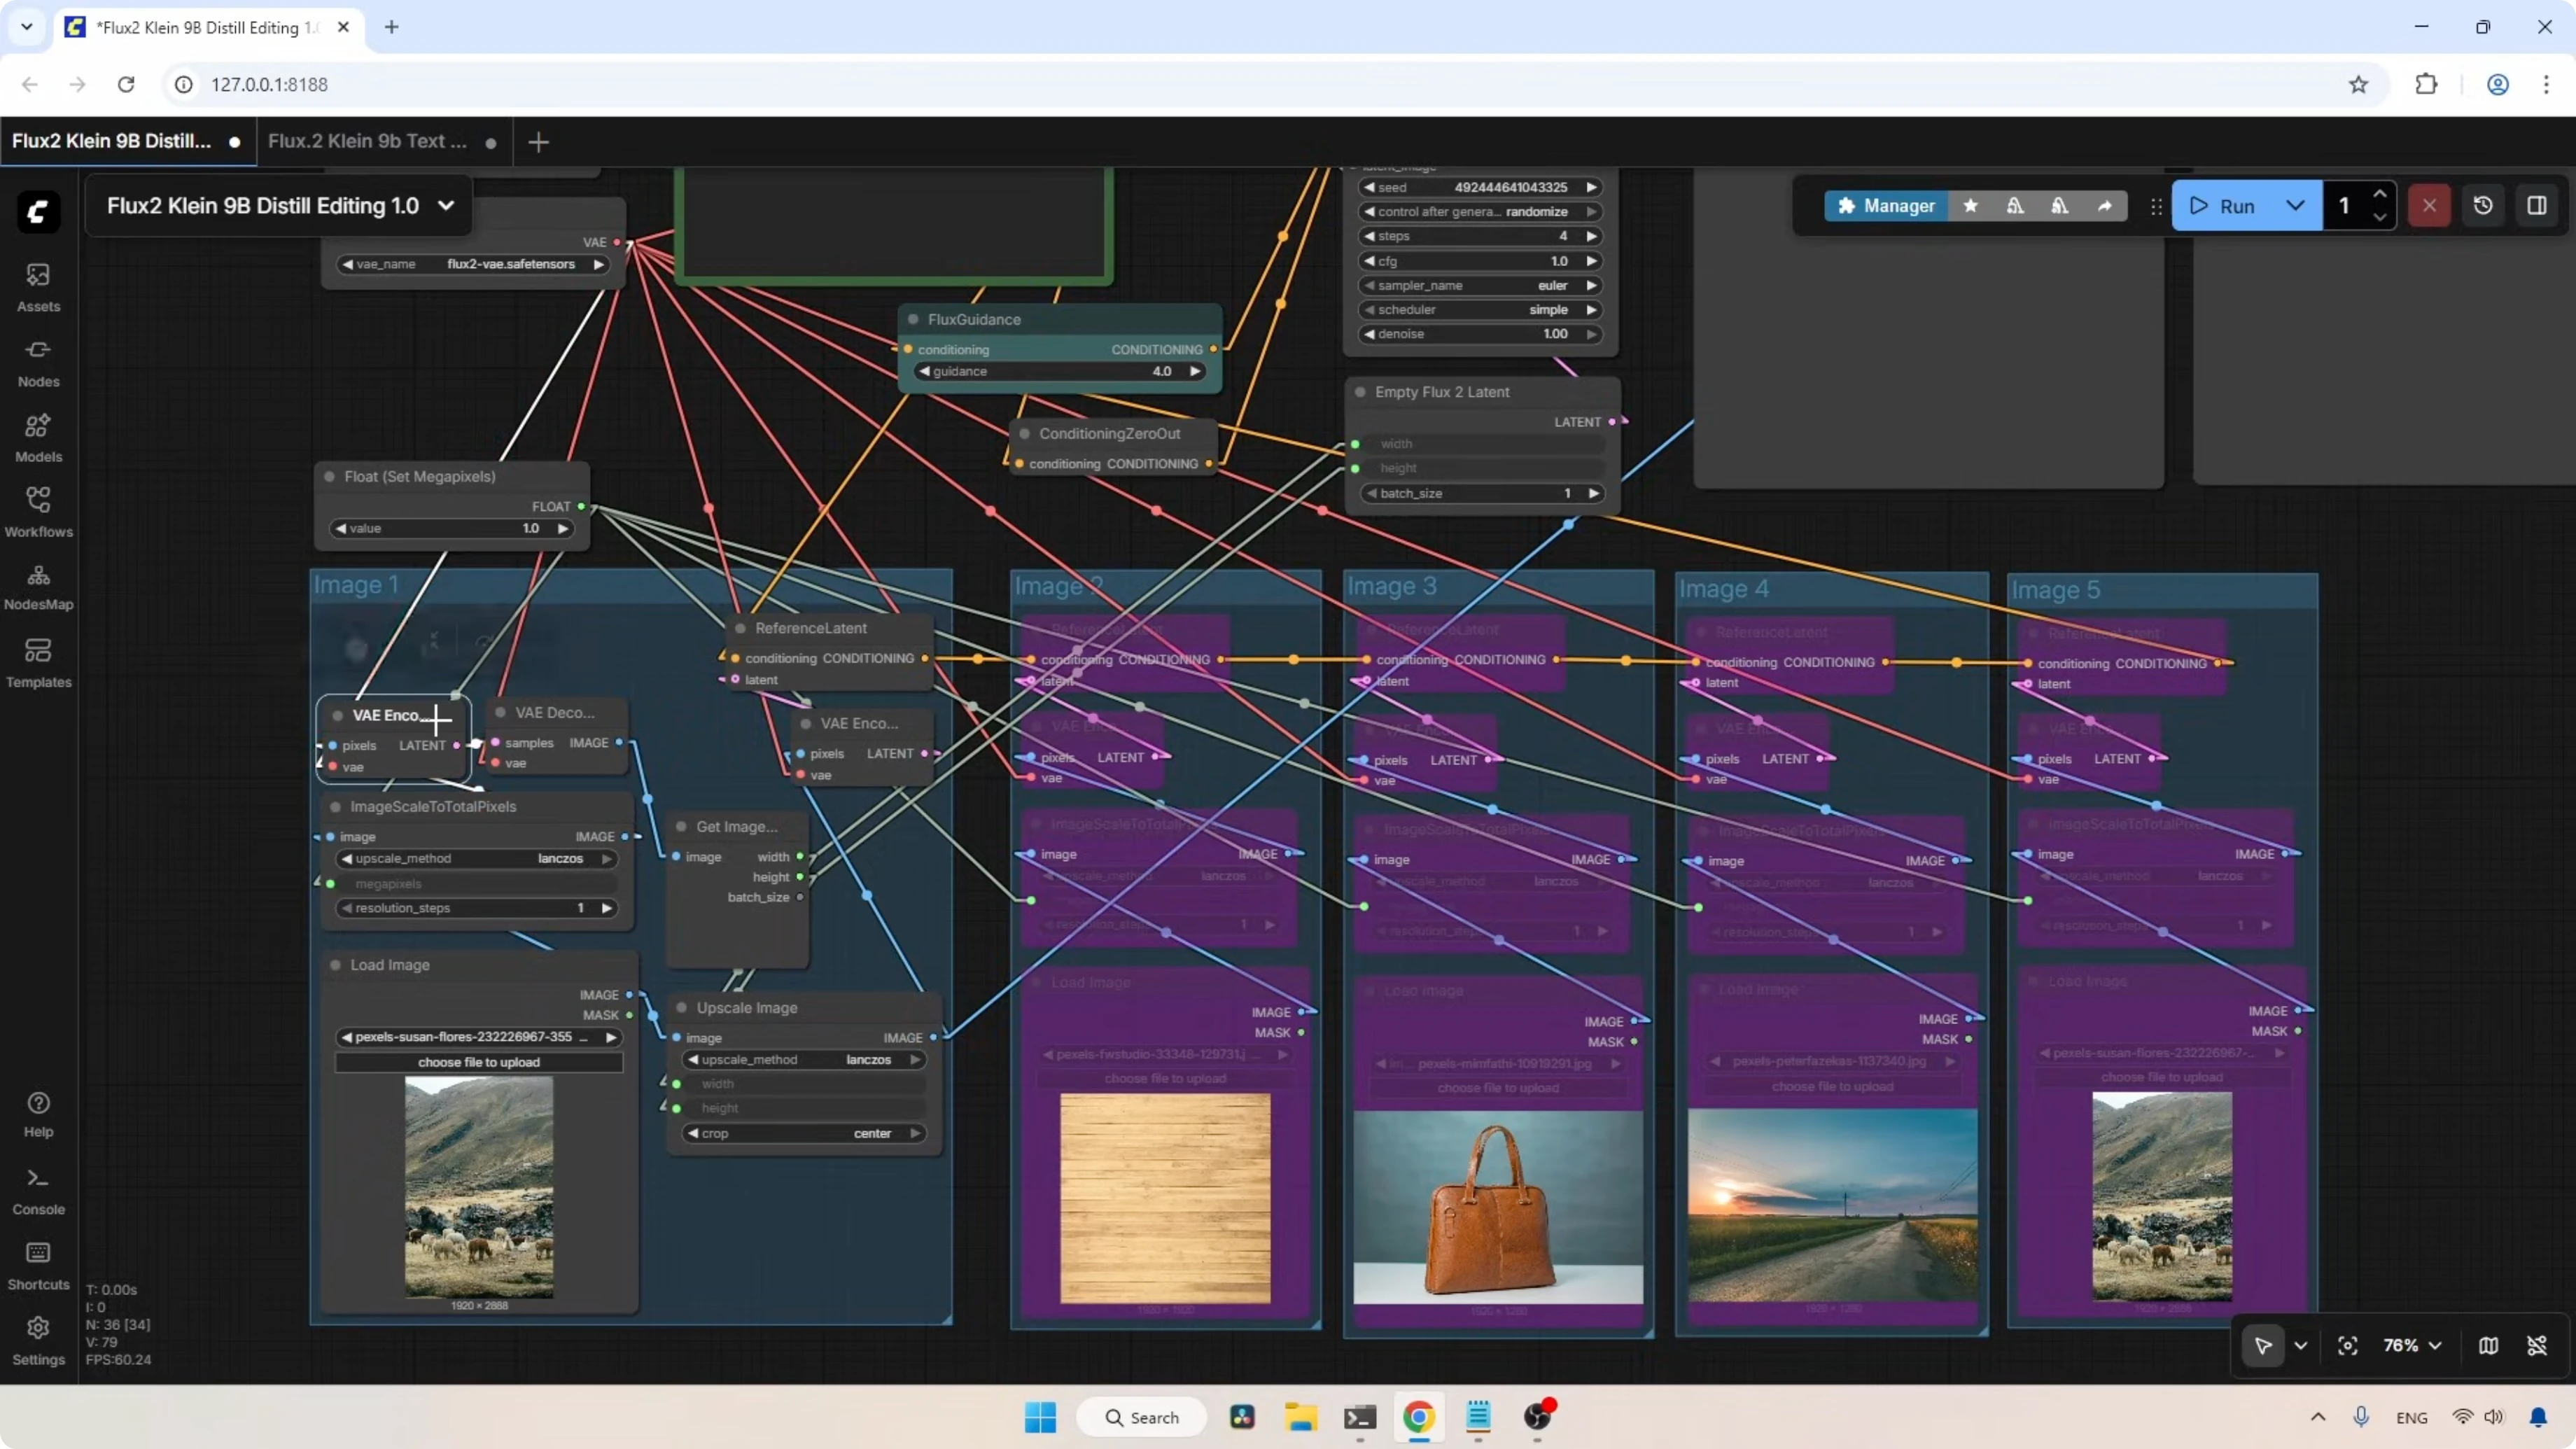
Image Loader Groups and Pixel Shift Control
In this workflow, there are five image loader groups that can load five different images to create new composites.
- Each group has a Load Image node. The loaded image is rescaled using the Image Scale To Total Pixels node.
- The first image loader group includes extra nodes designed to reduce pixel shifting in the generated images. I always suggest using this first group for your main image as it is also the group used for setting the output resolution.
- A VAE Encode node transforms the rescaled image into a latent.
- A VAE Decode node transforms that latent back into an image.
- A Get Image Size node extracts width and height.
- That information is used to rescale the loaded image with the Upscale Image node, which then goes into another VAE Encode node. This transforms the image into a latent and sends it to the Reference Latent, which combines it with the text conditioning and sends it to the Flux Guidance node.
- The other image loaders are currently in bypass mode. When active, they also transform loaded images into latents and combine them with the text conditioning. If you are not using the other image loader groups, keep them in bypass mode. Otherwise, they can interfere with the image generation.
- Reference Latent nodes are connected to each other, then to Flux Guidance, then to KSampler.
KSampler and Resolution Settings
- I’m using a random seed with Steps set to 4 as the distilled model only needs four steps to generate an image. Based on some tests, increasing the steps can actually improve the quality.
- CFG value is 1.0.
- Sampler is set to Euler and the scheduler is set to simple.
- Denoise value is 1.0.
- The Empty Flux2 Latent node is where you can set the output resolution. Right now the resolution is managed by the first image loader group. If you want a custom resolution, remove those connections and set the resolution you like.
- The latent output of this node connects to the Latent Image input of the KSampler. The latent output from the KSampler goes to a VAE Decode node to transform the newly generated latent into an image. Finally, the image is saved using a Save Image node.
- I’ve also included an Image Compare custom node pack to compare the generated image with the original.
Single Reference Editing - I Tested Flux2 Klein 9B in Just 4 Steps. The Results Were Unexpected
Add Object
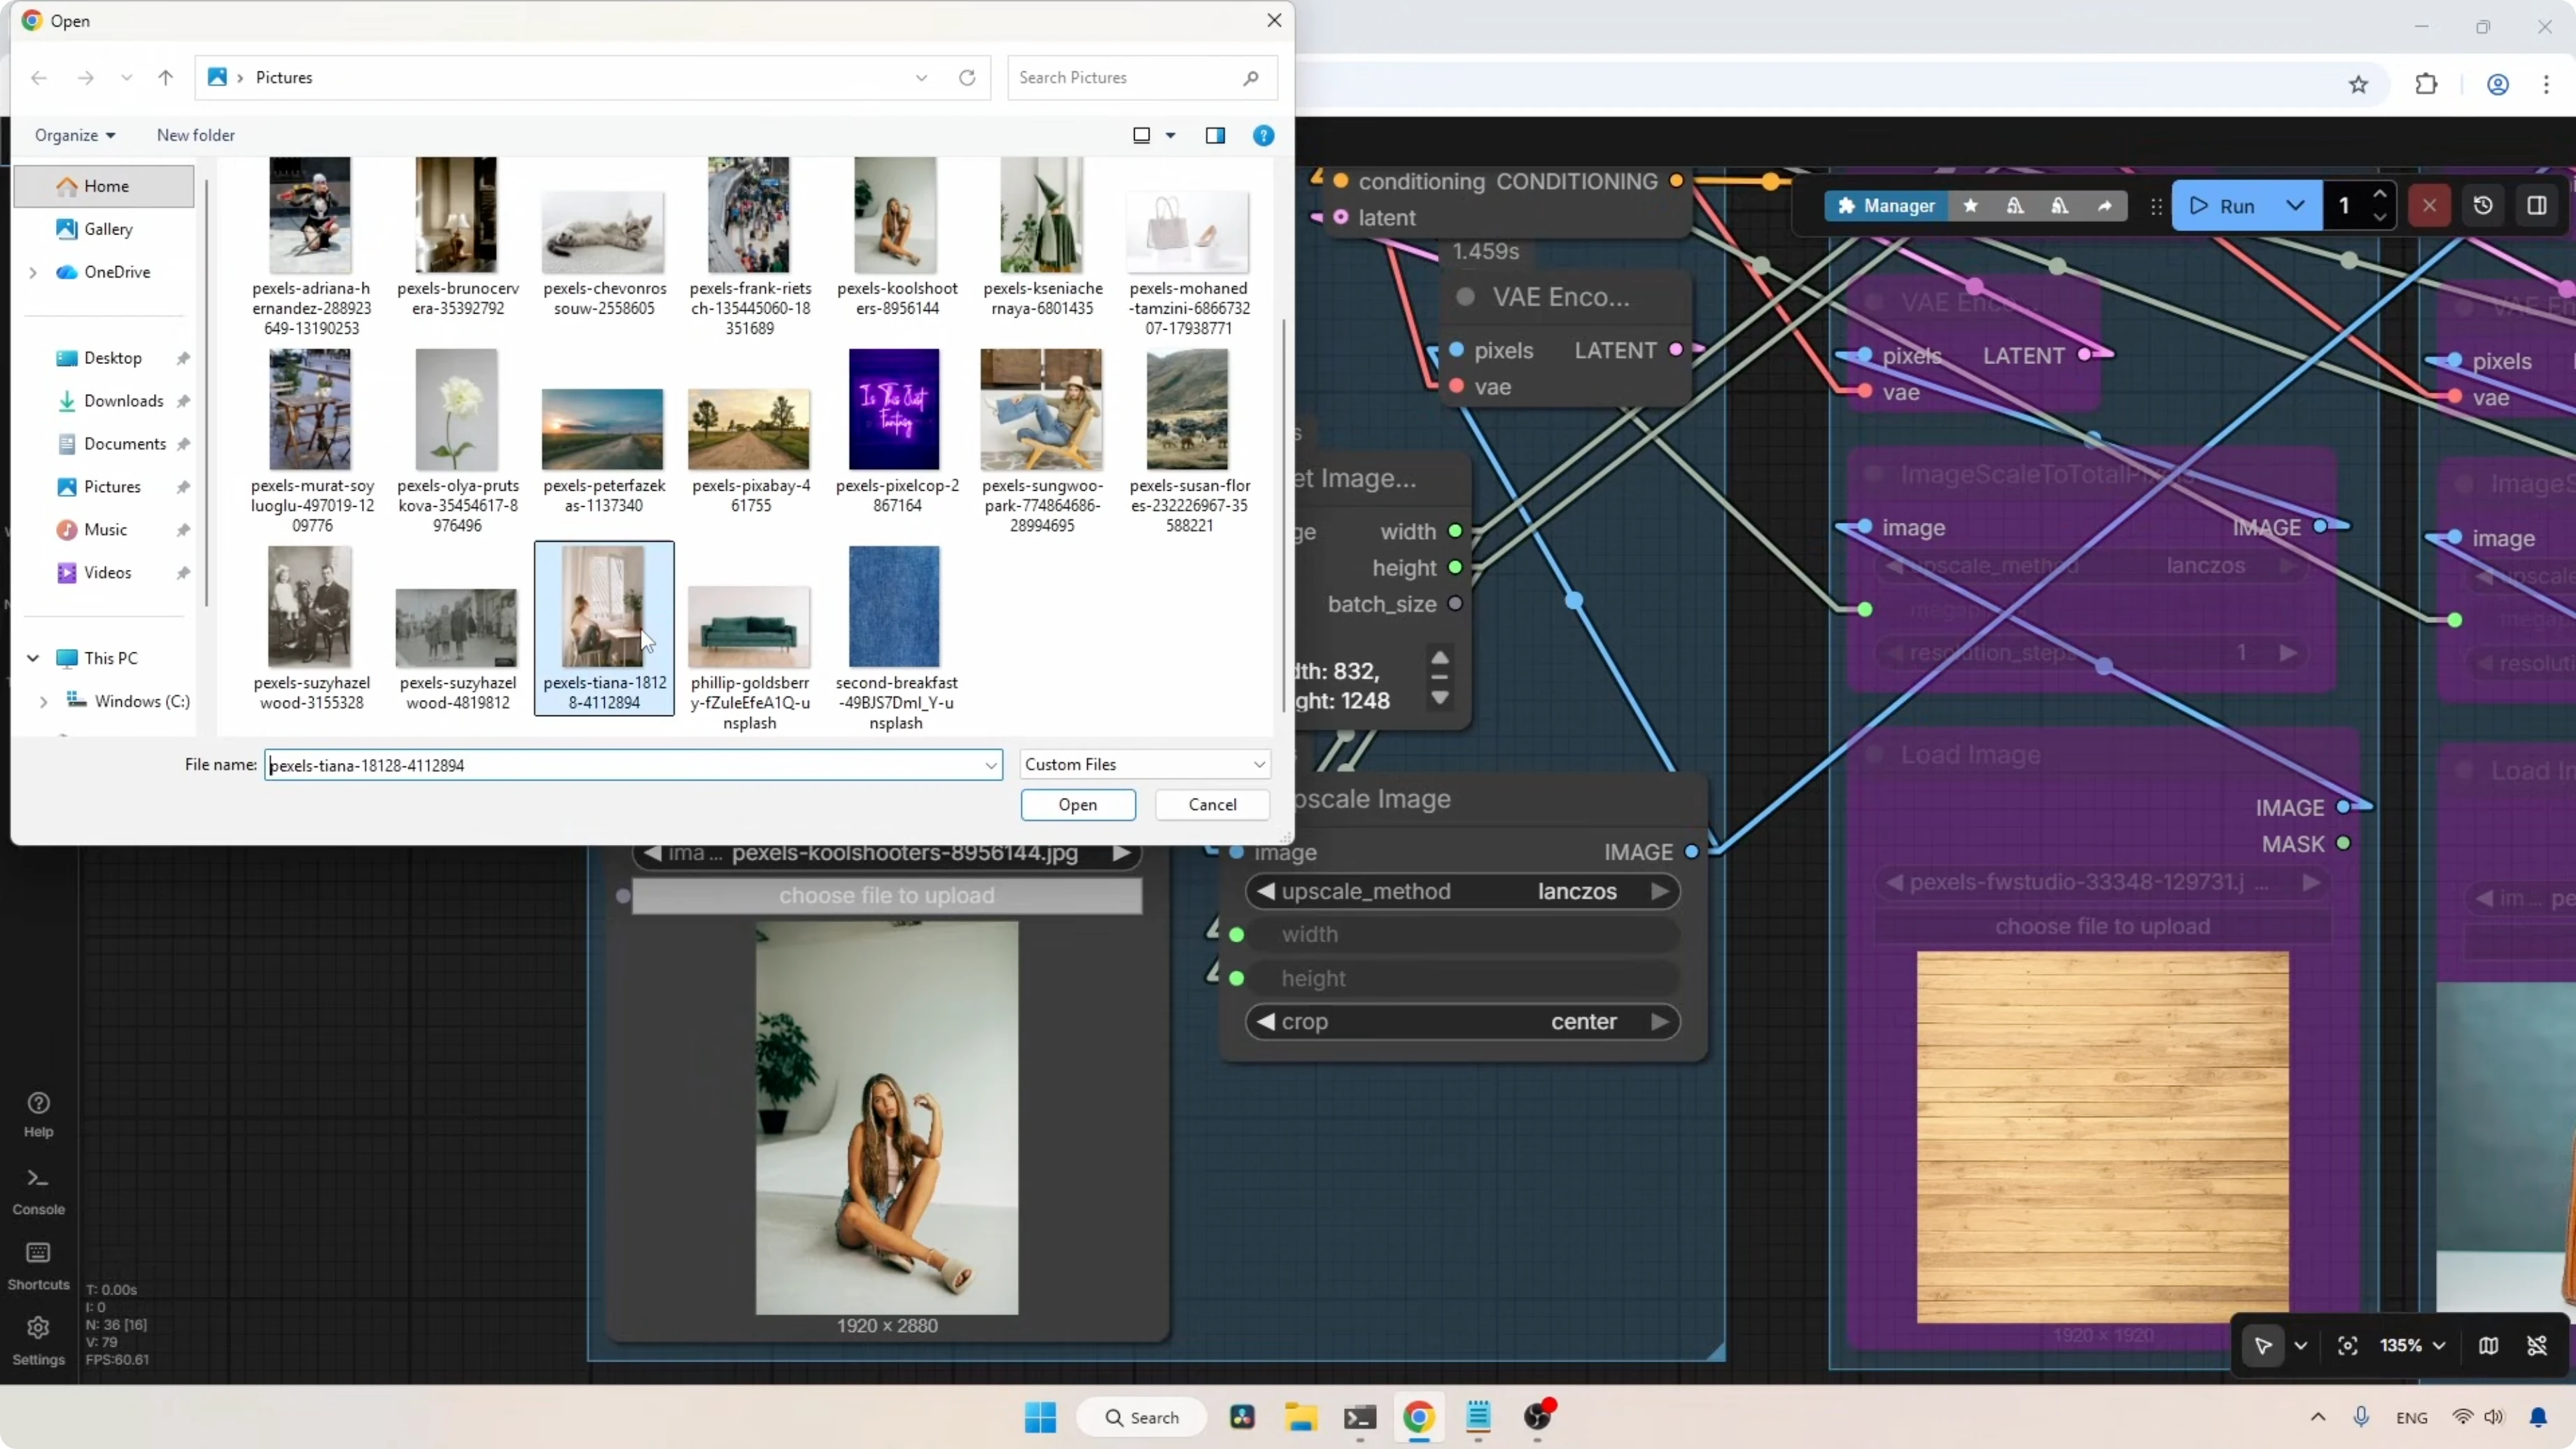
I selected an image of a woman sitting on the floor. The plan was to add a hat to her head.
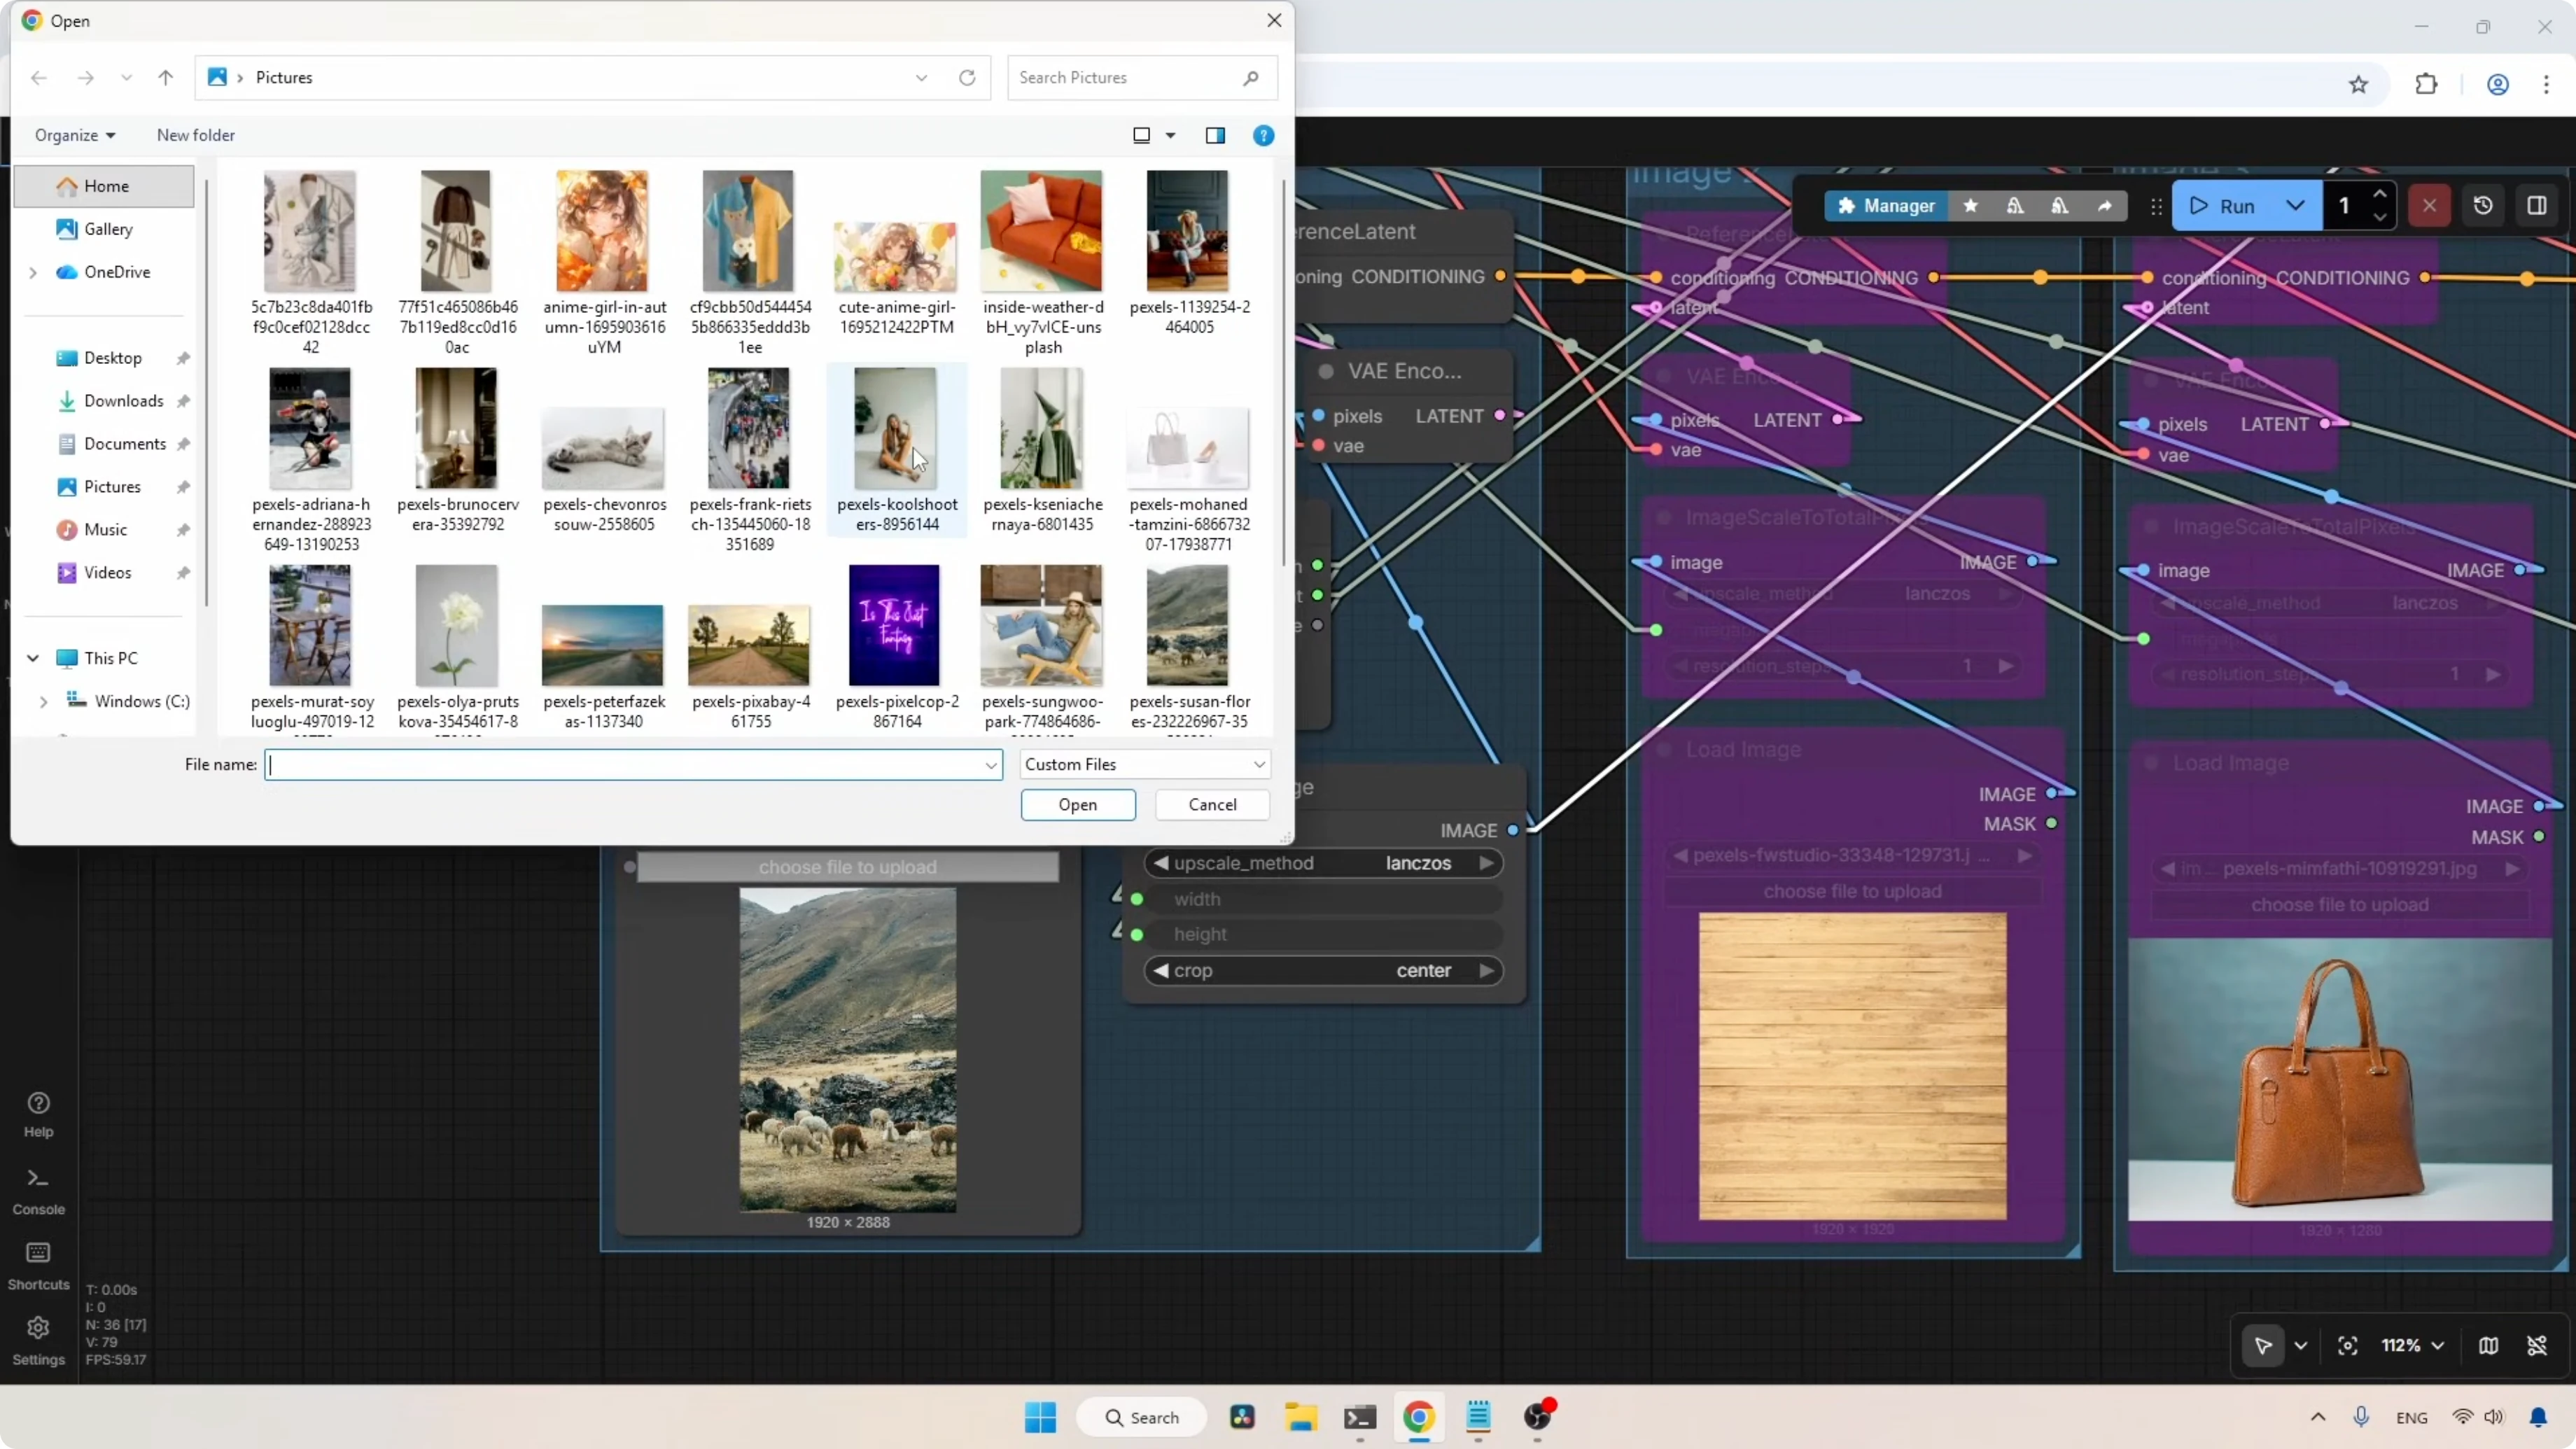
- The Float Set Megapixels node is set to 1.0, which means every image loaded into this workflow is rescaled to a 1 megapixel image. If you want 2 megapixels, type 2 here.
- Positive prompt: the woman in image one wearing a bowler hat.
Result: She is now wearing a bowler hat. That is very nicely done. Comparing it with the original, you can really see the difference. There is a slight pixel shift visible in the generated image, but even so, I love the result. It took around 162 seconds, about 2.7 minutes. I am using the bigger text encoder, so the generation will be slower.
Remove Object
I chose an image of a woman sitting on a chair. My goal was to remove the woman from the image entirely.
- Positive prompt: remove the woman from the image.
Result: The woman has been removed. There is very little pixel shifting effect in this version. Overall, this generation is really good. It took around 145 seconds, about 2.4 minutes.
Global Edits - I Tested Flux2 Klein 9B in Just 4 Steps. The Results Were Unexpected
Change Time and Season
I chose an image of alpacas. I’m actually in doubt. Is it alpacas or sheep? I changed the image from day to night.
- Positive prompt: change the day to night. Add a street lamp near the brown sheep.
Result: This looks great. I really like how the shadows were created on the ground and I don’t see any pixel shifting in this image.
Then I changed the season of the loaded image.
- Positive prompt: change the season to monsoon season. Add greenery.
Result: The result looks good, and I don’t see any pixel shifting in this one at all.
I pushed it further.
- Positive prompt: add dense green vegetation, trees, and foliage.
Result: The image has a completely different vibe than before. I’ve noticed that Flux 2 models always try to add more saturation to the generated images.
Style Transformations - I Tested Flux2 Klein 9B in Just 4 Steps. The Results Were Unexpected
Bring Anime To Life
I chose an image of an anime character and transformed it into a photorealistic one.
- Positive prompt: transform this image into a photorealistic image.
Result: This cute little kid looks completely real. Comparing the generated image with the original, the model did a pretty good job.
Transform Photo Into Anime Art
I selected a photo of a cosplayer.
- Positive prompt: transform this image into anime art style.
Result: Overall, the result looks good. But looking closer at her face, there is a problem with her lips and the index finger of her left hand. There is also a slight issue with the ring finger on her right hand. I could do another generation to see if the result improves, but I don’t want to do any cherry-picking.
Structured Views - I Tested Flux2 Klein 9B in Just 4 Steps. The Results Were Unexpected
Generate Character Sheet
I loaded a photo of a woman sitting on a sofa.
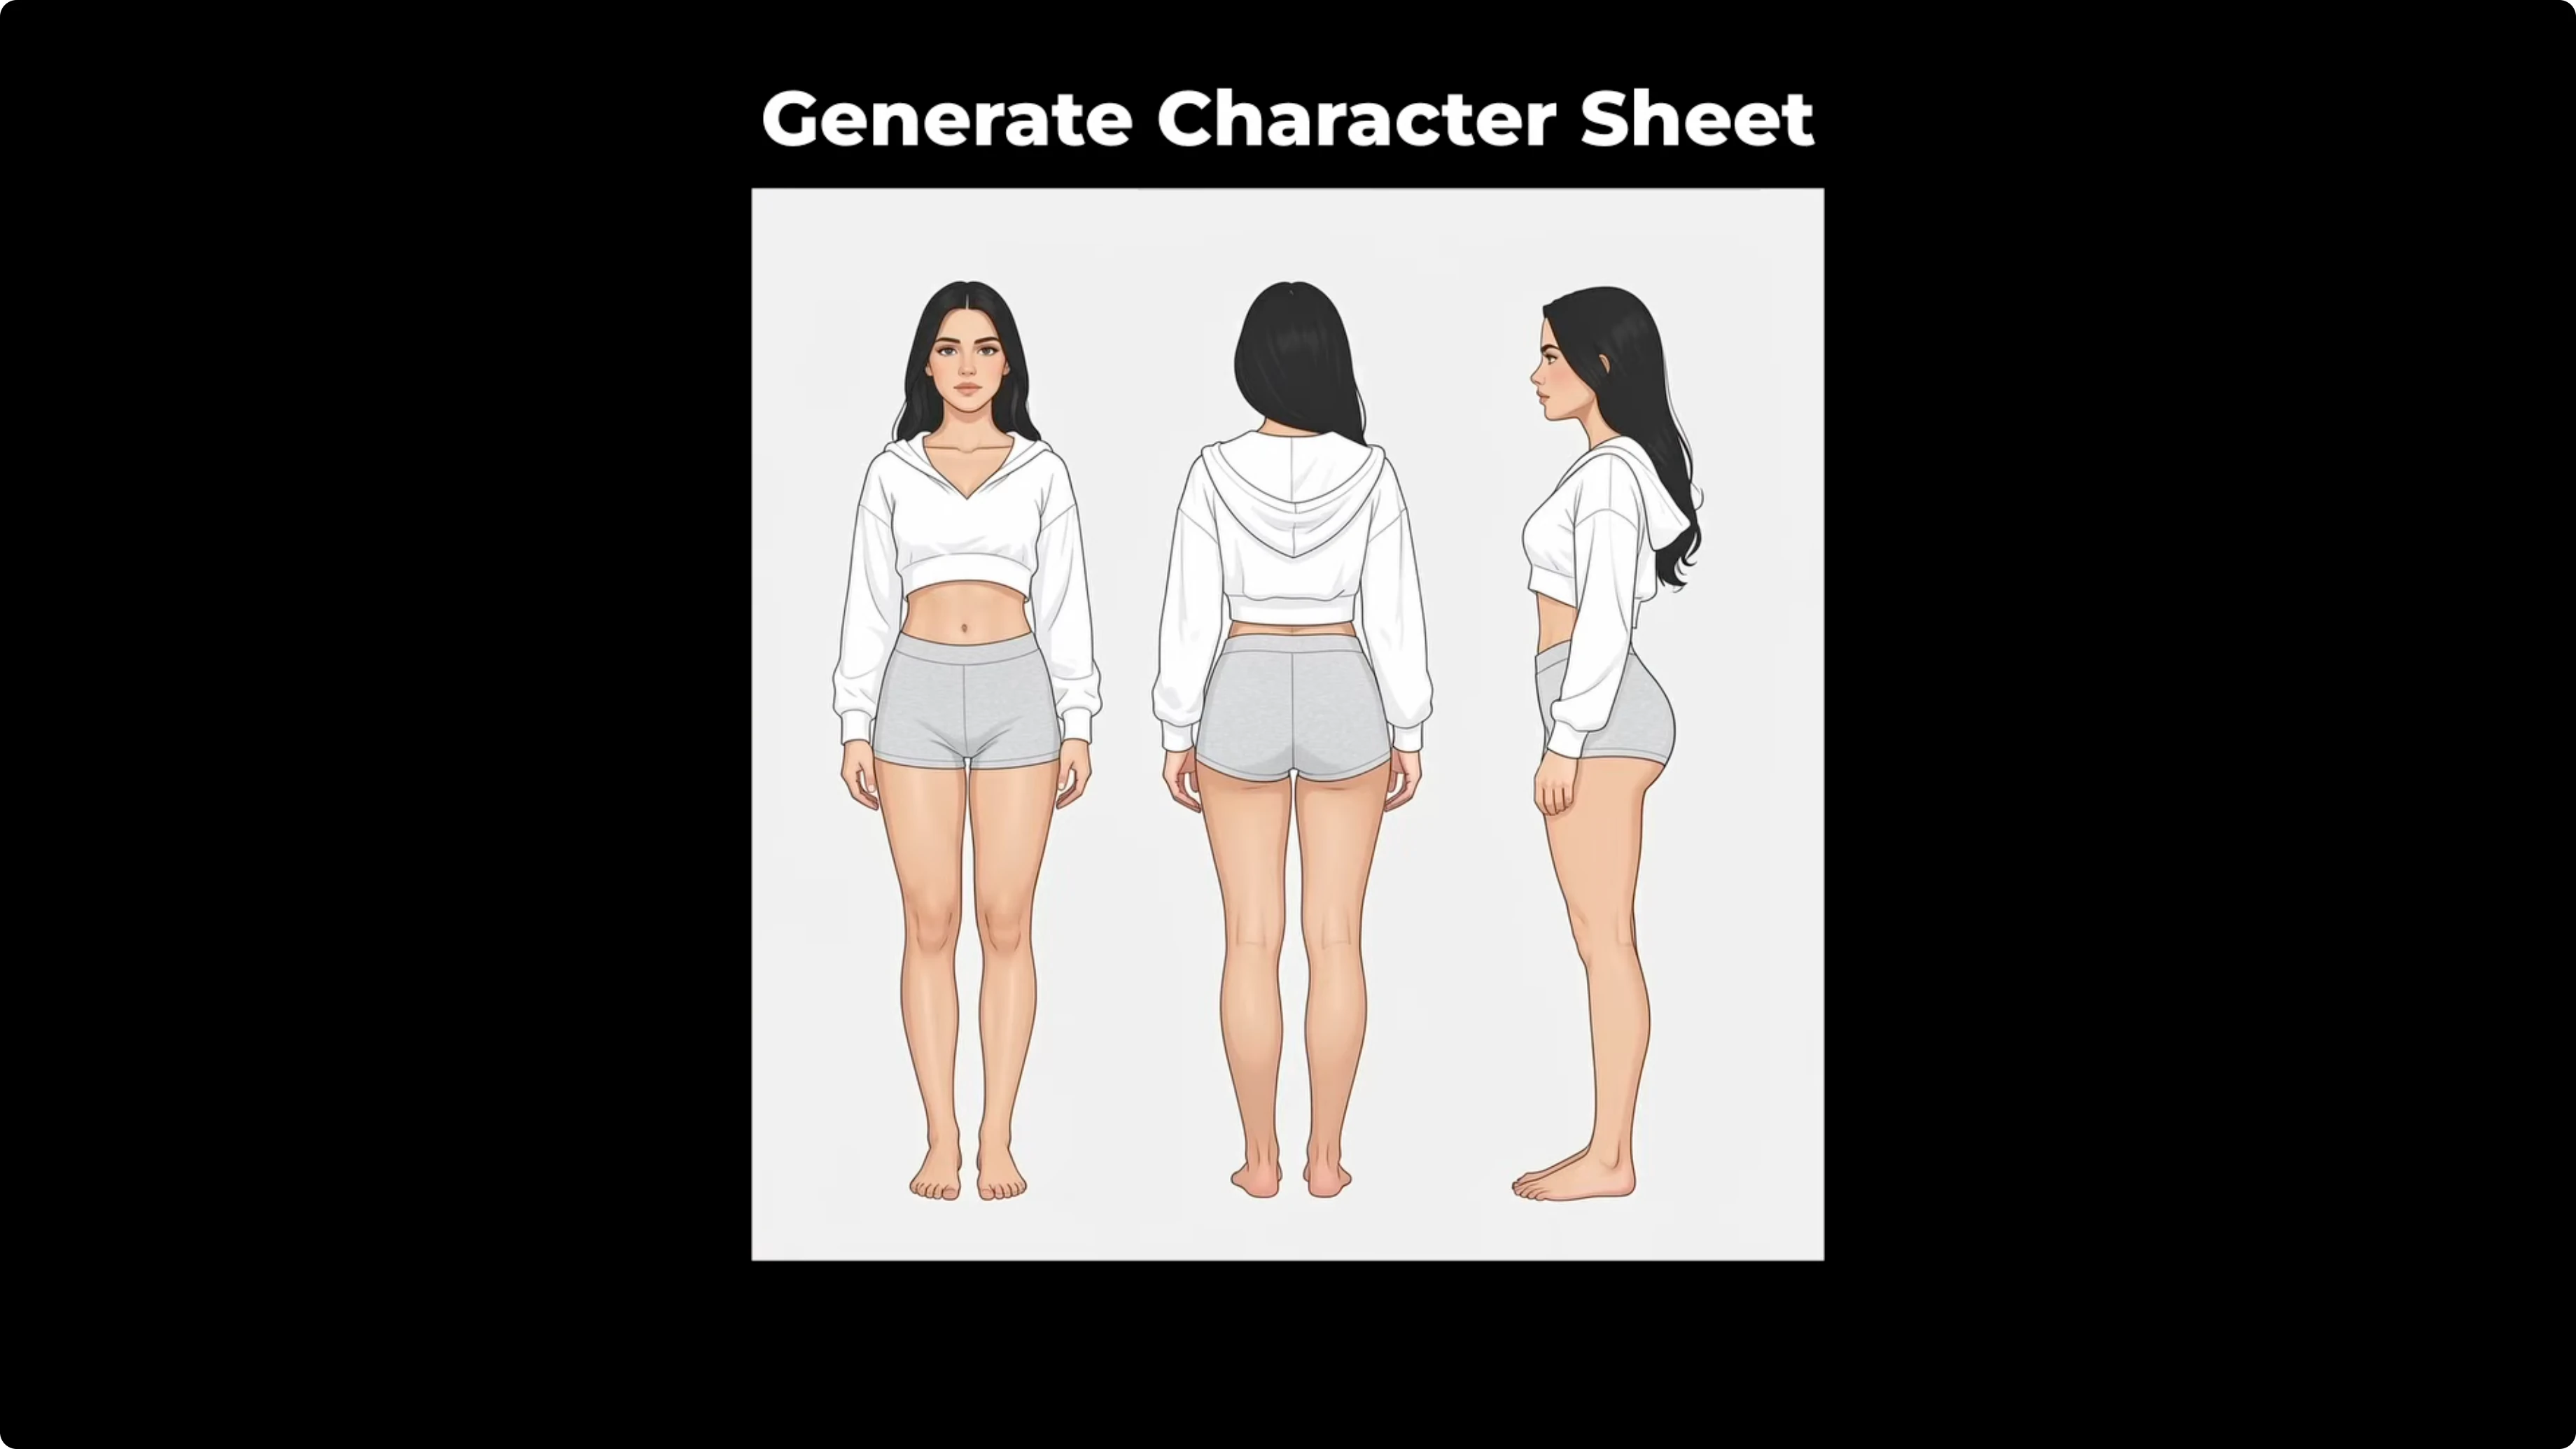
- Positive prompt: generate a character sheet of the woman showing front profile, back profile, and side profile.
- Custom resolution: I removed the connections to the Empty Flux2 Latent node and set the resolution to 1024 for both width and height.
Result: The character sheet is done and it’s a great result for 3D artists. Even though the original photo was a kneeling pose, the model successfully generated a standing reference. I really like how it moved the hair in front profile and side profile. That may help with the clothing details. The consistency between the front, back, and side views is really amazing.
Generate Blueprint
I selected an image of a white car.
- Positive prompt: generate a blueprint of the car showing front profile, back profile, and side profile.
Result: Overall, it’s not that bad. At first glance, the rear spoiler looks shorter in the front profile. Additionally, in side profile, the front splitter looks shorter in length.
Restoration - I Tested Flux2 Klein 9B in Just 4 Steps. The Results Were Unexpected
Restore Old Photo
I selected a photo of children that seems to have a lot of issues.
- Positive prompt: restore the image and add colors to it.
- Resolution setup:
- Connect the Width output of the Get Image Size node to the Width input of the Empty Flux2 Latent node.
- Connect the Height output to the Height input.
Result: The restored photo is really amazing. I love how the model removed the unwanted artifacts and colorized the old photo so well.
Final Thoughts
The Flux 2 Klein 9B distilled model can edit in just four steps and it is fast. With the highest quality text encoder, generations take a bit longer, but the quality is excellent. Single reference edits like adding or removing objects work well with minimal pixel shifting. Global edits such as changing time of day or season are convincing, though the model tends to add more saturation. Style transformations are strong, with occasional issues in hands and facial details. Structured outputs like character sheets are impressively consistent, and restoration results are outstanding. If you need more speed or have limited VRAM, the FP8 and NVFP4 variants are solid options, and increasing steps beyond 4 can improve quality.
Subscribe to our newsletter
Get the latest updates and articles directly in your inbox.

Related Posts

8 Best Claude Code Plugins in 2026 (You Need to Know)
8 Best Claude Code Plugins in 2026 (You Need to Know)

7 Best Claude Code Skills (You Need to Know)
7 Best Claude Code Skills (You Need to Know)

Claude Code Desktop IDE Features (You Need to Know)
Claude Code Desktop IDE Features (You Need to Know)