
Table Of Content
- Flux 2 Is Here: Open Weights And Native ComfyUI Support
- What Flux 2 Improves Over Flux 1
- Native 4 Megapixel Generation
- Flux 2 Is Setup On Hugging Face And In ComfyUI
- New VAE And Text Encoder
- What To Download
- Where To Place The Files In ComfyUI
- Flux 2 Is Running In ComfyUI: Update And Required Nodes
- The Flux 2 Workflow In ComfyUI
- Reference Images: Up To 10 In One Generation
- Flux 2 Is Structured JSON Prompts
- VRAM Use And Color Control With JSON
- Why The Structured Format Matters
- Flux 2 Is Results From The Structured Prompts
- Tuning Steps And Reference Likeness
- Quality Gains Over Flux 1
- Step By Step: Run Flux 2 Is Natively In ComfyUI
- Quick Reference: Flux 2 Is Components And Notes
- Final Notes

How to use Flux 2 in ComfyUI: Quick Setup
Table Of Content
- Flux 2 Is Here: Open Weights And Native ComfyUI Support
- What Flux 2 Improves Over Flux 1
- Native 4 Megapixel Generation
- Flux 2 Is Setup On Hugging Face And In ComfyUI
- New VAE And Text Encoder
- What To Download
- Where To Place The Files In ComfyUI
- Flux 2 Is Running In ComfyUI: Update And Required Nodes
- The Flux 2 Workflow In ComfyUI
- Reference Images: Up To 10 In One Generation
- Flux 2 Is Structured JSON Prompts
- VRAM Use And Color Control With JSON
- Why The Structured Format Matters
- Flux 2 Is Results From The Structured Prompts
- Tuning Steps And Reference Likeness
- Quality Gains Over Flux 1
- Step By Step: Run Flux 2 Is Natively In ComfyUI
- Quick Reference: Flux 2 Is Components And Notes
- Final Notes
Flux 2 Is Here: Open Weights And Native ComfyUI Support
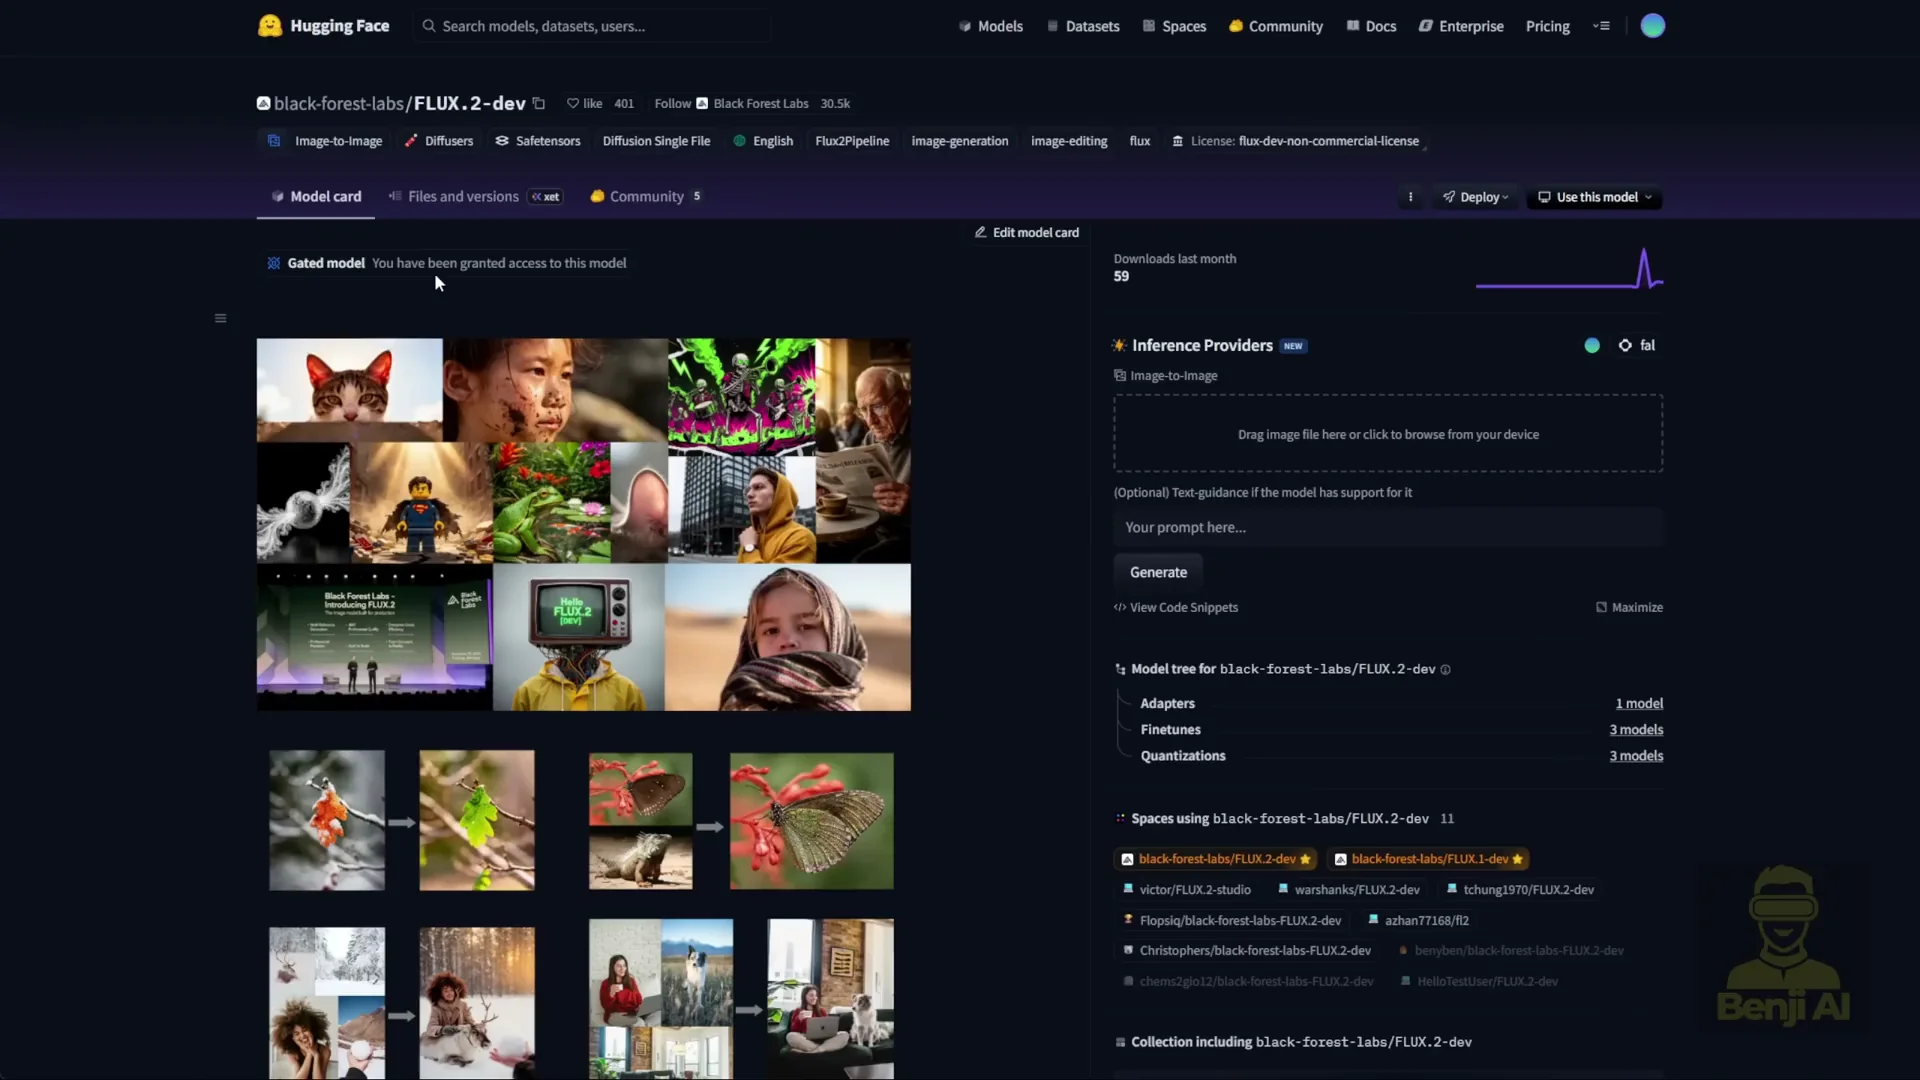
Black Forest Labs launched Flux 2 this week and released the open weights for Flux 2 dev on Hugging Face. You can check out the open weight models there.
Let me walk through what is new compared to Flux 1 and how to run Flux 2 natively in ComfyUI.
What Flux 2 Improves Over Flux 1
Flux 1 has been a phenomenal image generation model. Flux 2 improves image aesthetics and texture, and it adds new capabilities for referencing up to 10 images simultaneously during editing tasks.
This model is not just text to image or image to image. It supports using images as references for editing, similar to what we used to do in Nano Banana and qwen image edit. It can handle up to 10 images at once.
Text rendering is clearer, and prompt adherence has improved significantly. Flux 2 now supports the prompt JSON format. It interprets prompts where you can specify styles, camera angles, lens shots, mood, and coloration. With JSON structured prompts, it is more precise, giving you more detailed control over what you want in controllable image generation.
Flux 2 has been trained with more real world knowledge, including lighting and spatial logic, resulting in more coherent scenes.
Native 4 Megapixel Generation
Flux 2 can generate 4 megapixel images, which is 4 million pixels. If you look up 4 megapixel resolution on Google, it refers to cameras that support more than 1080p HD resolution. It is a large image size for an AI image generation model.
This is not just pixel enlargement. Flux 2 supports more pixels natively at that 4 megapixel resolution. You will get way more detail than the 1024 pixel images you used to get with previous image generation models.
Flux 2 Is Setup On Hugging Face And In ComfyUI
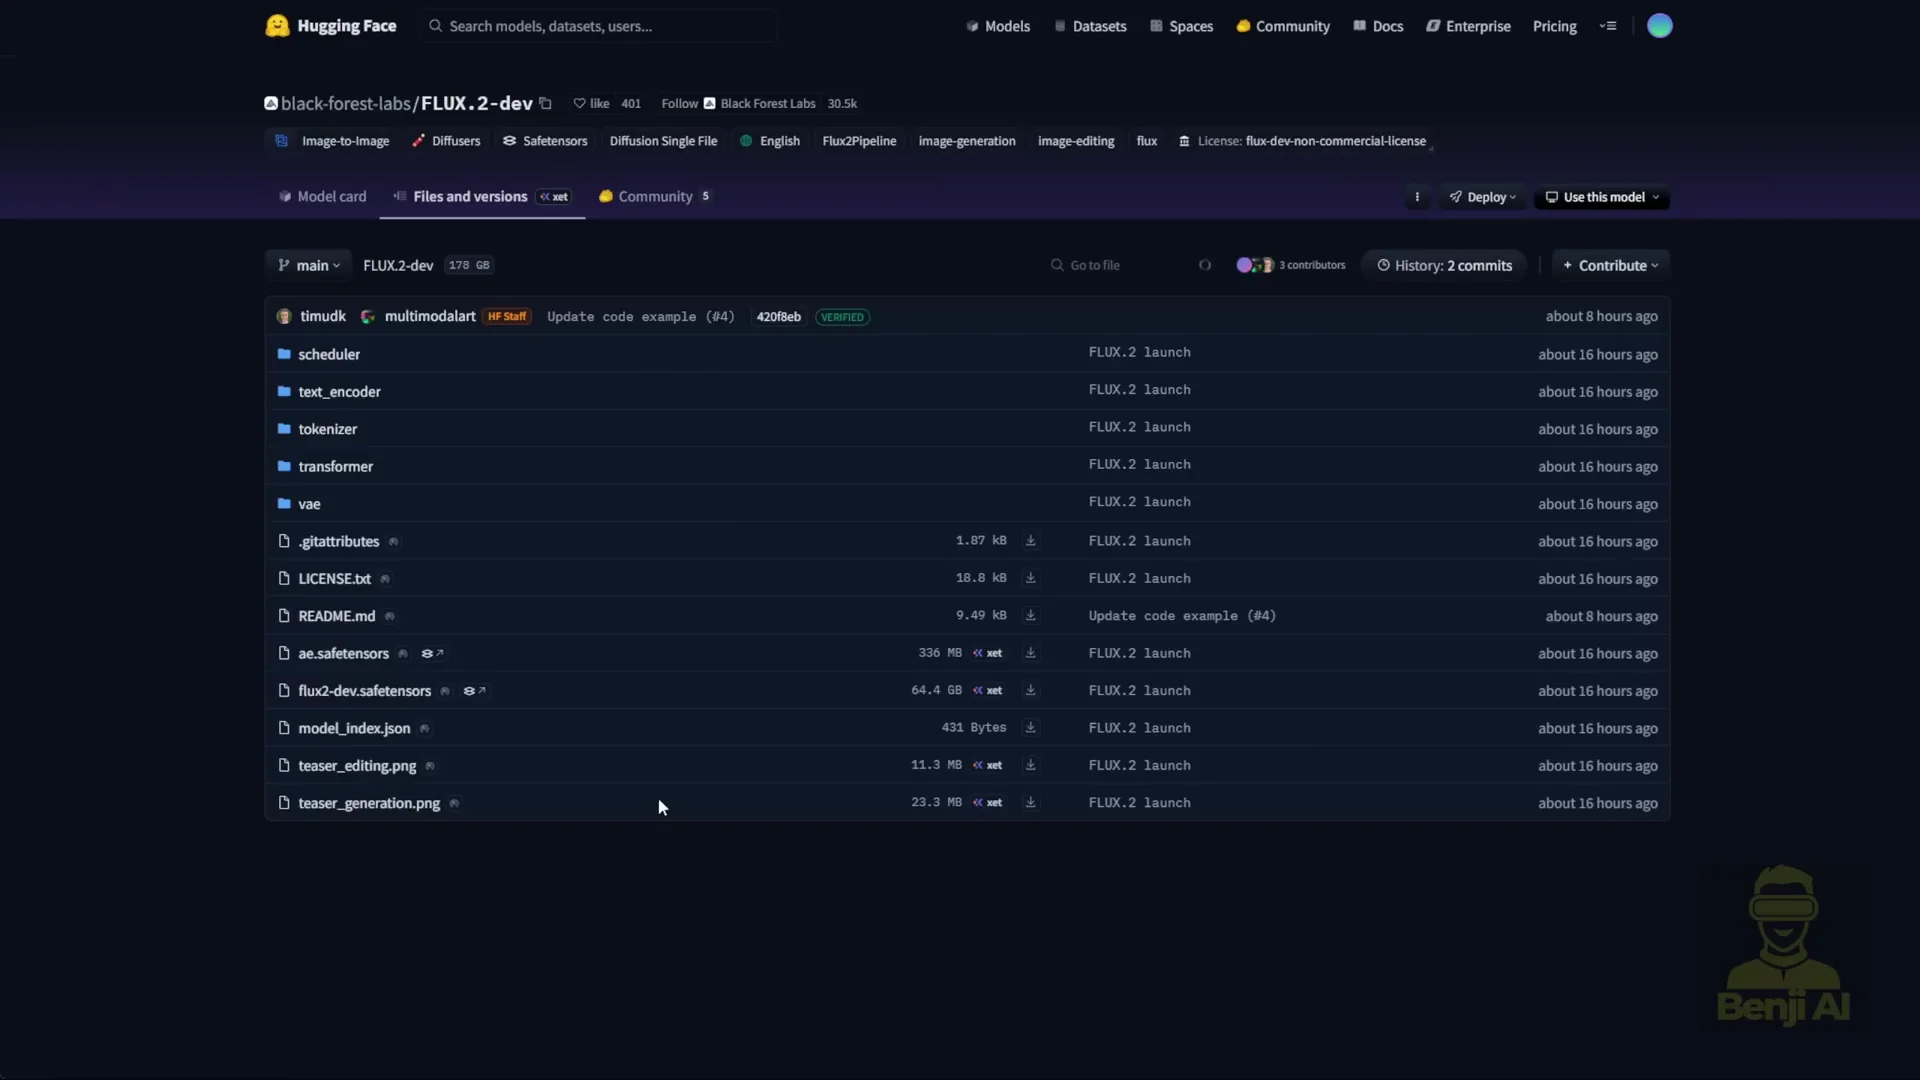
On Hugging Face, once you grant access to the models and press the agree button, you can download the files. The Flux 2 dev model is 64 GB and requires almost 64 GB of VRAM. No consumer PC can handle that as is.
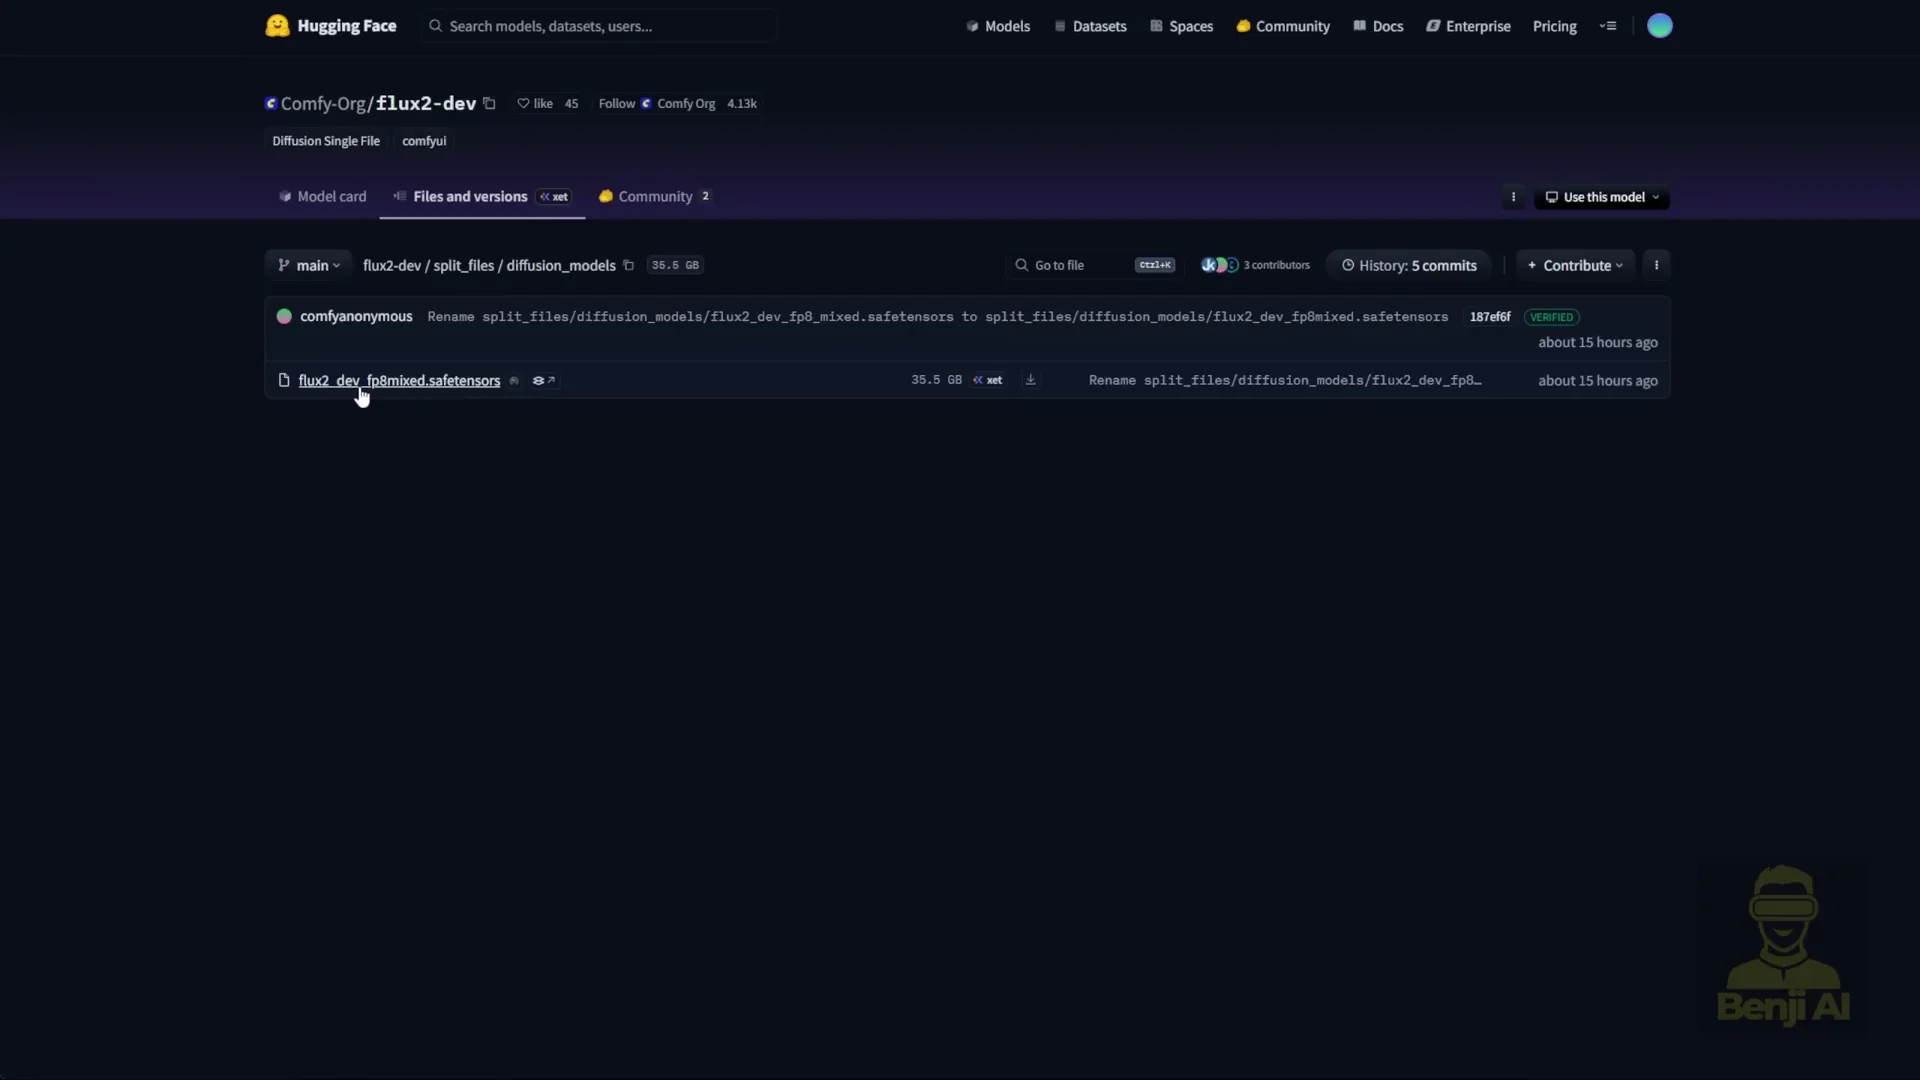
The ComfyUI team partnered with Nvidia to create an open source FP8 version of the Flux 2 dev model. That makes it more consumer friendly. If you have an Nvidia 4090 or 5090, you should be able to run the FP8 model.
The FP8 model in the ComfyUI Hugging Face repo for Flux 2 is about 35 GB in file size.
New VAE And Text Encoder
We are not using the previous Flux text encoder and VAE anymore. The VAE is a new Flux 2 VAE specifically designed for Flux 2. It is better than previous versions.
The text encoder is now Mistral 3 small. You can use either Flux 2 FP8 or BF16 models. Choose the one that fits your GPU and VRAM.
Prompt adherence has improved a lot because of the text encoder. Flux 2 now uses Mistral language models which understand prompts better than older clip based text encoders like T5.
What To Download
- Text encoder: Mistral 3 Flux 2 BF16 or FP8
- VAE: Flux 2 VAE
- Diffusion model: Flux 2D dev FP8 Mix or BF16
All three files go into their respective subfolders by name inside your ComfyUI models folder.
Where To Place The Files In ComfyUI
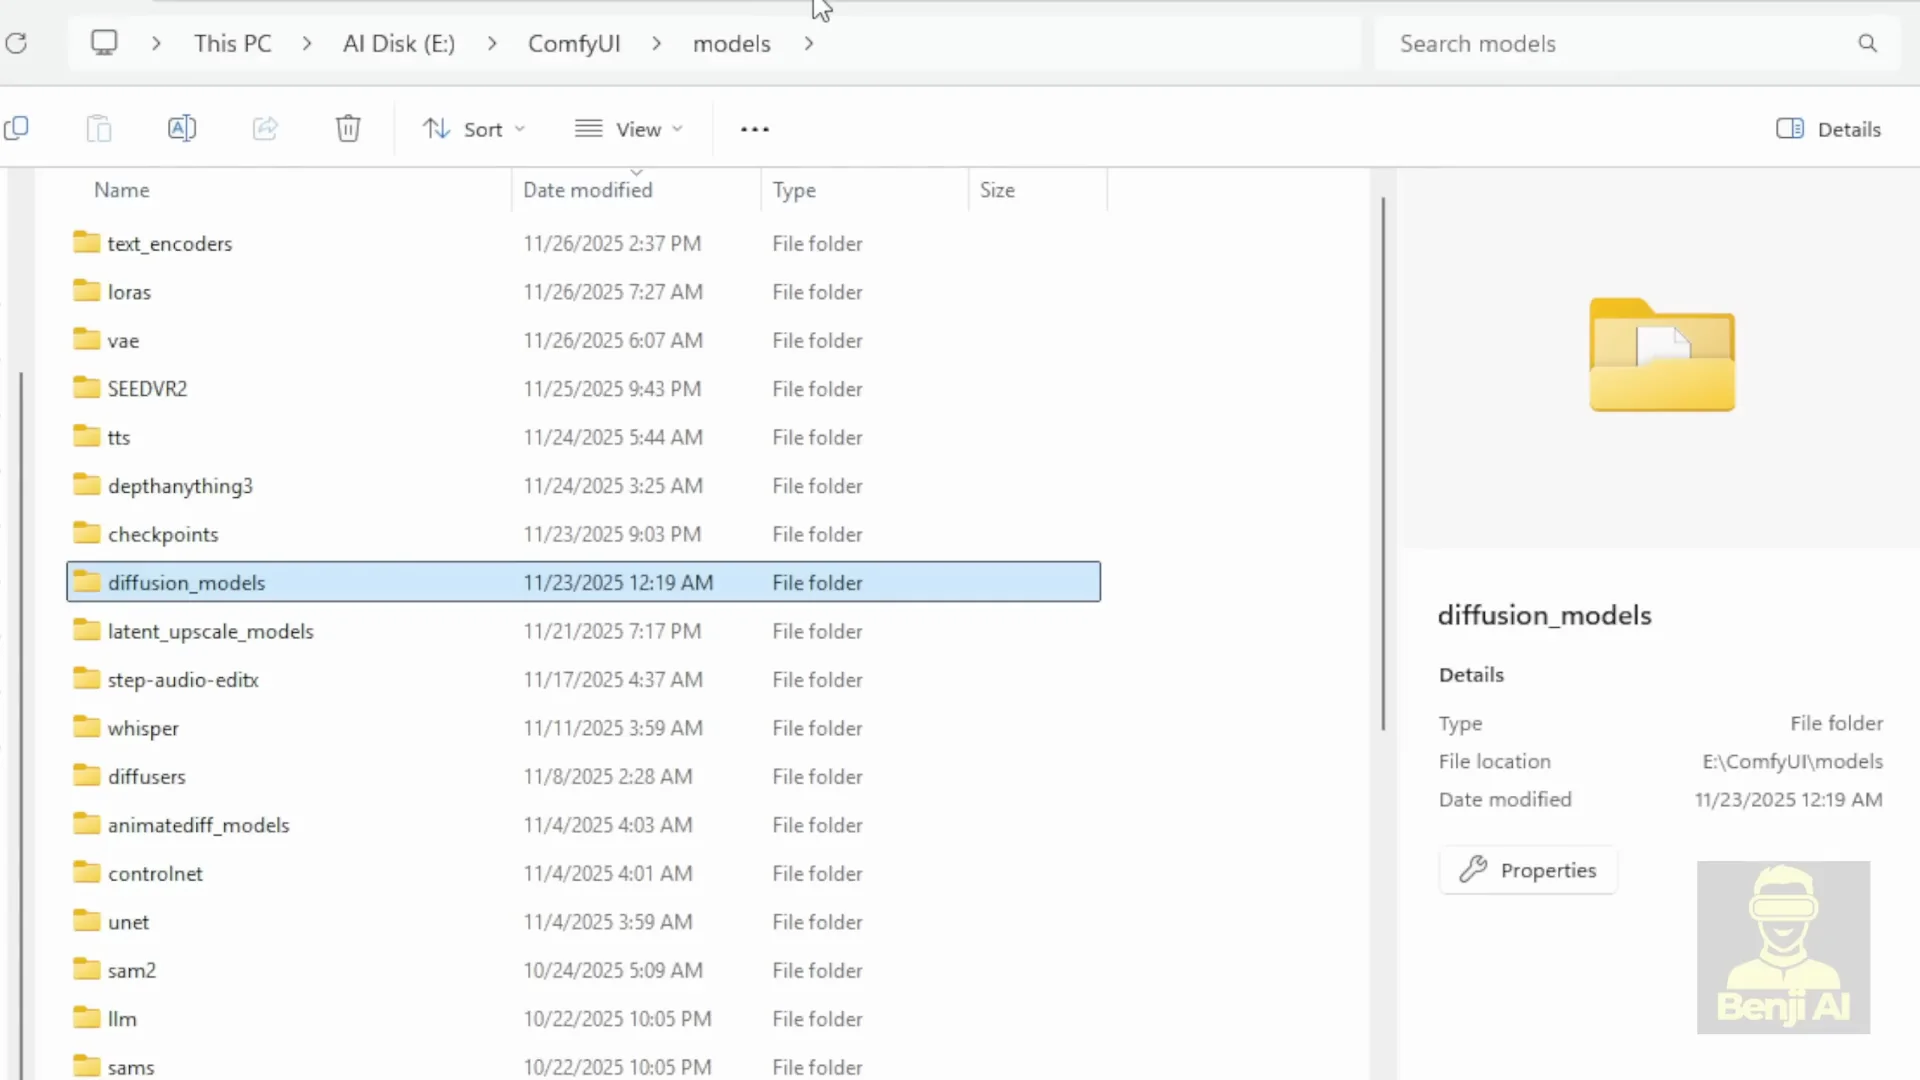
- Diffusion model files go into models - diffusion_models
- Text encoder files go into models - text_encoders
- VAE files go into models - vae
A ready to run workflow is available on ComfyUI’s site with explanations and links to download everything you need. At the bottom of that page you will see two workflows. One is the Flux 2 FP8 workflow that you can run directly.
As noted there, Nvidia’s FP8 versions reduce VRAM requirements by 40 percent. That means taking the BF16 model size and subtracting 40 percent, bringing it down to around 30 something GB of VRAM usage.
Flux 2 Is Running In ComfyUI: Update And Required Nodes
Once Flux 2 is loaded, pick the FP8 Mix and the clip encoder. When you update ComfyUI to the latest version, you will see the Flux 2 text encoder option appear. If you see that, it means ComfyUI is successfully updated.
In older versions, loading this workflow gives a red error box. That is because previous versions of ComfyUI did not include the Flux 2uler or the Empty Flux 2 Latent Image node. Both are new native nodes in ComfyUI that support Flux 2.
Update ComfyUI. My way is using Git. Just run gitpull origin master in the command prompt for the ComfyUI branch. You will get all these updates including Flux support. When you see those indicators, you know ComfyUI is up to date. Then the Flux 2uler and Empty Flux 2 Latent nodes will load without the red box error.
The Flux 2 Workflow In ComfyUI
The workflow is typical. You load the diffusion model, text encoder, and VAE. All three model files are loaded.
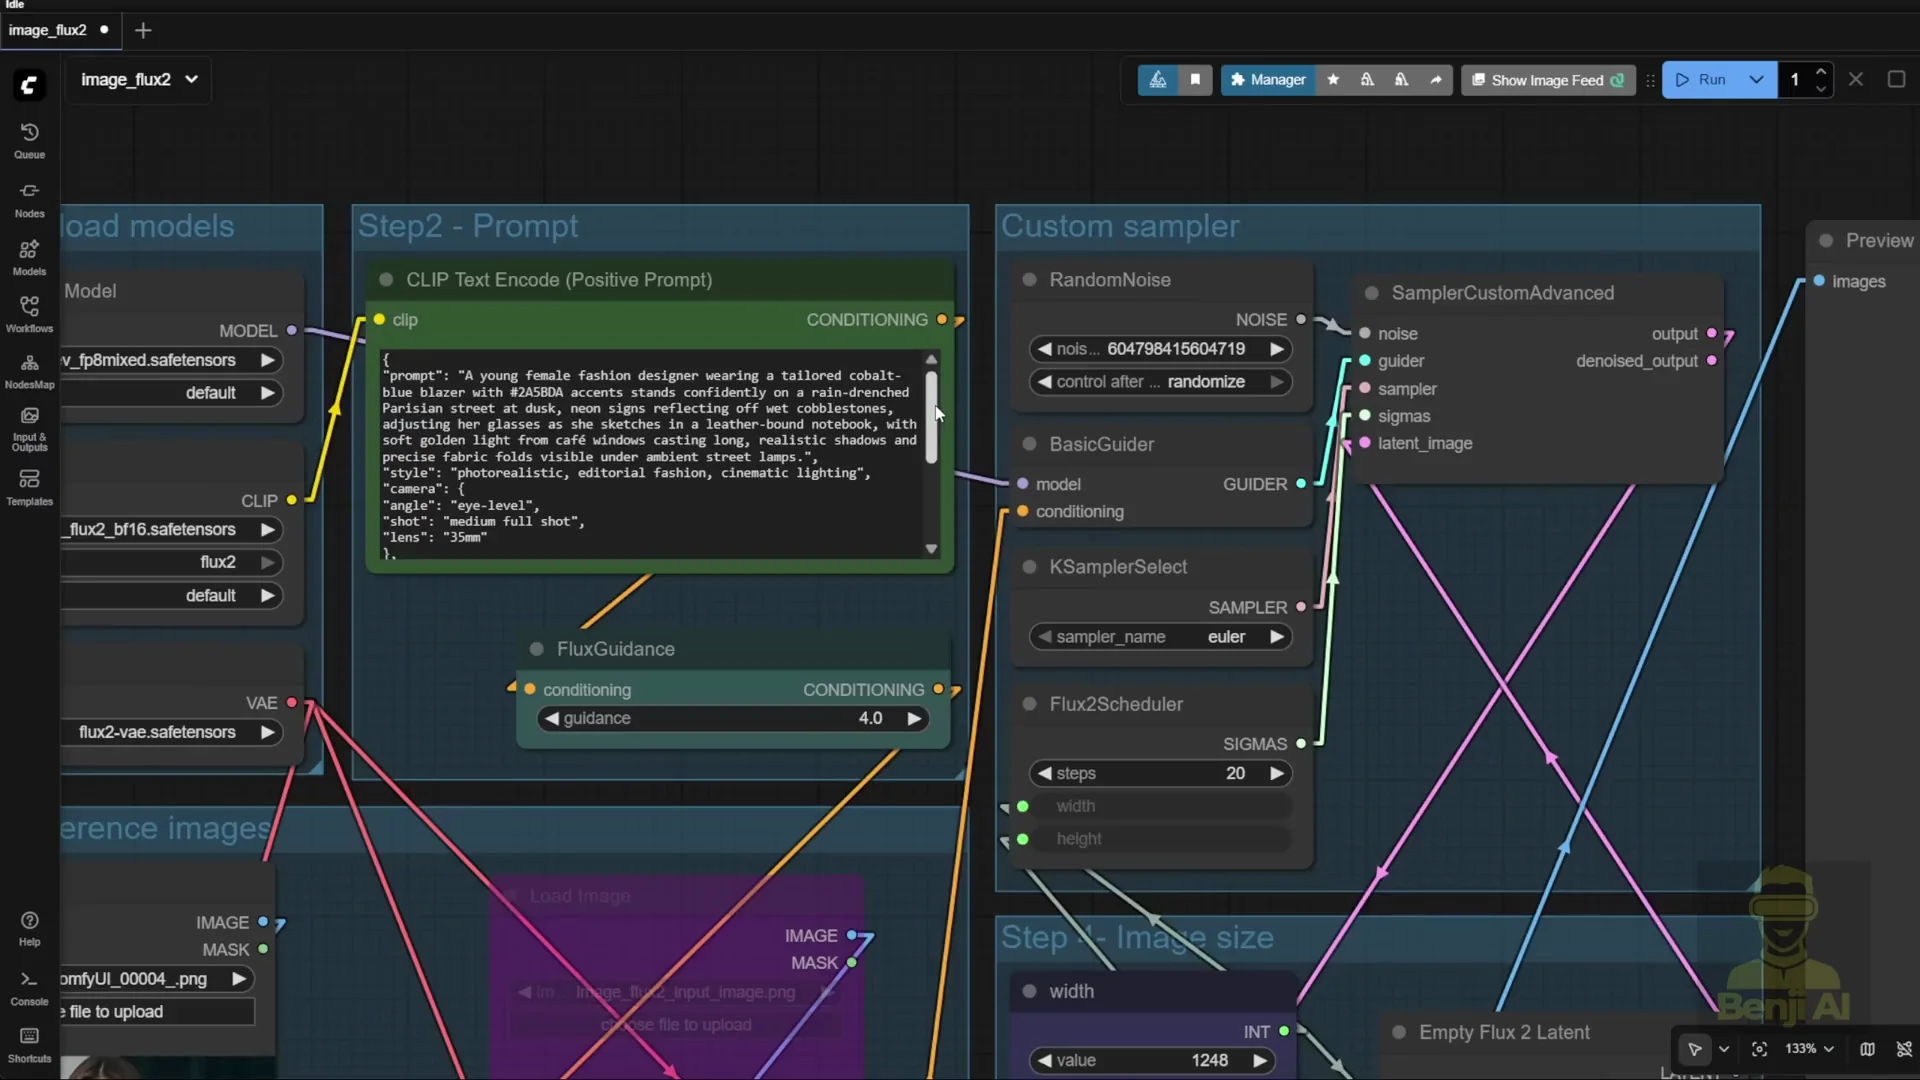
You also have a clip text encoder for the positive prompt. With Flux, you do not need a negative prompt. It is just an empty text box. If you add a negative prompt and connect it to the K Sampler or whatever sampler node you are using for flux guidance, that is fine. Since the Flux 1 release, it has been the same setup, including the custom sampler.
This part goes more in depth into how you combine sigma sampler and guider together in the custom sampler. The Flux 2uler is the new thing you need to run Flux 2.
Reference Images: Up To 10 In One Generation
The reference image section is like qwen image edit or Nano Banana. You can reference any existing image as an element in your new edited AI generated image.
You can input up to 10 reference images simultaneously in a single generation. By default, the workflow comes with two image containers you can use. Load your image, then use Image Scale To Total Pixels to align your images together. The VAE encodes this and connects the latent data to the reference latent.
Reference latent is new in recent image generation models. You can use reference latent and connect it through the conditioning, letting the pipeline know to use that latent data as a reference when your text prompt mentions it or specifies where to place those objects in your new generated image.
If you do not want to use a reference image, highlight that group and bypass it. If you do not need reference image two, click bypass. That way you only focus on image one. All the yellow conditioning lines are linked for all the reference latent nodes. If you bypass one, it ignores that image and moves forward to the sampler.
Flux 2 Is Structured JSON Prompts
Flux 2 now natively supports JSON structured prompts. I created some text prompts based on examples from the Flux official website. I used this format to ask an AI to generate 10 text prompts using the JSON structure. Flux 2 can even use HTML style color codes in prompts.
I tried one to see how it looks in an actual image. The prompt includes camera angles and lens types, plus color. It includes the color code and mood. Since the text prompt mentions a young female fashion designer, it uses that as a reference for the character.
VRAM Use And Color Control With JSON
Even when using FP8 models, VRAM use is about 60 something GB when running. That is because this setup loads Mistral and Flux 2 together. Roughly 30 something plus 30 something gigabytes adds up to about 60 something or even 70 gigabytes.
ComfyUI uses the reference character as the fashion designer. The prompt uses a very specific blue color code, and it is applied correctly. You can look up HTML color codes and try them.
I generated with the same text prompt but changed the color code to pink. Generation speed is not too slow, but VRAM requirements are large because the files are large. The output shows the color change. I also set it for the jacket and reran it. Changing the color via code gave exactly the color I wanted for the jacket. You can switch styles in the structured prompt.
Why The Structured Format Matters
Flux 2 combines image editing models with text to image and image to image models. The part I like most is native support for structured prompts in JSON.
Some other models like 1 2.2 and others claim to support it, but if you make the JSON prompt more complex, those models do not handle it well. In Flux 2, the structured prompt format is officially defined. You can get this format from the Black Forest Labs documentation in the Flux 2 prompt guide. It shows the JSON structure for image prompts, including the base schema.
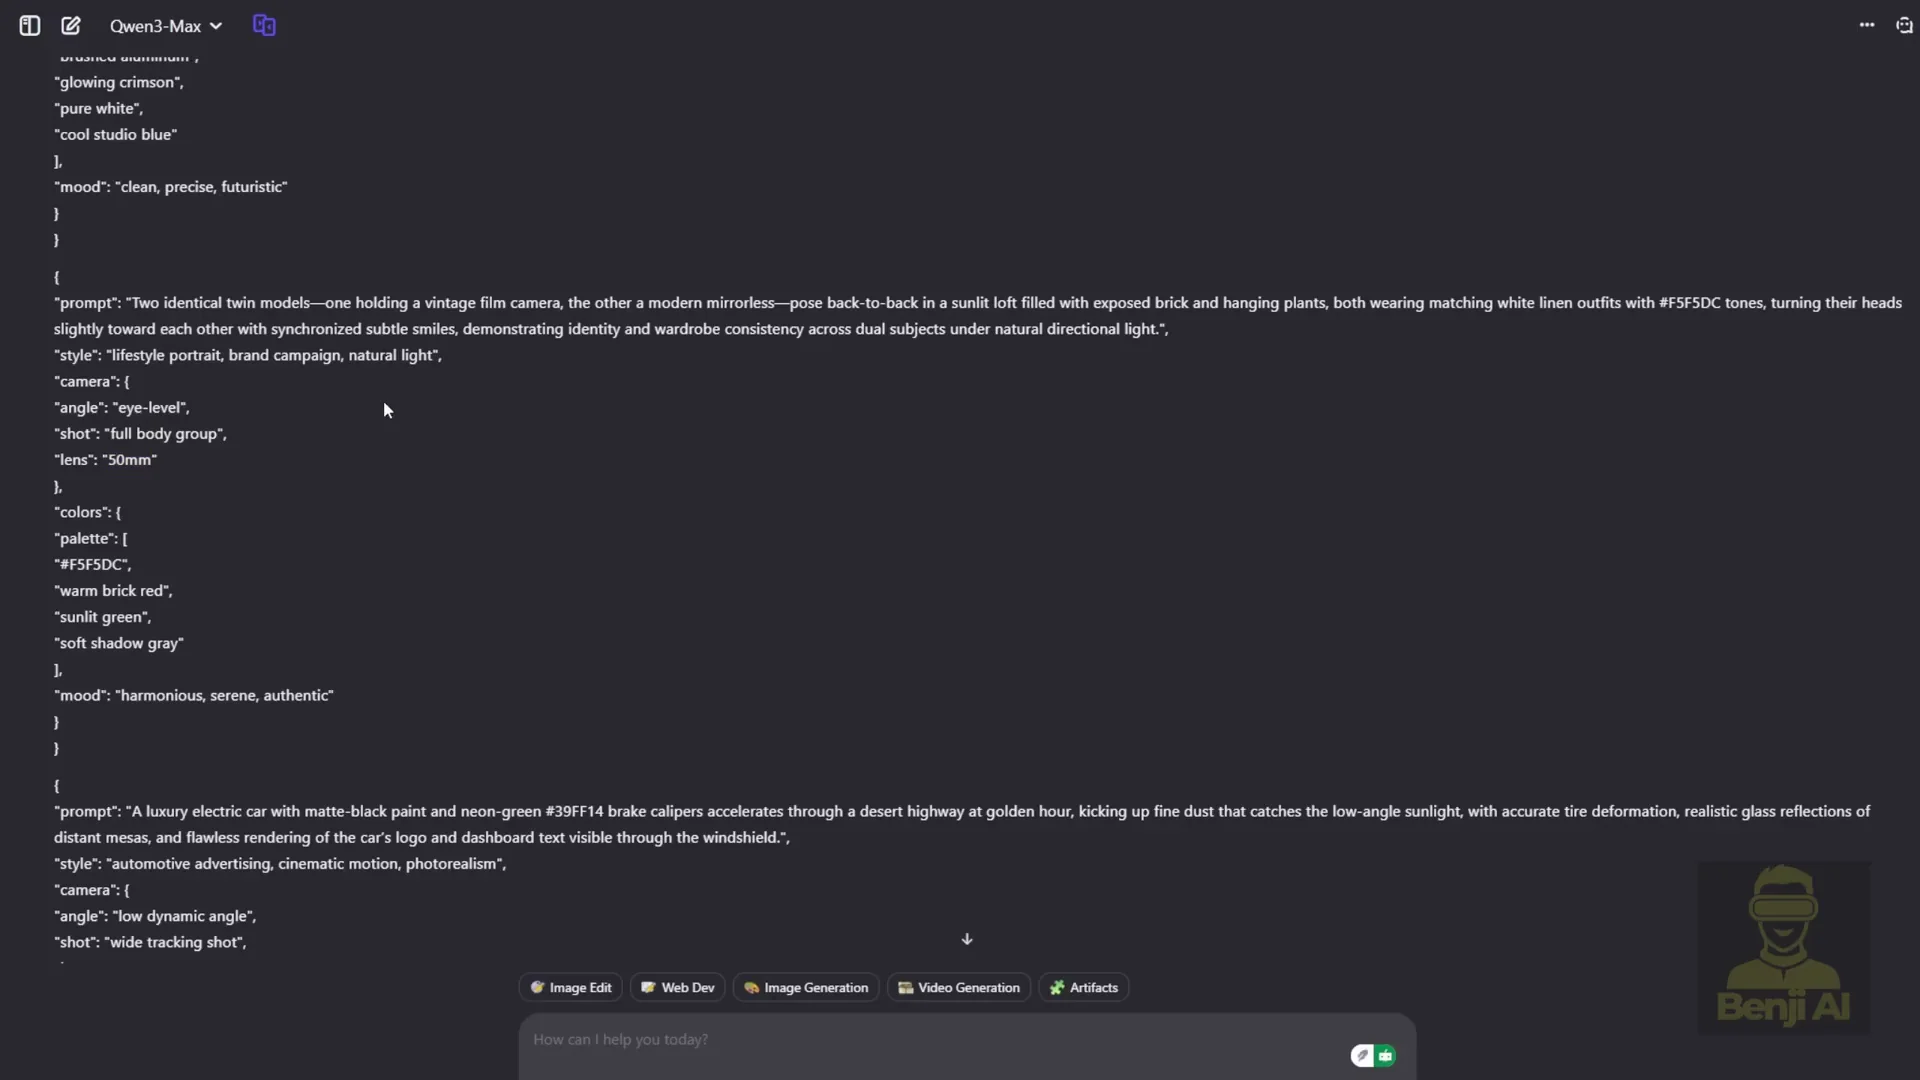
You describe the overall scene, background colors, and whatever you want. It shows examples. You can take those examples and feed them into a large language model. I used qwen 3 for this. I had input text prompts for image generation, and it converted them into structured JSON text prompts.
These prompts were made to test the new features in Flux 2. I gave the AI information about Flux 2 and asked it to create prompts that highlight those capabilities. All the text prompts test how well Flux 2 runs its new features.
Flux 2 Is Results From The Structured Prompts
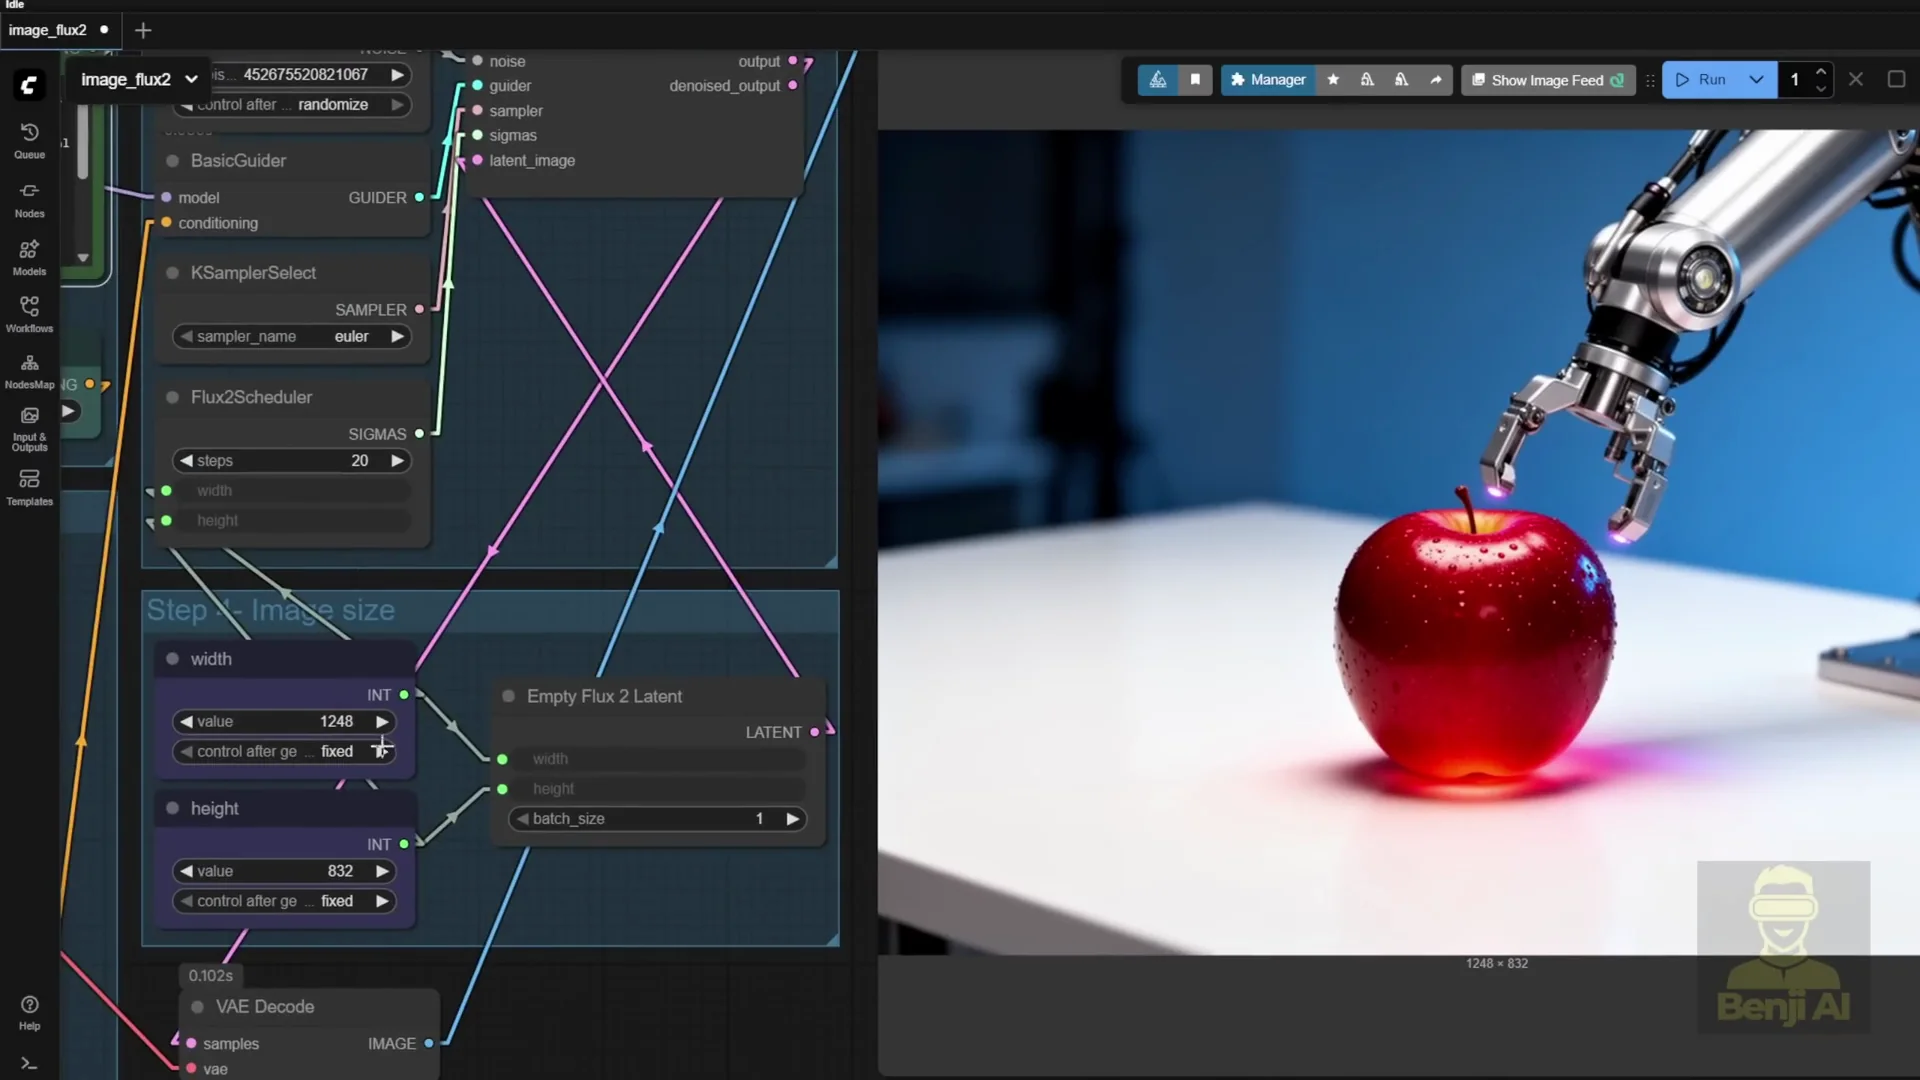
I tried another prompt that looked interesting. The result shows robotic arms trying to hold up an apple. The prompt describes a growing red apple. It looks like light is coming from the apple. The detail is good even using FP8 models. The native resolution is already large.
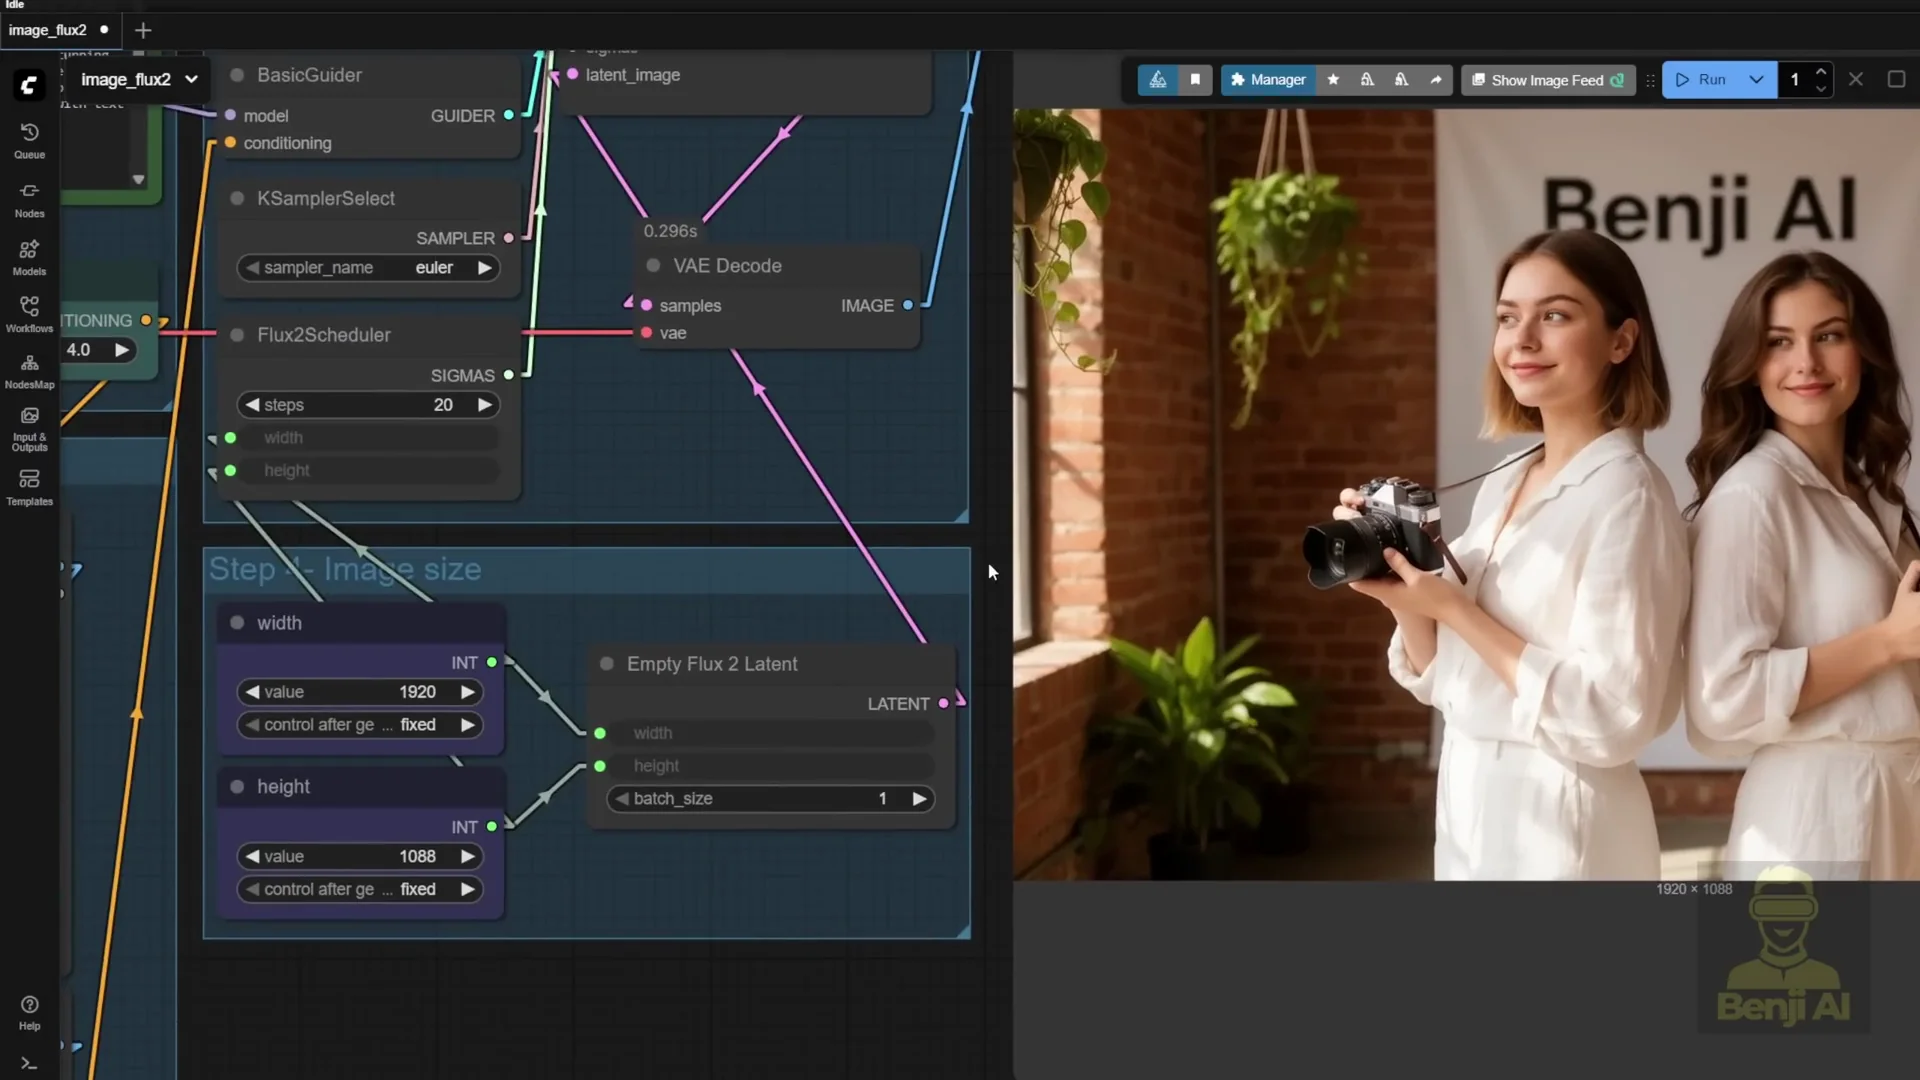
I tried full 1080p resolution. The next text prompt includes a banner. I tweaked it and generated. The result was two twin models holding a camera with a Benji AI banner in the background. The characters looked a certain way because I forgot to turn off the reference latent. It applied the reference character’s face to both people.
I then used two reference images for two characters to see how it would turn out. The text prompt says two identical twins, so they should look almost exactly the same. I tried two different faces to get more detail.
The second try used two reference images. Now I have two characters. They are not identical twins, but two different people holding the camera. The likeness works. Their faces look similar but with slight differences.
Prompt adherence is accurate. The prompt says young lady model one reference one holding a vintage camera and reference two mirroring the pose, posing back to back. That is exactly what the output shows. They are standing back to back as in the prompt. I added text at the end specifying the background has a banner with text Benji AI, and the banner appears.
I tried another text prompt. There are many, so I am not going through every one. I will attach the file so you can try it yourselves.
These structured JSON prompts are effective because you can pinpoint exactly which camera, which lens, and what kind of shot you want instead of cramming everything into one paragraph that may be hard for language models to interpret clearly.
With Flux 2 text prompts, you can get a strong image in one pass like this. If you have enough VRAM, go higher in resolution or upscale later.
If you need customizations to the workflow, we will mostly focus on LoRA models. You can train your own LoRA character models or style LoRAs to use with Flux image generation. That improves the image generation content.
Tuning Steps And Reference Likeness
I did a second try with the same text prompt and the two ladies as character references. I bumped the uler steps up by 30 more steps and lowered the resolution for practical generation. It gives more definition to the two characters. Both faces are clearly pulled from the reference images. It performs well in likeness when referencing.
Quality Gains Over Flux 1
Human anatomy is improved, especially hands and fingers. You can see knuckles on the back of the hand. Character aesthetics are better than Flux 1.
Object ratios have improved. The camera does not come out as an oversized vintage camera or a strange model. Proportions are correct, which helps overall object generation. Plants, indoor plants, and banners do not end up too big or too small as they sometimes did in Flux 1. The model produces better AI generated images.
The best part is that it is open source. You can download it locally and run it yourself. It is a great time to be in this space. So much good stuff has been dropping recently.
Step By Step: Run Flux 2 Is Natively In ComfyUI
Follow these steps in order.
- Get access on Hugging Face
- Visit the Flux 2 dev model page.
- Grant access and agree to the terms.
- Choose the right model files
- Diffusion model: Flux 2D dev FP8 Mix if you need reduced VRAM, or BF16 if you have enough VRAM.
- Text encoder: Mistral 3 small for Flux 2, FP8 or BF16 to match your choice above.
- VAE: Flux 2 VAE designed for Flux 2.
- Download file sizes to note
- Flux 2 dev model: about 64 GB in BF16 and about 35 GB in FP8 from the ComfyUI repo.
- FP8 versions reduce VRAM by about 40 percent compared to BF16.
- Place files into ComfyUI
- models - diffusion_models: diffusion model files.
- models - text_encoders: Mistral 3 Flux 2 text encoder files.
- models - vae: Flux 2 VAE files.
- Update ComfyUI to get the new nodes
- Use your Git setup and run gitpull origin master in the ComfyUI branch.
- Verify the Flux 2 text encoder option appears in ComfyUI.
- Ensure the Flux 2uler and Empty Flux 2 Latent Image nodes are present. If they are missing, update again.
- Load the Flux 2 FP8 workflow
- Open the provided FP8 workflow from the ComfyUI page.
- Confirm VRAM use matches your GPU capacity.
- The FP8 workflow typically uses around 30 something GB of VRAM for the model plus additional memory for the text encoder.
- Configure the workflow
- Load the diffusion model, text encoder, and VAE.
- Use the clip text encoder for the positive prompt.
- Leave the negative prompt empty unless you want to connect it to the sampler.
- Optional: Add reference images
- Use the provided reference image containers.
- Align images with Image Scale To Total Pixels.
- Let the VAE encode to reference latent and connect through conditioning.
- Bypass any reference image groups you do not need.
- Use JSON structured prompts
- Follow the prompt schema from the Flux 2 prompt guide.
- Include style, camera, lens, mood, and hex color codes as needed.
- Generate and refine. Adjust resolution and steps as your VRAM allows.
Quick Reference: Flux 2 Is Components And Notes
- Diffusion model
- Flux 2D dev FP8 Mix or BF16.
- FP8 reduces VRAM by about 40 percent.
- Text encoder
- Mistral 3 small for Flux 2, FP8 or BF16.
- Better prompt interpretation than older clip based encoders like T5.
- VAE
- Flux 2 VAE designed specifically for Flux 2.
- Nodes needed in ComfyUI
- Flux 2uler.
- Empty Flux 2 Latent Image.
- Reference images
- Up to 10 images.
- Encoded to reference latent.
- Bypass any group you do not need.
- JSON prompts
- Official schema in the Flux 2 prompt guide.
- Supports detailed structure and hex color codes.
- Resolution
- Native 4 megapixel generation.
- Strong results at 1080p and above.
- VRAM expectations
- FP8 model files around 35 GB.
- Overall runtime VRAM can reach 60 to 70 GB with model and text encoder combined.
Final Notes
Flux 2 improves image quality, prompt adherence, text rendering, and scene coherence while adding native support for structured JSON prompts and multi image referencing up to 10 images. The new Flux 2 VAE and the Mistral 3 small text encoder contribute to better results than previous setups.
With the FP8 models from the ComfyUI repo, Flux 2 becomes practical to run on high end consumer GPUs. Once you place the files in the correct ComfyUI folders and update to the latest build, the new nodes make Flux 2 run natively. The workflow supports reference latent conditioning, optional negative prompts, and JSON structured prompts that control style, camera, lens, mood, and color precisely.
Image detail, hands, object proportions, and overall aesthetics are improved over Flux 1. The model can generate at 4 megapixels natively and adheres closely to prompts, including text in scenes and banners. You can work from a single pass or upscale, and you can further customize results by training LoRA character and style models for Flux 2.
Subscribe to our newsletter
Get the latest updates and articles directly in your inbox.

Related Posts

8 Best Claude Code Plugins in 2026 (You Need to Know)
8 Best Claude Code Plugins in 2026 (You Need to Know)

7 Best Claude Code Skills (You Need to Know)
7 Best Claude Code Skills (You Need to Know)

Claude Code Desktop IDE Features (You Need to Know)
Claude Code Desktop IDE Features (You Need to Know)