
Table Of Content
- DreamTalk: Complete Step-by-Step Installation Guide
- Introduction to DreamTalk Installation
- What is DreamTalk?
- Overview of Requirements
- Key Features of DreamTalk
- Step 1: Download DreamTalk from GitHub
- Steps:
- Step 2: Open Anaconda and Navigate to the Extracted Folder
- Steps:
- Step 3: Create a Python Environment
- Steps:
- Step 4: Activate the Environment
- Steps:
- Step 5: Install Required Packages
- Steps:
- Step 6: Install CUDA or CPU Version of PyTorch
- Steps for CPU Setup:
- Step 7: Install FFmpeg
- Steps:
- Step 8: Install Additional Modules
- Steps:
- Step 9: Download Checkpoints
- Steps:
- Step 10: Install Sound File
- Steps:
- Step 11: Prepare Your Audio and Picture Files
- Folder Structure:
- Step 12: Update the Main Command
- Step 13: Run the Main Command
- Step 14: Locate the Output File
- Final Folder Structure
- Complete Command Flow
- Navigate to folder
- Create environment
- Activate environment
- Install requirements
- Install PyTorch for CPU
- Install FFmpeg
- Install additional modules
- Run main command
- Troubleshooting Tips
- Frequently Asked Questions (FAQs)
- Q1: Can DreamTalk run without a GPU?
- Q2: Where should I put my audio and image files?
- Q3: Where can I find the output after processing?
- Q4: What version of Python is required?
- Q5: What should I do if I don’t have a GPU?
- Conclusion

DreamTalk AI Talking Avatar
Table Of Content
- DreamTalk: Complete Step-by-Step Installation Guide
- Introduction to DreamTalk Installation
- What is DreamTalk?
- Overview of Requirements
- Key Features of DreamTalk
- Step 1: Download DreamTalk from GitHub
- Steps:
- Step 2: Open Anaconda and Navigate to the Extracted Folder
- Steps:
- Step 3: Create a Python Environment
- Steps:
- Step 4: Activate the Environment
- Steps:
- Step 5: Install Required Packages
- Steps:
- Step 6: Install CUDA or CPU Version of PyTorch
- Steps for CPU Setup:
- Step 7: Install FFmpeg
- Steps:
- Step 8: Install Additional Modules
- Steps:
- Step 9: Download Checkpoints
- Steps:
- Step 10: Install Sound File
- Steps:
- Step 11: Prepare Your Audio and Picture Files
- Folder Structure:
- Step 12: Update the Main Command
- Step 13: Run the Main Command
- Step 14: Locate the Output File
- Final Folder Structure
- Complete Command Flow
- Navigate to folder
- Create environment
- Activate environment
- Install requirements
- Install PyTorch for CPU
- Install FFmpeg
- Install additional modules
- Run main command
- Troubleshooting Tips
- Frequently Asked Questions (FAQs)
- Q1: Can DreamTalk run without a GPU?
- Q2: Where should I put my audio and image files?
- Q3: Where can I find the output after processing?
- Q4: What version of Python is required?
- Q5: What should I do if I don’t have a GPU?
- Conclusion
DreamTalk: Complete Step-by-Step Installation Guide
DreamTalk is a powerful tool that allows you to run it directly on your computer without needing a GPU. In fact, it can work faster on a CPU as well. In this guide, I will walk you through every step to download, install, and run DreamTalk on your system.
I will include all necessary instructions step-by-step so that you can set it up smoothly and get the desired output without missing any detail.
Introduction to DreamTalk Installation
DreamTalk is now accessible on your computer, even if you don’t have a GPU. This means that anyone can install and use it effectively with just a CPU.
Here’s a quick overview of what we’ll do:
- Download the main files from GitHub.
- Extract and set up the environment using Anaconda.
- Install all required dependencies and modules.
- Configure files and paths for audio and images.
- Run the main command to generate the final result.
What is DreamTalk?
DreamTalk is a software tool that allows you to create talking animations by combining an audio file with a static image. It processes both the voice input and the image, generating a result where the image moves and speaks according to the provided audio.

The best part is that it works even without a GPU, which means you can run it on almost any modern computer, making it accessible to a wider audience.
Overview of Requirements
Below is a quick summary of what you need before starting the installation:
| Requirement | Details |
|---|---|
| Python Version | Python 3.7 |
| Software | Anaconda |
| Extra Libraries | ffmpeg, PyTorch, CUDA (if you have GPU) |
| Input Files | Audio file and image file |
| DreamTalk Checkpoint | Download from the link provided in the guide |
Key Features of DreamTalk
- Runs smoothly without requiring a GPU.
- Compatible with CPU-only systems.
- Allows you to combine audio with an image to create a talking video.
- Works entirely offline once installed.
- Output files are automatically stored in a dedicated results folder.
Step 1: Download DreamTalk from GitHub
To get started, you first need to download the DreamTalk files to your computer.
Steps:
- Open the GitHub page for DreamTalk by clicking the link provided.
- Once the page loads, click on "Code" and download the ZIP file to your computer.
- After downloading, extract the ZIP file to a folder where you want to install DreamTalk.
Step 2: Open Anaconda and Navigate to the Extracted Folder
We’ll use Anaconda to run commands and set up the environment.
Steps:
- Open Anaconda as Administrator.
- Navigate to the folder where you extracted the DreamTalk files using the
cdcommand.
Example:
cd path_to_extracted_folderStep 3: Create a Python Environment
DreamTalk works with Python 3.7, so you need to create a new environment specifically for it.
Steps:
- Go to the GitHub main page and copy the environment creation code.
- Paste it into Anaconda to create a new environment.
Example:
conda create -n dreamtalk python=3.7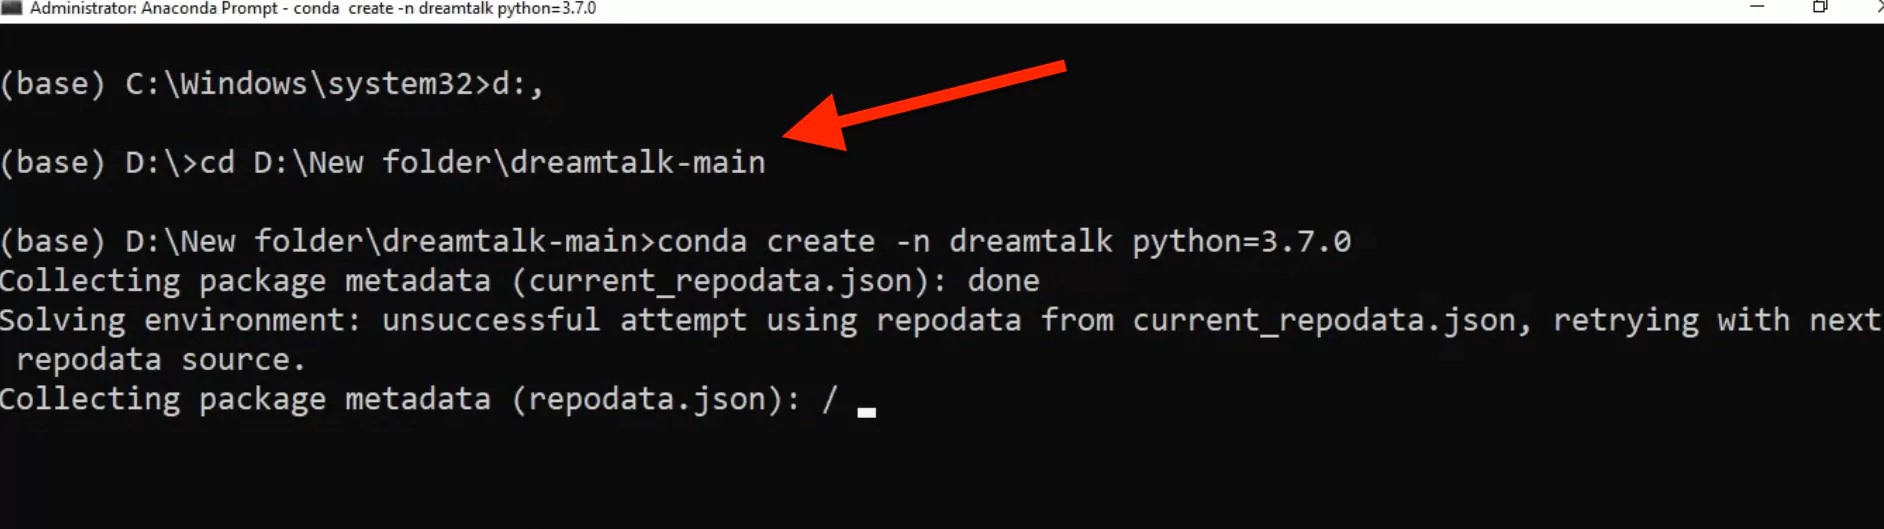
Step 4: Activate the Environment
Once the environment is created, it must be activated before installing other dependencies.
Steps:
- Copy the activation command from the GitHub main page.
- Paste it into Anaconda.
Example:
conda activate dreamtalkStep 5: Install Required Packages
DreamTalk requires several dependencies to run smoothly.
Steps:
- Run the requirements installation command from the GitHub page.
- Paste it into Anaconda to install all the necessary libraries.
Example:
pip install -r requirements.txtStep 6: Install CUDA or CPU Version of PyTorch
DreamTalk supports both GPU and CPU. If you don’t have a GPU, you’ll need the CPU version of PyTorch.
Steps for CPU Setup:
- Go to the PyTorch website.
- Copy the installation command for CPU.
- Paste it into Anaconda and run it.
Note: This process may take some time, depending on your internet speed and system performance.
Step 7: Install FFmpeg
DreamTalk requires FFmpeg for audio and video processing.
Steps:
- Copy the FFmpeg installation command from the GitHub page.
- Paste it into Anaconda and execute it.
Example:
conda install ffmpegStep 8: Install Additional Modules
There are three other essential modules you need to install before running DreamTalk.
Steps:
- Go to the GitHub main page.
- Copy the commands for these three modules.
- Paste each command one by one into Anaconda.
Step 9: Download Checkpoints
DreamTalk requires checkpoints for processing.
Steps:
- Download the checkpoint file from the provided link.
- Paste the downloaded file inside the main folder of DreamTalk.
Step 10: Install Sound File
Before running the main code, you must install a sound file.
Steps:
- Install the sound file package using the provided command.
- Run the command in Anaconda.
Step 11: Prepare Your Audio and Picture Files
To generate your result, DreamTalk needs two files:
- Audio file – Your input voice file.
- Image file – The picture you want to animate.
Folder Structure:
Go to the main folder and locate the data folder. Inside it, you will find subfolders:
audio– Place your audio file here.source_image– Place your picture here.
Step 12: Update the Main Command
You need to replace placeholders in the main command with your actual file names.
- Replace the audio path with your audio file name.
- Replace the picture path with your picture file name.
Example:
python main.py --audio data/audio/your_audio.mp3 --image data/source_image/your_image.jpgStep 13: Run the Main Command
Now that everything is ready, run the main command to generate the output.
Note:
- The first run may take several minutes as it will download additional files.
- Even on CPU, it will work, but initial setup time will be longer.
Step 14: Locate the Output File
Once the process is complete, the result file will be available inside the result folder.
You can open this folder to check and use your generated file.
Final Folder Structure
Here’s how your DreamTalk folder should look after proper setup:
| Folder Name | Purpose |
|---|---|
data/audio | Stores input audio files |
data/source_image | Stores input images |
result | Stores generated output files |
checkpoints | Stores downloaded checkpoint files |
Complete Command Flow
Here’s a quick summary of the commands you’ll run in Anaconda:
# Navigate to folder
cd path_to_extracted_folder

# Create environment
conda create -n dreamtalk python=3.7

# Activate environment
conda activate dreamtalk

# Install requirements
pip install -r requirements.txt

# Install PyTorch for CPU
pip install torch torchvision torchaudio --index-url https://download.pytorch.org/whl/cpu

# Install FFmpeg
conda install ffmpeg

# Install additional modules
pip install module1
pip install module2
pip install module3

# Run main command
python main.py --audio data/audio/your_audio.mp3 --image data/source_image/your_image.jpg
Troubleshooting Tips
-
If the tool runs slowly:
- This is normal when using only a CPU. Be patient during the first run.
-
If you encounter missing module errors:
- Double-check that you installed all dependencies correctly, especially the three extra modules mentioned in Step 9.
-
If your files are not detected:
- Ensure you placed your audio and image files in the correct subfolders (
audioandsource_image).
- Ensure you placed your audio and image files in the correct subfolders (
Frequently Asked Questions (FAQs)
Q1: Can DreamTalk run without a GPU?
Yes, DreamTalk works on CPU-only systems. It may be slightly slower than GPU processing, but it is fully functional.
Q2: Where should I put my audio and image files?
- Audio files go inside the
audiofolder located in thedatadirectory. - Image files go inside the
source_imagefolder within thedatadirectory.
Q3: Where can I find the output after processing?
The generated video file will be saved in the result folder.
Q4: What version of Python is required?
You need Python 3.7 to run DreamTalk successfully.
Q5: What should I do if I don’t have a GPU?
Install the CPU version of PyTorch instead of CUDA. Instructions are available on the PyTorch website.
Conclusion
By following this step-by-step guide, you can successfully install and run DreamTalk on your computer, even without a GPU. The process involves:
- Downloading and extracting files.
- Setting up a Python environment using Anaconda.
- Installing all required dependencies and modules.
- Organizing audio and image files in the correct folder structure.
- Running the main command to generate your desired output.
Once completed, you’ll find your generated files inside the result folder, ready to use.
Subscribe to our newsletter
Get the latest updates and articles directly in your inbox.

Related Posts

8 Best Claude Code Plugins in 2026 (You Need to Know)
8 Best Claude Code Plugins in 2026 (You Need to Know)

7 Best Claude Code Skills (You Need to Know)
7 Best Claude Code Skills (You Need to Know)

Claude Code Desktop IDE Features (You Need to Know)
Claude Code Desktop IDE Features (You Need to Know)