
Table Of Content
- USO: AI Image Generation by UXO Team at Bytedance
- What is USO?
- An Overview of USO
- Key Features of USO
- How to Use USO: A Step-by-Step Guide
- Step 1: Requirements and Installation
- Step 2: Download the Model Checkpoints
- Step 3: Running Inference (Generating Images)
- Step 4: Using the Web Demo (Gradio)
- Tips for Best Results
- Frequently Asked Questions (FAQs)
- Community Reaction and Feedback
- Conclusion

USO: AI Image Generation by UXO Team at Bytedance
Table Of Content
- USO: AI Image Generation by UXO Team at Bytedance
- What is USO?
- An Overview of USO
- Key Features of USO
- How to Use USO: A Step-by-Step Guide
- Step 1: Requirements and Installation
- Step 2: Download the Model Checkpoints
- Step 3: Running Inference (Generating Images)
- Step 4: Using the Web Demo (Gradio)
- Tips for Best Results
- Frequently Asked Questions (FAQs)
- Community Reaction and Feedback
- Conclusion
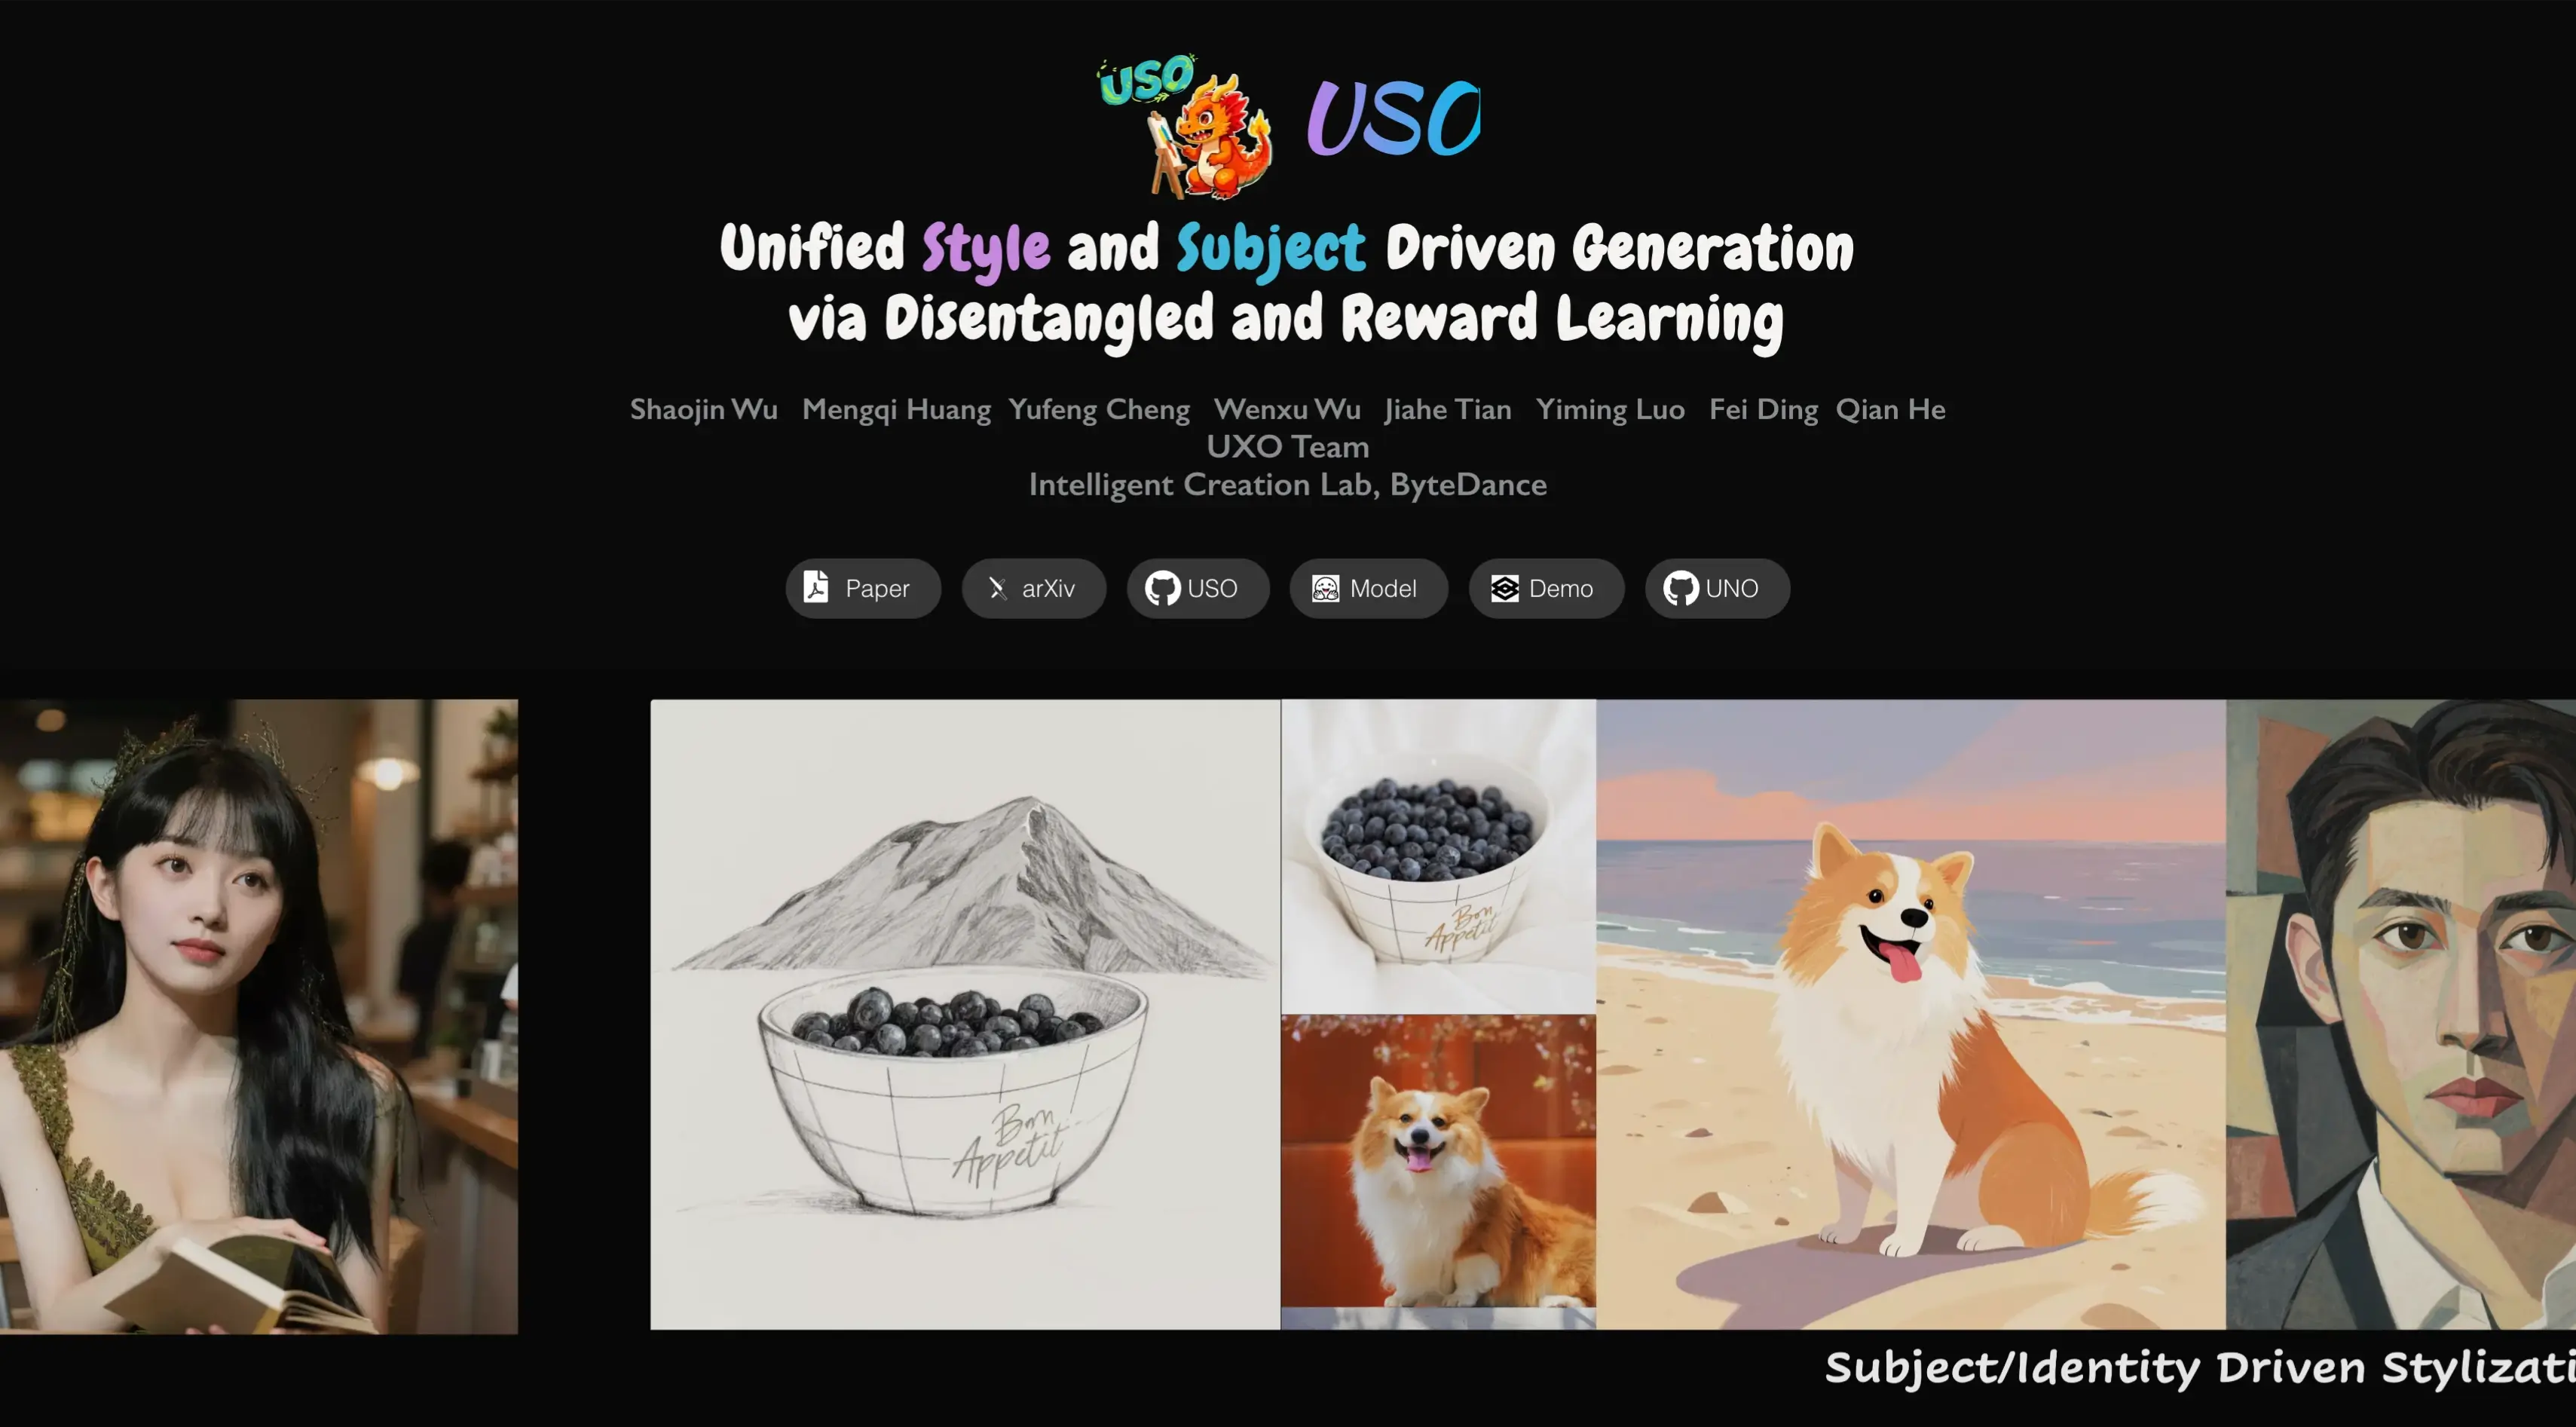
USO: AI Image Generation by UXO Team at Bytedance
I'm excited to share with you a powerful new tool in the world of AI image generation. It's called USO, which stands for Unified Framework for Style-driven and Subject-driven Generation. It was created by the UXO Team at Bytedance, and they have made the entire project open-source. In this article, I will walk you through what USO is, how it works, and how you can start using it yourself.
What is USO?
USO is a new model designed to handle two important tasks in image generation: style-driven generation and subject-driven generation. Usually, these are treated as two separate jobs. Style-driven generation focuses on making an image look like it has a certain artistic style, while subject-driven generation makes sure a specific subject, like a person or an object, looks consistent across different images.
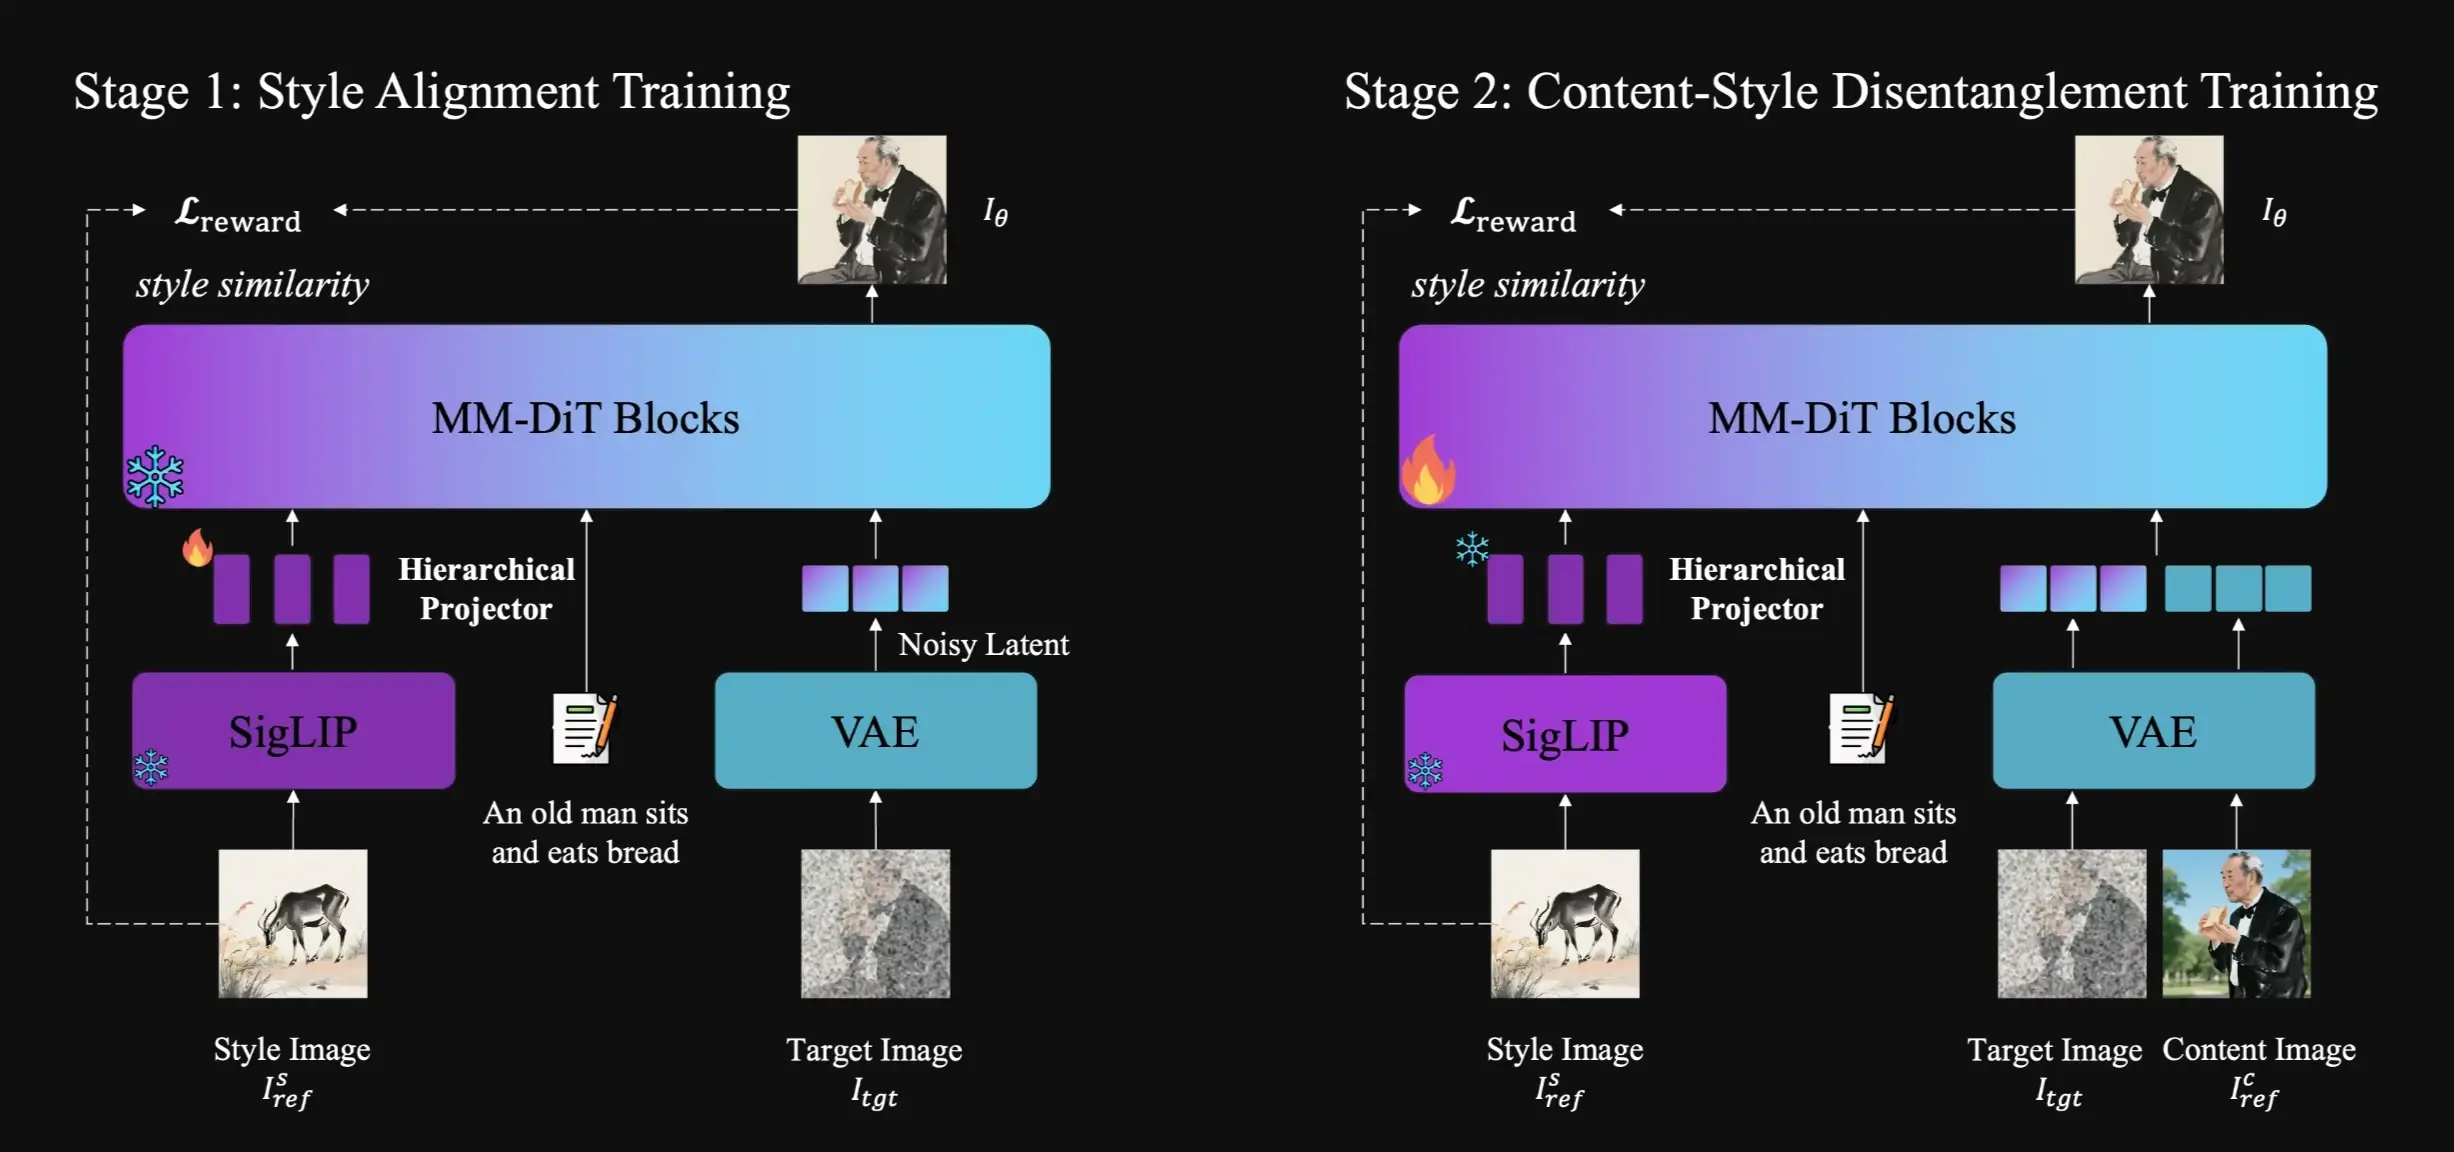
The team behind USO argued that these two tasks don't have to be separate. They can be combined into one framework because both are really about separating "content" from "style" and then putting them back together in a new way. This is an idea that has been explored before in style-driven research, but USO brings it all together.
To make this happen, the team did three main things:
- They built a large collection of data. This data includes triplets: a content image, a style image, and the final image that combines them.
- They created a learning method that pulls apart content and style. This method uses two goals: one to align style features and another to separate content from style.
- They added a reward system to help the model learn to perform even better.
In simple terms, USO lets you take a subject from one image and place it into a new scene, all while applying a specific artistic style from another image. It's a very flexible tool for creating new images.
An Overview of USO
Here is a quick summary of what USO offers:
| Aspect | Description |
|---|---|
| Full Name | Unified Framework for Style-driven and Subject-driven Generation |
| Developed By | UXO Team, Bytedance |
| Core Idea | Unifies subject consistency and style transfer into a single model |
| Base Model | Built upon FLUX.1-dev |
| Training Method | Uses a special LoRA (Low-Rank Adaptation) training approach |
| Model Size | The additional model files are about 500 MB |
| Key Strength | Excels at combining a specific subject with a specific style |
| Availability | Fully open-source on GitHub |
Key Features of USO
USO comes with several strong features that make it stand out.
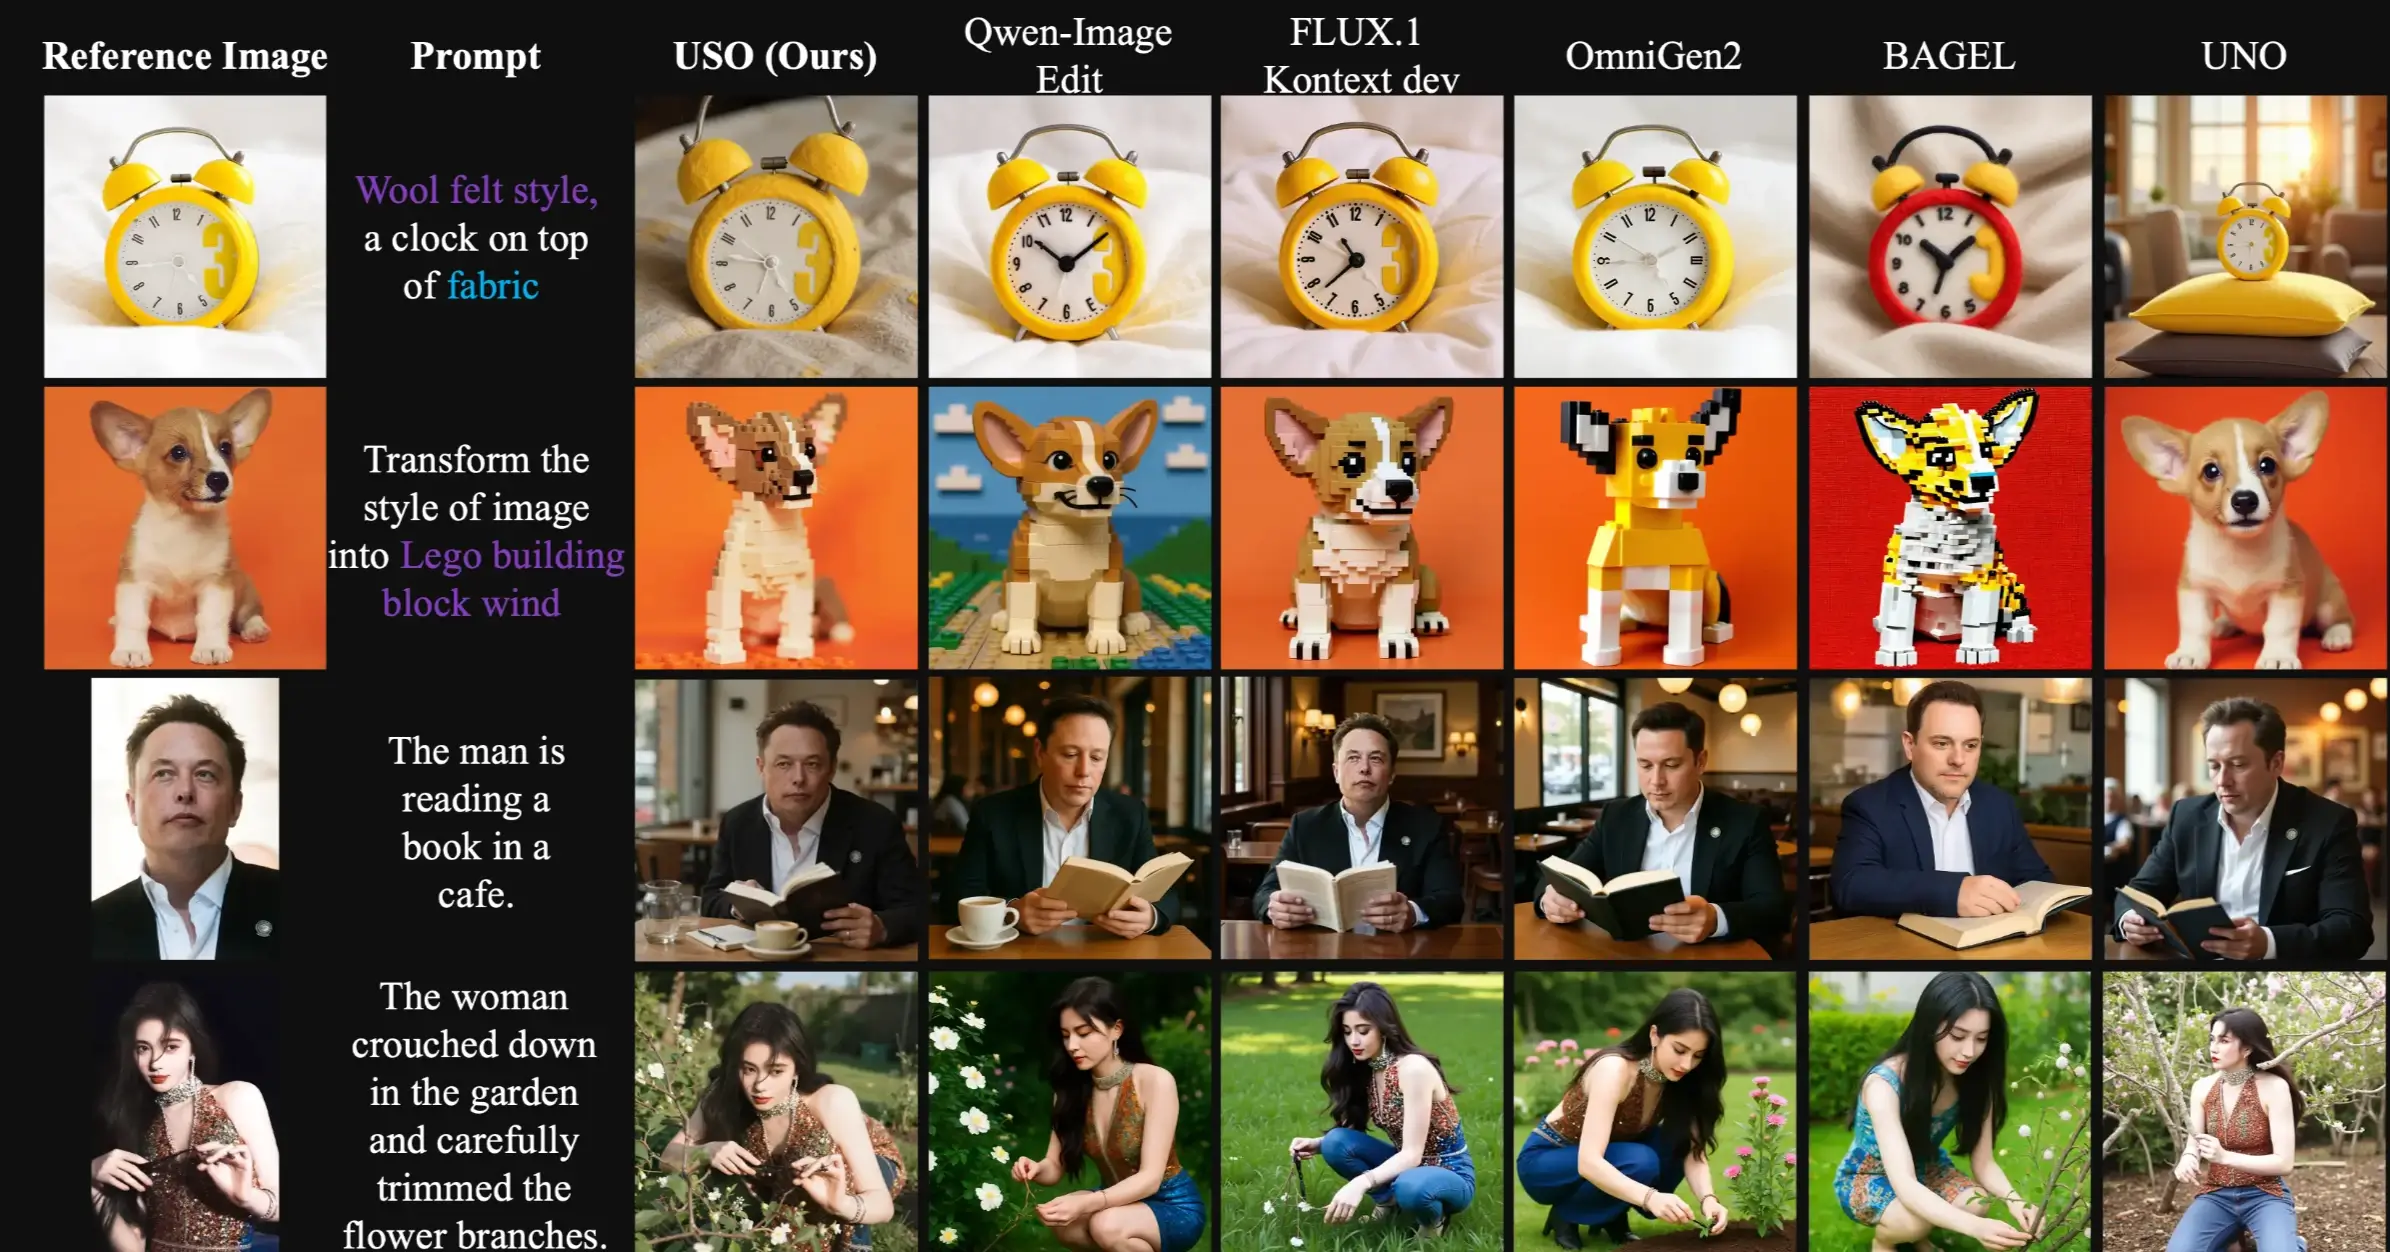
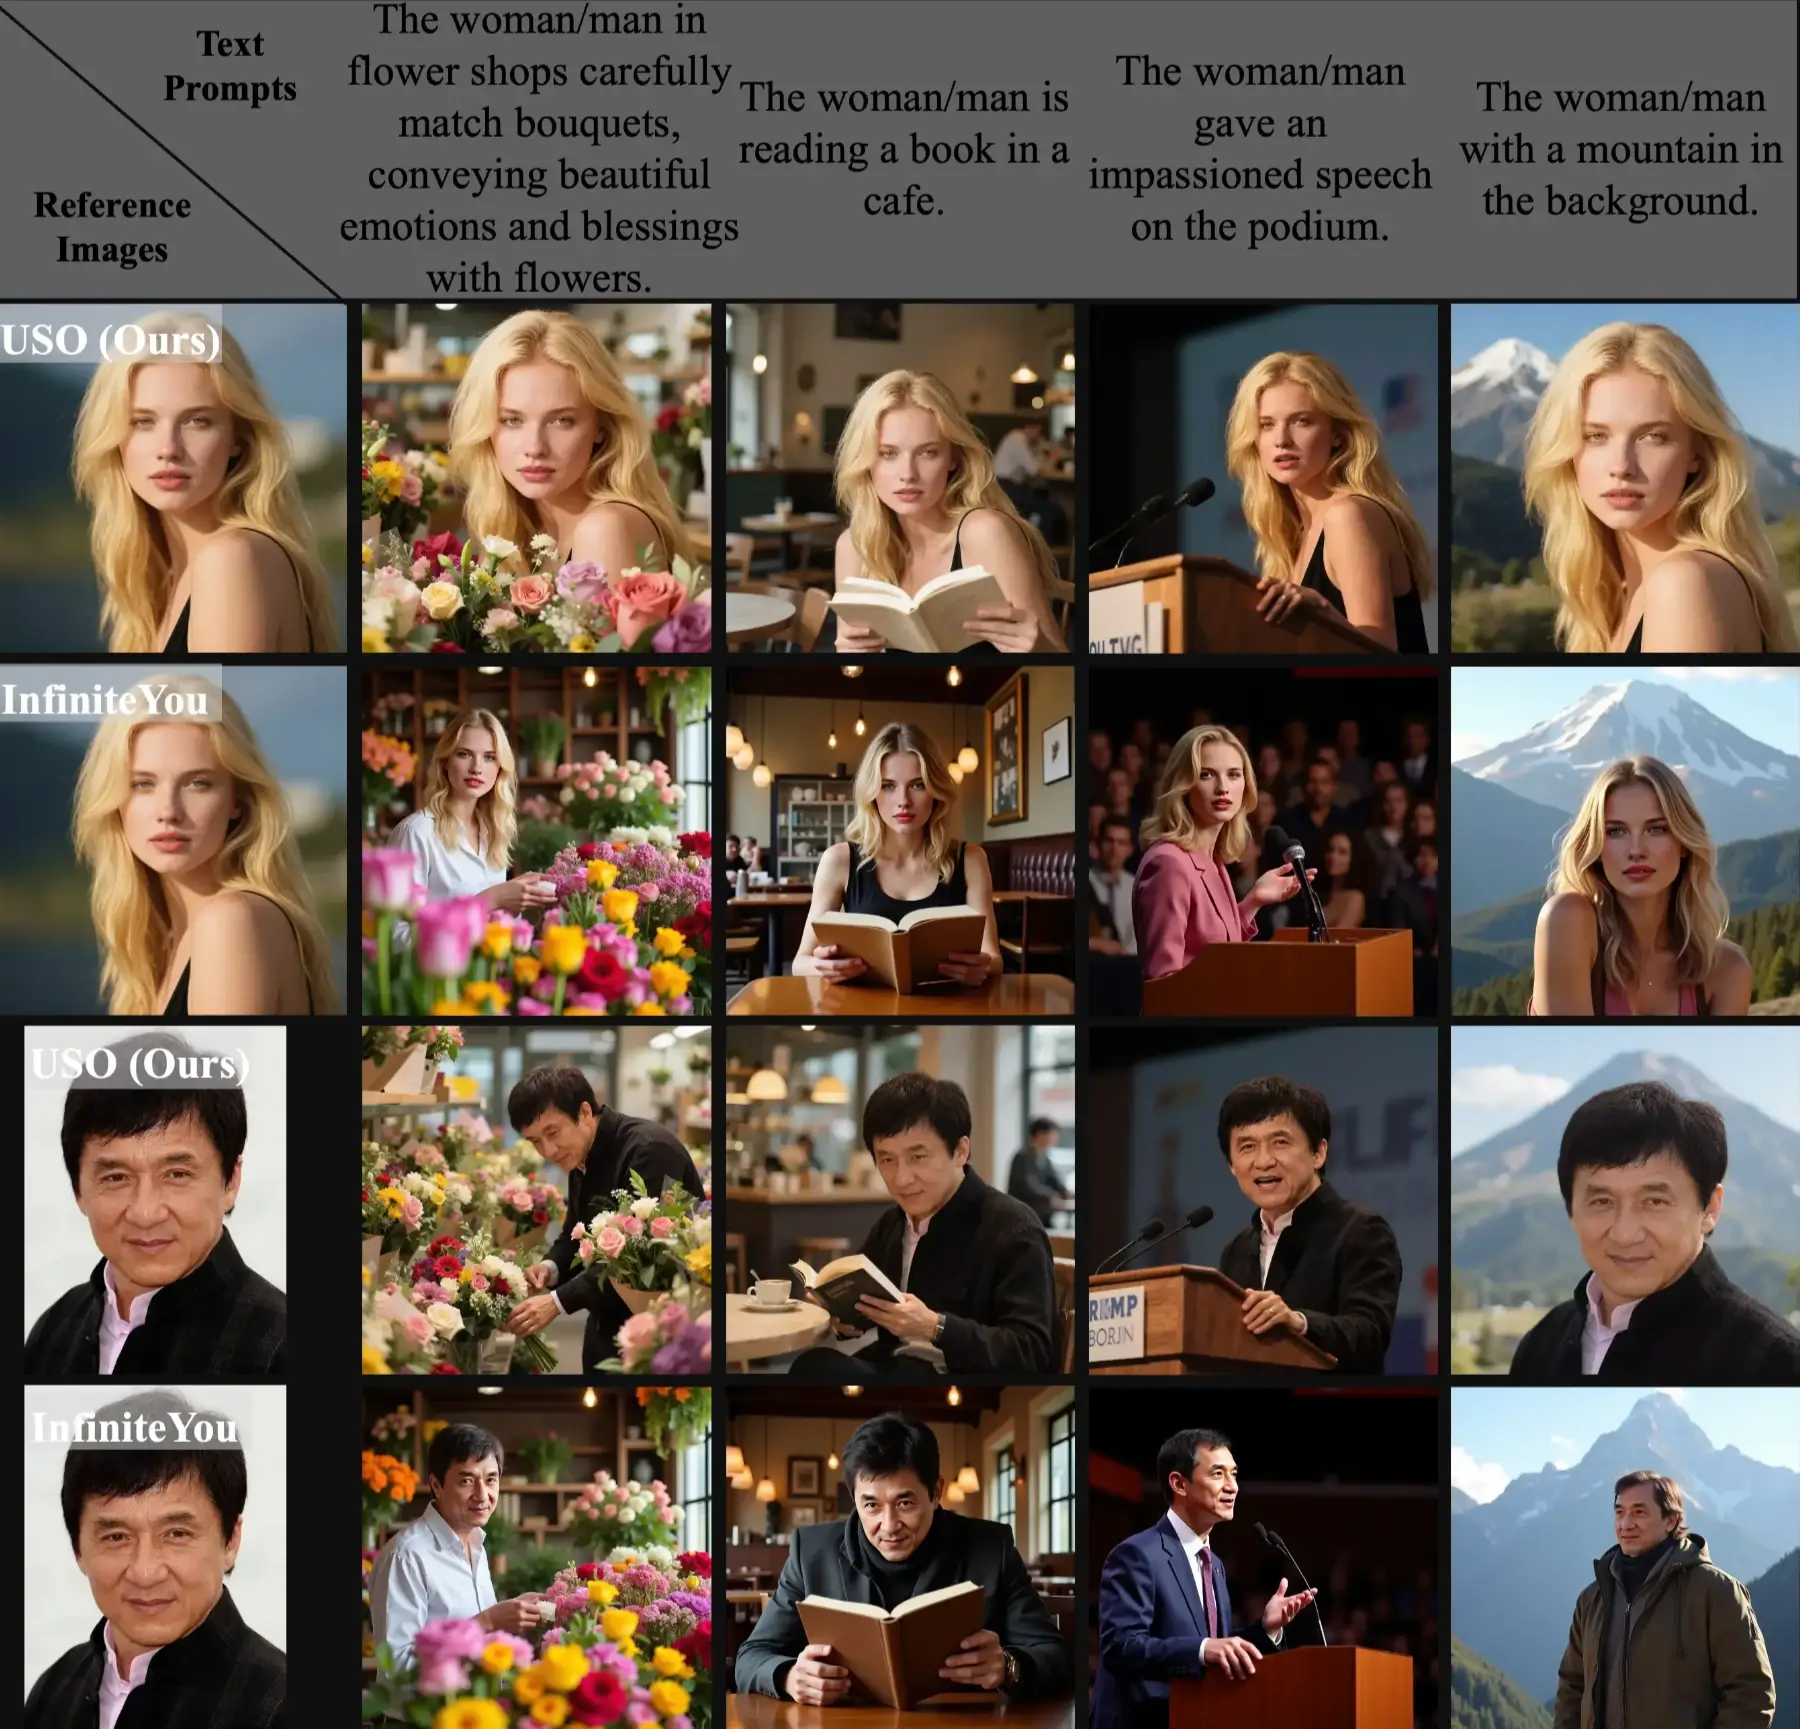
1. Unified Generation Framework USO does not force you to choose between making a subject look right or making a style look right. It handles both at the same time. You can give it a subject image and a style image, and it will create a new image that keeps the subject recognizable while adopting the new style.
2. High-Quality Output The model is good at producing images with high levels of detail, especially in skin textures for portraits. It works best when you use a close-up half-body image for a half-body prompt, and a full-body image when the pose needs to change.
3. Support for Multiple Styles You are not limited to just one style image. USO can understand and blend together multiple style references. This lets you create even more unique and complex artistic results.
4. Open-Source The entire project is available for anyone to use, modify, and build upon. This encourages collaboration and lets everyone experiment with this technology.
How to Use USO: A Step-by-Step Guide
Let's get you started with using USO on your own computer. I will guide you through the setup process and show you how to run it.
Step 1: Requirements and Installation
First, you need to set up your computer environment.
-
Create a Virtual Environment: It's a good practice to isolate project dependencies. You can use
venvor Conda.- Using
venv:python -m venv uso_env source uso_env/bin/activate - Using Conda:
conda create -n uso_env python=3.10 -y
conda activate uso_env
- Using
-
Install PyTorch: USO needs a specific version of PyTorch. Install it with this command:
pip install torch==2.4.0 torchvision==0.19.0 --index-url https://download.pytorch.org/whl/cu124 -
Install Other Requirements: Next, install the remaining Python packages the project needs.
pip install -r requirements.txt
Step 2: Download the Model Checkpoints
The model weights are stored on Hugging Face. You need a token to download them.
-
Set Up Your Environment File: Copy the example environment file and then add your token to it.
cp example.env .envNow, open the newly created
.envfile in a text editor. Find the line that saysHF_TOKEN=and change it to include your actual Hugging Face token:HF_TOKEN=your_huggingface_token_here -
Run the Download Script: Use the provided script to get the model weights. You can open the
./weights/downloader.pyfile and comment out any weights you don't need to save space and time.pip install huggingface_hub python ./weights/downloader.py
Step 3: Running Inference (Generating Images)
Now for the fun part: creating images. You use the inference.py script with different commands depending on what you want to do.
Important Note: The first image path you provide is for the subject (content). The images that follow are for style.
-
For Subject-Driven Generation: This is for placing a specific subject into a new scene. Use natural language in your prompt.
python inference.py --prompt "The man in flower shops carefully match bouquets, conveying beautiful emotions and blessings with flowers." --image_paths "assets/gradio_examples/identity1.jpg" --width 1024 --height 1024 -
For Style-Driven Generation: This is for applying a style to a brand new image. Keep the first image path empty.
python inference.py --prompt "A cat sleeping on a chair." --image_paths "" "assets/gradio_examples/style1.webp" --width 1024 --height 1024 -
For Style-Subject Driven Generation: This combines both a subject and a style. You can also leave the prompt empty if you want to keep the original layout and only change the style.
python inference.py --prompt "The woman gave an impassioned speech on the podium." --image_paths "assets/gradio_examples/identity2.webp" "assets/gradio_examples/style2.webp" --width 1024 --height 1024 -
For Multi-Style Generation: Blend more than one style together. Remember to keep the first image path empty.
python inference.py --prompt "A handsome man." --image_paths "" "assets/gradio_examples/style3.webp" "assets/gradio_examples/style4.webp" --width 1024 --height 1024 -
For Low VRAM (GPU Memory): If you have a graphics card with less memory, add the
--offloadflag and use a different model type.python inference.py --prompt "your prompt" --image_paths "your_image.jpg" --width 1024 --height 1024 --offload --model_type flux-dev-fp8
Step 4: Using the Web Demo (Gradio)
If you prefer a visual interface, you can launch a web demo.
-
Start the Basic Demo:
python app.py -
Start the Demo for Low Memory: For this, you need to set an environment variable first to point to the right model, then run the app with special flags.
export FLUX_DEV_FP8="YOUR_FLUX_DEV_PATH"
python app.py --offload --name flux-dev-fp8
Using this low-memory mode, the program will use about 16GB to 18GB of GPU memory.
Tips for Best Results
To get the most out of USO, keep these tips in mind:
- For Subjects: Use clear, well-defined images of your subject. For people, a half-body close-up works well for half-body prompts. Use a full-body image if you want to change the pose a lot.
- For Prompts: Use natural language to describe what you want the subject to be doing in the new scene.
- For Style-Only Transfer: If you only want to change the style and keep the layout, use a instructive prompt like "Transform the style into a watercolor painting."
Frequently Asked Questions (FAQs)
Q: Is USO a completely new model from the ground up? A: Not exactly. It is a special adapter (a LoRA) trained on top of the existing FLUX.1-dev model. This makes it efficient to build and run.
Q: How big are the model files? A: The additional USO adapter files are about 500 MB.
Q: Is there a ComfyUI version available? A: Not at the moment. The model was just released. Many users in the community are asking for it, so someone will likely create a ComfyUI workflow for it soon.
Q: My graphics card doesn't have a lot of memory. Can I still use USO?
A: Yes. Make sure to use the --offload and --model_type flux-dev-fp8 flags when running the inference script or the Gradio app. This reduces the memory needed.
Q: Where can I find the code? A: The complete project is available on GitHub: https://github.com/bytedance/USO
Community Reaction and Feedback
The release of USO on platforms like Reddit has generated a lot of excitement. Many people are impressed that a full project was open-sourced again by the UXO team. The post received hundreds of upvotes.
People in the comments were quick to discuss the model:
- Some users were excited about the fast pace of new model releases.
- Others pointed out the technical details, noting it was a LoRA trained on FLUX.
- Several users immediately asked about ComfyUI support, showing high demand for integration with that popular interface.
- Some early testers noted that while the model is very good at style transfer, it can sometimes struggle with perfectly preserving the identity of a specific human face compared to some other models, and it might occasionally create minor errors in anatomy. However, others praised its performance on stylization, saying it works exceptionally well.
This mix of feedback shows a community that is engaged, testing the model thoroughly, and looking forward to its continued development.
Conclusion
USO represents a significant step forward in unifying different tasks in AI image generation. By bringing together subject-driven and style-driven generation into a single, open-source framework, the UXO Team at Bytedance has given creators a powerful and flexible new tool.
Whether you are an artist, a developer, or just someone who likes to experiment with AI, USO is definitely worth exploring. The setup process is straightforward, and the potential for creativity is vast. I encourage you to visit the GitHub page, try out the examples, and see what amazing images you can create.
Subscribe to our newsletter
Get the latest updates and articles directly in your inbox.

Related Posts

8 Best Claude Code Plugins in 2026 (You Need to Know)
8 Best Claude Code Plugins in 2026 (You Need to Know)

7 Best Claude Code Skills (You Need to Know)
7 Best Claude Code Skills (You Need to Know)

Claude Code Desktop IDE Features (You Need to Know)
Claude Code Desktop IDE Features (You Need to Know)