
Table Of Content
- What is Go-with-the-Flow?
- Go-with-the-Flow Overview
- How Does Go-with-the-Flow Work?
- Cut and Drag Functionality
- Additional Examples of Cut and Drag
- Motion Transfer
- 3D Object Transformation
- Full Image Manipulation
- First Frame Editing
- How to use Go-with-the-Flow on Local?
- 1. Animation Template GUI (Local)
- Step 1: Clone the Repository
- Step 2: Install Local Requirements
- Step 3: Run the GUI
- Step 4: Follow GUI Instructions
- Step 5: Transfer the MP4 File
- 2. Running Video Diffusion (GPU)
- Step 1: Clone the Repository on the GPU Machine
- Step 2: Install GPU Requirements
- Step 3: Warp the Noise
- Step 4: Run Inference
- Step 5: View the Output
- The Technology Behind Go-with-the-Flow
- Getting Started with Go-with-the-Flow
- **Image-to-Video (I2V) Applications**
- **Text-to-Video (T2V) Applications**
- **Cross-Modal Applications**
- **Technical Innovations**

Go-with-the-Flow: Motion Control for Video Diffusion Models
Table Of Content
- What is Go-with-the-Flow?
- Go-with-the-Flow Overview
- How Does Go-with-the-Flow Work?
- Cut and Drag Functionality
- Additional Examples of Cut and Drag
- Motion Transfer
- 3D Object Transformation
- Full Image Manipulation
- First Frame Editing
- How to use Go-with-the-Flow on Local?
- 1. Animation Template GUI (Local)
- Step 1: Clone the Repository
- Step 2: Install Local Requirements
- Step 3: Run the GUI
- Step 4: Follow GUI Instructions
- Step 5: Transfer the MP4 File
- 2. Running Video Diffusion (GPU)
- Step 1: Clone the Repository on the GPU Machine
- Step 2: Install GPU Requirements
- Step 3: Warp the Noise
- Step 4: Run Inference
- Step 5: View the Output
- The Technology Behind Go-with-the-Flow
- Getting Started with Go-with-the-Flow
- **Image-to-Video (I2V) Applications**
- **Text-to-Video (T2V) Applications**
- **Cross-Modal Applications**
- **Technical Innovations**
What is Go-with-the-Flow?
Go-with-the-Flow is an innovative and efficient method designed to control the motion patterns of video diffusion models. This tool allows users to dictate how the camera and objects within a scene move, and even enables the transfer of motion patterns from one video to another.
The process is straightforward: we fine-tune a base model without making any changes to the original pipeline or architecture. The only modification is the use of warped noise instead of pure i.i.d. Gaussian noise. Importantly, the computational cost during inference remains the same as running the base model.
Go-with-the-Flow Overview
| Feature | Details |
|---|---|
| Model Name | Go-with-the-Flow |
| Functionality | Controls motion patterns in video diffusion models through warped noise |
| Paper | arxiv.org/abs/2501.08331 |
| Usage Options | Local Installation |
| GitHub Repository | github.com/Eyeline-Research/Go-with-the-Flow |
| Project Website | eyeline-research.github.io/Go-with-the-Flow/ |
How Does Go-with-the-Flow Work?
Cut and Drag Functionality
One of the standout features of Go-with-the-Flow is its "cut and drag" functionality. This allows users to select specific elements within a video and manipulate their motion.
For example:
-
Example 1: If you select the faces of two cats in a video and drag them in different directions, the AI will generate a new video incorporating this motion. In this case, the left cat yawns as its face is dragged upward, while the right cat turns its head as its face is dragged to the side.
-
Example 2: You can select a character in a video and make her smaller as the video zooms in. The AI will then generate a video with this new motion, creating a smooth zoom-in effect.
This level of granular control over motion is what sets Go-with-the-Flow apart from other tools.
Additional Examples of Cut and Drag
Here are more examples of what you can achieve with the cut and drag feature:
-
Sunflowers: Mask two sunflowers and drag them around. The AI will generate a video showing the sunflowers moving as directed.
-
Stuffed Animals: Mask two stuffed animals and drag them across a table. The AI will create a video of the stuffed animals moving across the table.
-
Hand Drawing: Select a person's hand holding a pen and drag it to the lower right. The AI will generate a video of the person drawing something on a piece of paper.
-
Rubber Duck: Take a rubber duck and drag it around. The AI will produce a video of the rubber duck moving as you directed.
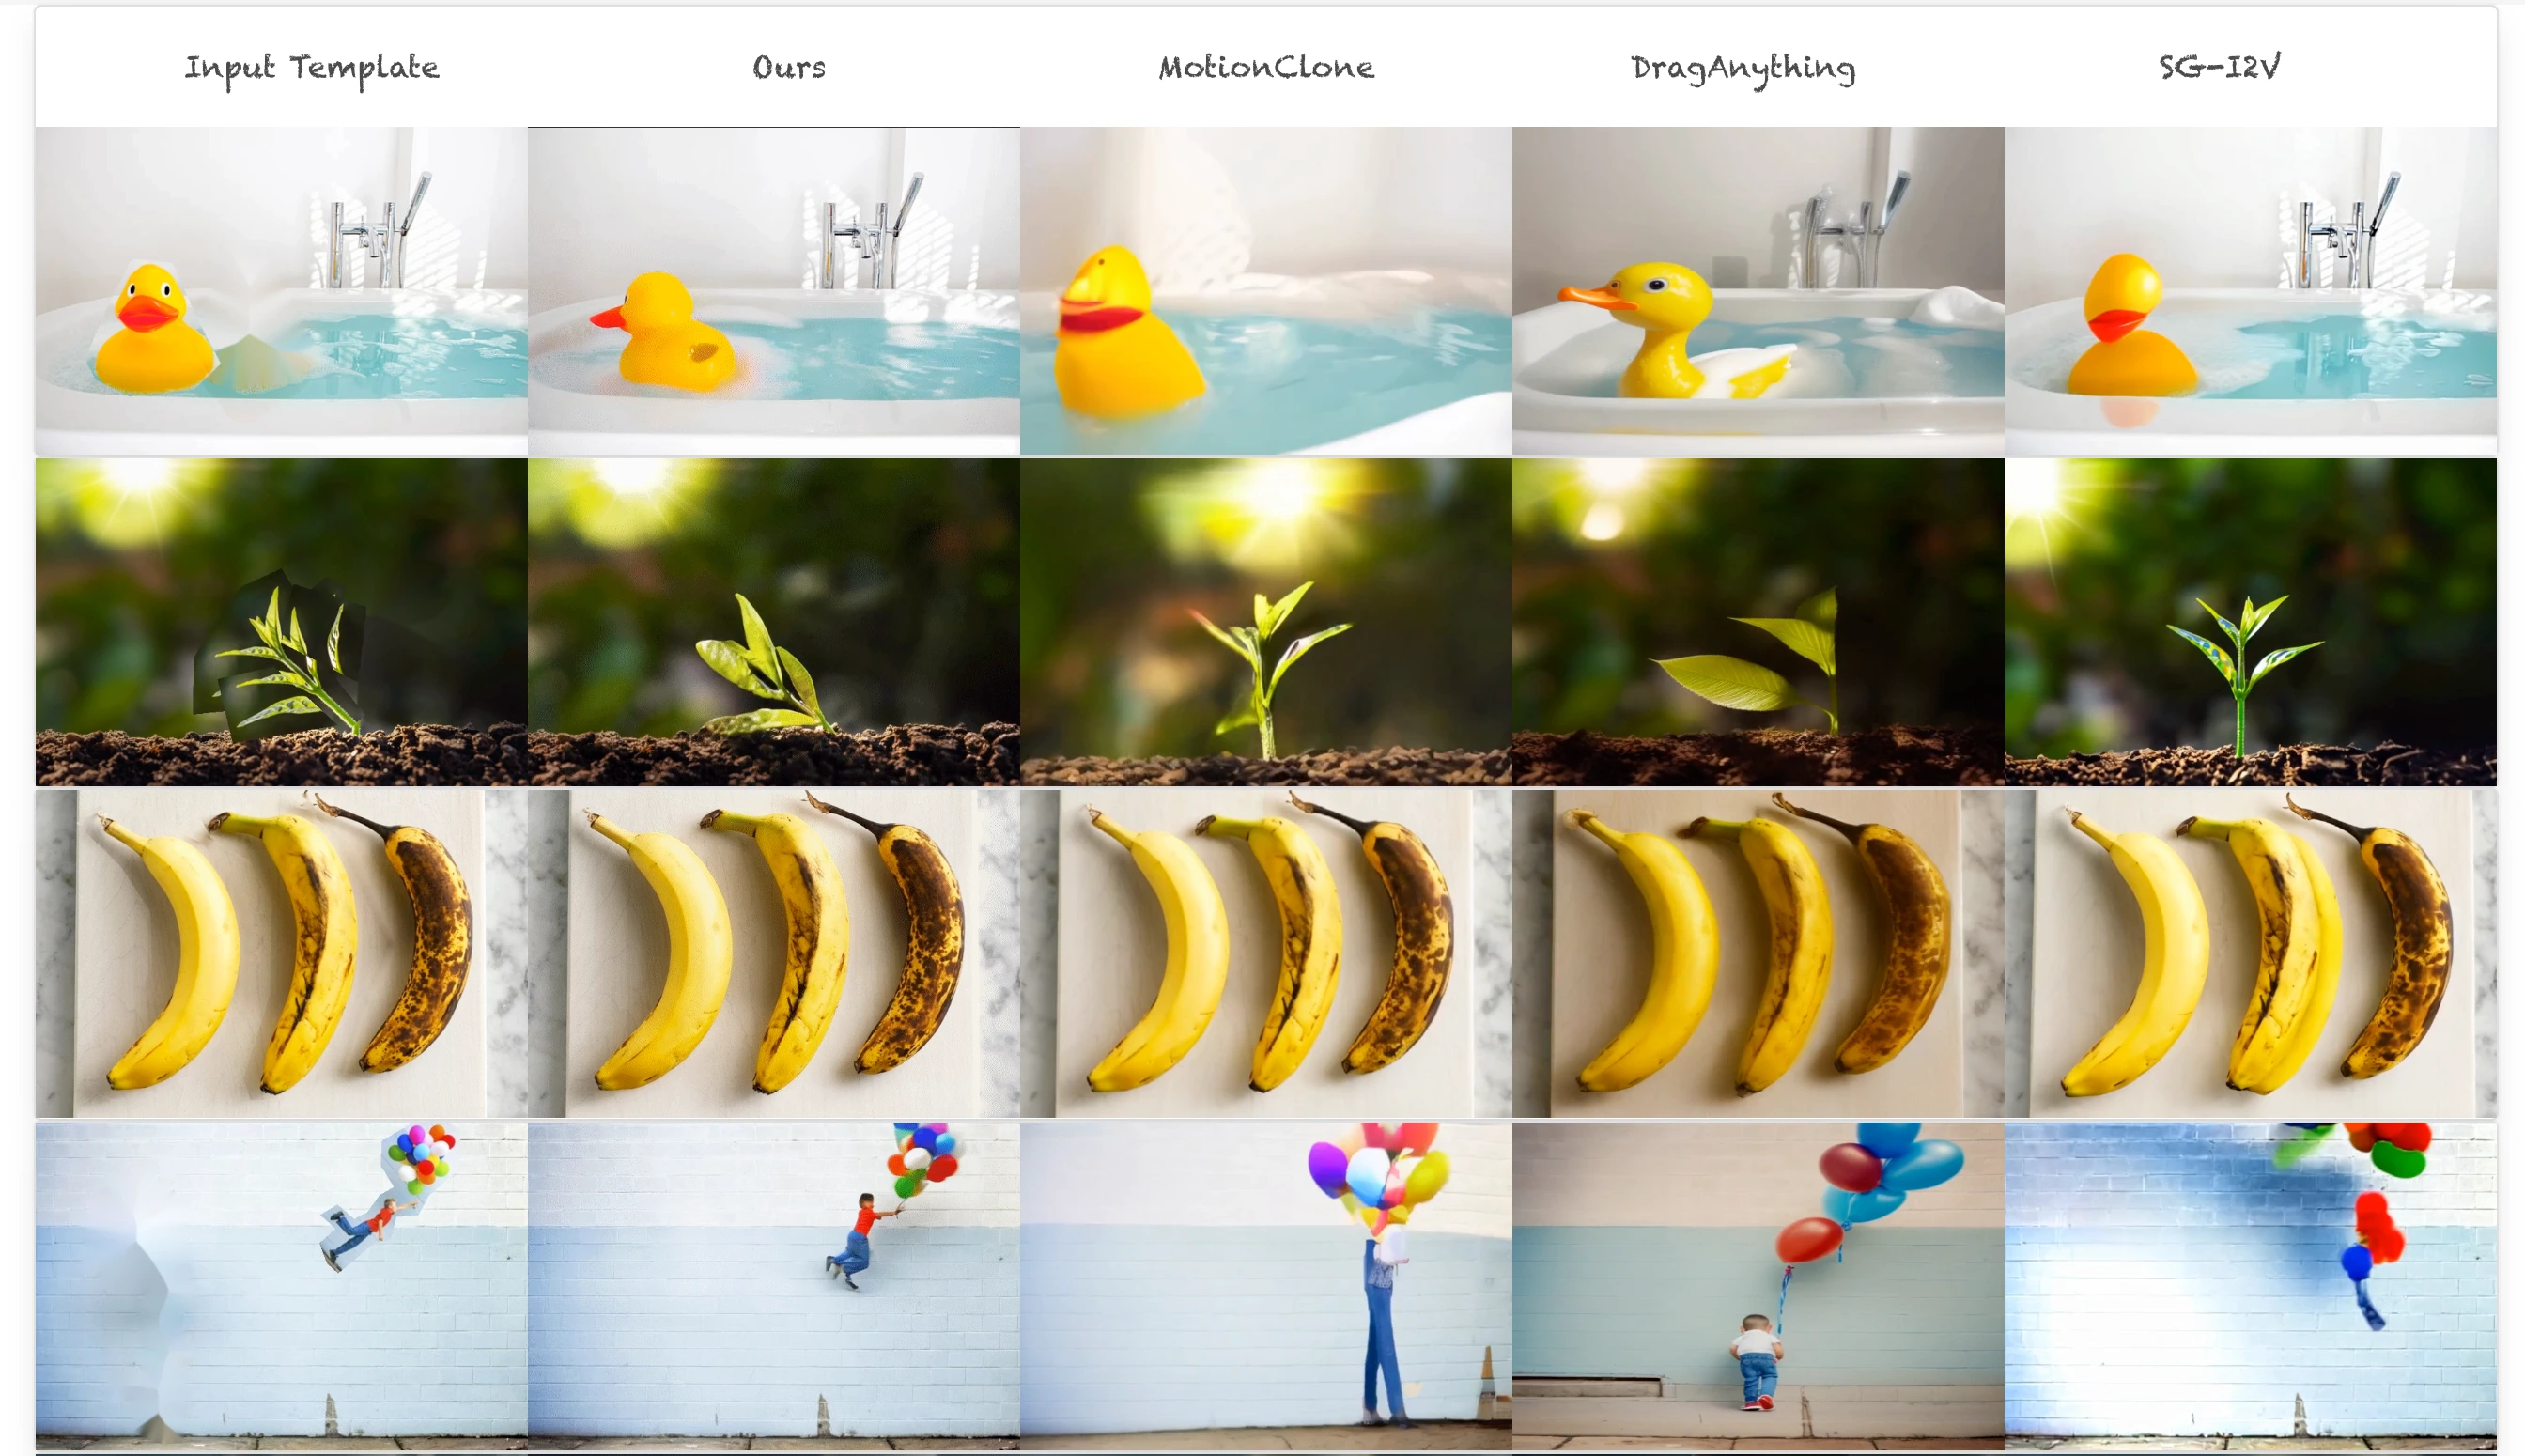
When compared to other tools like Motion Clone or Drag Anything, Go-with-the-Flow offers more consistent and accurate results.
Motion Transfer
Go-with-the-Flow isn't limited to cut and drag. It also allows you to transfer motion from one video to another. For instance, you can take the motion from one video and apply it to a completely different scene, creating a seamless blend of motion and content.
3D Object Transformation
Another impressive feature is the ability to take a 3D object and transform it into something else using a prompt. For example, you can generate a squirrel that moves according to how you manipulated the 3D model. This opens up a world of creative possibilities for animators and content creators.
Full Image Manipulation
You can also take an entire image and drag it around. The AI will generate a video that matches the motion of your drag, effectively allowing you to control the camera movement within the video.
This feature is particularly useful for creating dynamic and engaging video content.
First Frame Editing
Go-with-the-Flow also supports first frame editing. This involves taking the first frame of an original video and editing it to create a new scene. When you plug this edited frame back into the AI, it generates an entire video with the new frame while copying the original video's motion.
-
Example 1: Edit the first frame of a video showing a cake by adding flowers on top. The AI will generate a full video of the cake with flowers, maintaining the original motion.
-
Example 2: Take the first frame of a video and Photoshop a lighthouse into it. The AI will generate a full video of the lighthouse, copying the motion of the original video.
-
Example 3: If the original video is of a laptop, you can take the first frame and Photoshop a book onto the laptop. The AI will generate a full video with the book on the laptop, again copying the original motion.
How to use Go-with-the-Flow on Local?
1. Animation Template GUI (Local)
Step 1: Clone the Repository
Clone the repository to your local machine:
git clone https://github.com/Eyeline-Research/Go-with-the-Flow.git
cd Go-with-the-Flow
Step 2: Install Local Requirements
Install the required Python packages for the local GUI:
pip install -r requirements_local.txtStep 3: Run the GUI
Start the GUI for creating cut-and-drag animations:
python cut_and_drag_gui.pyStep 4: Follow GUI Instructions
- Use the GUI to provide input (e.g., an image or video) and specify motion signals (e.g., drag paths or object segmentation).
- After completing the process, the GUI will generate an MP4 file. Save this file for the next step.
Step 5: Transfer the MP4 File
Move the generated MP4 file to a machine with a GPU for further processing.
2. Running Video Diffusion (GPU)
Step 1: Clone the Repository on the GPU Machine
If you haven’t already, clone the repository on the GPU machine:
git clone https://github.com/Eyeline-Research/Go-with-the-Flow.git
cd Go-with-the-Flow
Step 2: Install GPU Requirements
Install the required Python packages for GPU processing:
pip install -r requirements.txtStep 3: Warp the Noise
Generate warped noise using the MP4 file or a video URL:
python make_warped_noise.py <PATH TO VIDEO OR URL> --output_folder noise_warp_output_folderReplace <PATH TO VIDEO OR URL> with the path to your MP4 file or a video URL. The output will be saved in the noise_warp_output_folder.
Step 4: Run Inference
Generate the final video using the warped noise and a text prompt:
python cut_and_drag_inference.py noise_warp_output_folder \
--prompt "A duck splashing" \
--output_mp4_path "output.mp4" \
--device "cuda" \
--num_inference_steps 5- Replace
"A duck splashing"with your desired text prompt. - Adjust
--output_mp4_pathto specify the output file name. - Use
--device "cuda"to leverage the GPU for faster processing. - Modify
--num_inference_stepsto control the number of diffusion steps (fewer steps = faster but lower quality).
Step 5: View the Output
The final video will be saved as output.mp4 (or the path you specified). You can now view or share the generated video.
The Technology Behind Go-with-the-Flow
Go-with-the-Flow uses a technique called warped noise to control the movements of objects in a video. This involves taking a special kind of noise and warping it to match the movements of objects in the video.
This technique allows the AI to generate videos that are smoother and more consistent.
Getting Started with Go-with-the-Flow
The team behind Go-with-the-Flow has already released a GitHub repository containing all the instructions needed to install and run the tool locally on your computer.
Additionally, there are plans to release a Google Colab option for users without GPUs, as well as a Comfy UI integration.
Go-with-the-Flow Applications Overview
The Go-with-the-flow framework enables advanced motion control for image-to-video (I2V) and text-to-video (T2V) generation through diverse techniques.
Image-to-Video (I2V) Applications
-
Cut-and-Drag Animations
- Purpose: Generate videos by translating user-provided motion signals (e.g., crude object segmentation or drag paths) into coherent object movement.
- Key Feature: Aligns generated video frames with user-specified motion while preserving spatial consistency.
-
First Frame Editing
- Purpose: Propagate edits made to the first frame of a video (e.g., adding/removing objects) across subsequent frames while retaining the original motion.
- Use Case: Ensures edits remain consistent throughout the video without manual frame-by-frame adjustments.
-
Depth-Based Camera Control
- Purpose: Synthesize 3D-consistent videos from a single image by warping it along user-defined camera paths, guided by monocular depth estimation.
- Applications:
- WonderJourney Enhancement: Converts monocular depth-warped sequences into smooth, coherent videos.
- Camera Zooms: Dynamically zooms into images while maintaining visual quality, akin to dynamic super-resolution.
-
Degradation-Level Motion Control
- Purpose: Adjust motion strength by degrading warped noise (used in video generation) to fine-tune motion realism or stylization.
-
Warped Noise for Temporal Consistency
- Purpose: Generate temporally consistent videos by aligning noise patterns with optical flow, reducing flickering artifacts in tasks like:
- Relighting (e.g., DiffRelight).
- Super-Resolution (e.g., DeepFloyd Stage II).
- Purpose: Generate temporally consistent videos by aligning noise patterns with optical flow, reducing flickering artifacts in tasks like:
Text-to-Video (T2V) Applications
-
Turntable Animations
- Purpose: Generate 3D-consistent videos from text prompts using synthetic camera motions (e.g., rotating "turntable" views).
- Advantage: Outperforms baselines in adhering to complex camera paths while maintaining scene coherence.
-
Motion Transfer
- Purpose: Transfer motion from a source video to a new scene described by a text prompt.
- Variants:
- DAVIS Motion Transfer: Applies motion from the DAVIS dataset to generate videos matching target prompts (e.g., transforming a train’s motion into an elephant’s stroll).
- General Motion Transfer: Reimagines videos by preserving motion dynamics while altering visual content (e.g., turning a horse gallop into a snowboarder’s motion).
Cross-Modal Applications
- Image-to-Image (I2I) with Video Extensions
- Purpose: Extend image-based diffusion models (e.g., Stable Diffusion) to video tasks using warped noise, ensuring temporal consistency without video-specific training.
- Examples: Relighting, super-resolution, and style transfer applied frame-by-frame with motion-aware noise warping.
Technical Innovations
- Warped Noise Generation: Rapid synthesis of Gaussian noise aligned with optical flow, critical for scalable video generation.
- Degradation Control: Adjusts motion intensity via noise degradation levels.
- 3D Consistency: Achieved through depth estimation and camera-path warping in I2V tasks.
These applications highlight Go-with-the-flow’s flexibility in bridging user input, motion signals, and generative models for creative and technical video synthesis.
In conclusion, Go-with-the-Flow is a powerful tool that offers unparalleled control over video motion. If you're looking to create dynamic animations, transfer motion between videos, or experiment with 3D object transformations, this tool provides the flexibility and precision needed to bring your creative visions to life.
Subscribe to our newsletter
Get the latest updates and articles directly in your inbox.

Related Posts

8 Best Claude Code Plugins in 2026 (You Need to Know)
8 Best Claude Code Plugins in 2026 (You Need to Know)

7 Best Claude Code Skills (You Need to Know)
7 Best Claude Code Skills (You Need to Know)

Claude Code Desktop IDE Features (You Need to Know)
Claude Code Desktop IDE Features (You Need to Know)